Announcement

Collapse
No announcement yet.

'00 Convertible M6 SS #1414

Collapse
X
Collapse
Who has read this thread:
 
  • Filter
  • Time
  • Show
Clear All
new posts

  • Atrus
    replied
    POWER STEERING COOLER

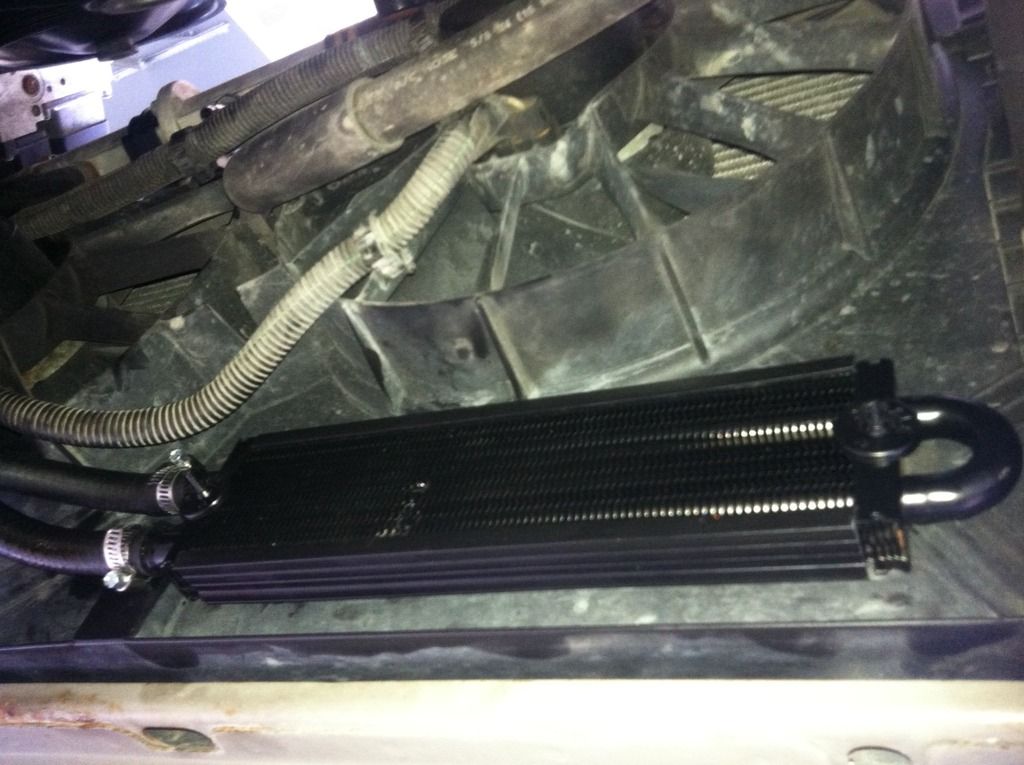
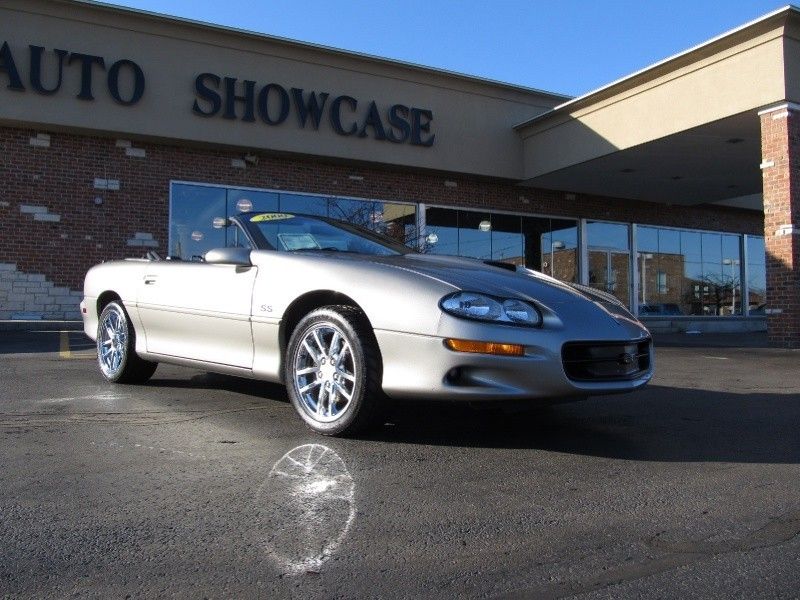
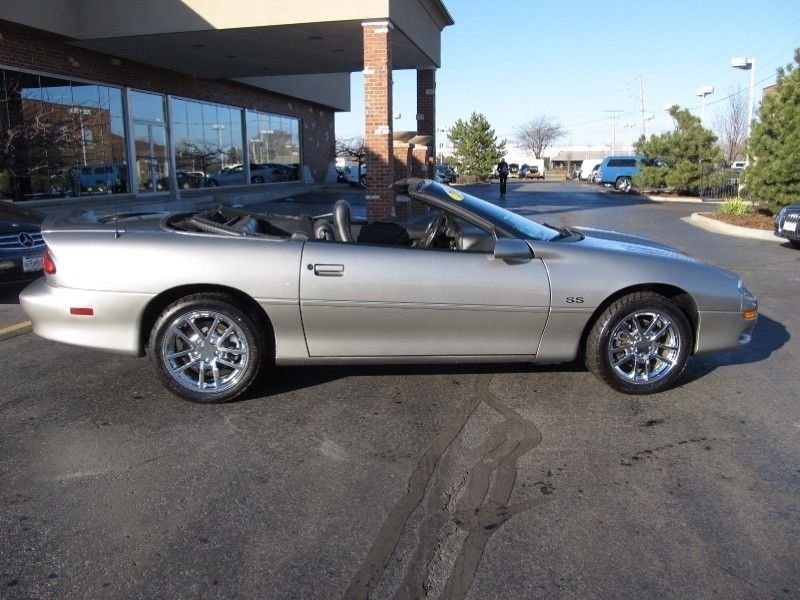
    While planning for maintenance in 2013, I noticed the “odd” metal thing in the upper radiator hose. I hit the old interwebs and discovered that it’s actually the power steering “cooler” – actually, it’s more like a heat exchanger between the engine cooling system and the power steering system. I also learned that these things liked to leak, which allows coolant into the steering system and PS fluid into the cooling system. So, I decided it needed to go.

    Research lead me to some folks using a 24” frame-mount Derale cooler mounted under the radiator support. I liked the concept, however, I didn’t want it mounted under the support as the car is already ridiculously low. Yes, I’d have bigger problems if I actually hit the radiator support on something, however, if I rupture that cooler I wouldn’t be able to drive the car.

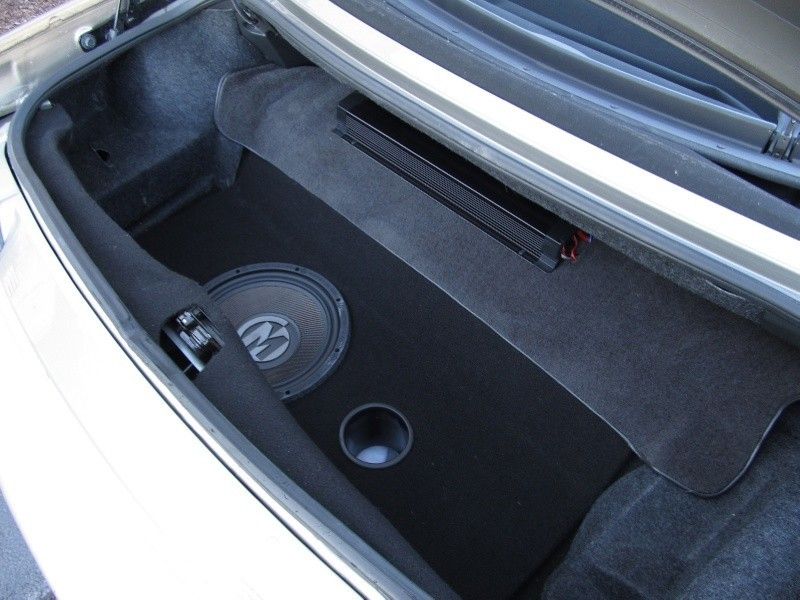
    I, therefore, opted to go with the Derale 13200 – this is a smaller 10” model that fit nicely under the passenger side fan. I drilled two 1/8” holes in the radiator shroud and used the ties that came with the cooler. The line fit really tightly on the reservoir, and it’s a little loose on the cooler, but as this is the low pressure side of the system I felt it was OK. I haven’t had any issues with it. Not sure if it’s any better than just not running a cooler at all, but I feel much better about running this vs the OE engine cooling hose exchanger.

    Last edited by Atrus; May 18th, 2015, 07:51 AM.

    Leave a comment:


  • Atrus
    replied
    SPRING MAINTENANCE/CLEANUP

    Yeah, another boring one, but wanted to document it. Starting in April 2013, I opted to perform all the necessary routine maintenance functions on the car. Being that I got the car in late June 2012, I basically just changed the oil and drove it until I parked it in Nov '12. I decided it was time to really inspect everything and make sure it was all fresh. So, I completed the following:

    - Changed engine oil
    - Changed trans fluid
    - Changed diff oil
    - Flushed clutch hydraulics (used a Motive powerbleeder)
    - Flushed brake hydraulics (used a Motive powerbleeder)
    - Flushed power steering fluid
    - Changed spark plugs
    - Changed PCV
    - Changed Water Pump & hoses (saw a few drips on the floor last season and it appeared to be weeping. Better safe than sorry!)
    - As a result of the water pump, refilled the majority of the cooling system with fresh coolant. Didn't flush as it didn't seem too grody. Will probably drain and refill radiator periodically.
    - New Brakemotive plated/slotted rotors and pads.
    - Cleaned K7N and installed the SLP lid I picked up from Conrad.

    I also decided to complete a few cleanup/visual upgrades as well:

    - Painted calipers black with duplicolor caliper kit. Really liked the kit, but as people mentioned - the included brush was terrible.
    - Brent Franker pewter colored "CAMARO" vinyl decals went on the front calipers
    - Brent Franker black bowtie vinyl decals went on the wheel centercaps - the stock red was completely faded away and couldn't be seen.
    - Redid the carpet area in the trunk - it was crap looking black feltish material previously. May not be a major improvement, but the other material really bugged me.

    Trunk went from this:


    To this:


    Brake Caliper & Centercap:
    Last edited by Atrus; May 18th, 2015, 07:50 AM.

    Leave a comment:


  • Atrus
    replied
    SUSPENSION

    With 70k miles on the stock Decarbons and a 4x4 stance, I decided it was time to tear into the suspension in April/May 2013. I really didn’t want to firm up the suspension a ton, and the vehicle isn’t a drag or track vehicle. As such, I was very hesitant about the aftermarket offerings as they would increase the spring rate, and some seemed more geared towards performance than aesthetics – some still appeared to have “saggy ass” where the rear looks lower than the front. After researching and considering my options, I decided to take the plunge and cut the factory springs, and run SLP Bilsteins. I didn’t want to subscribe to the “more is better” mentality and have rough-riding shocks with overly stiff springs. My mind was settled on the shocks, and I figured worst case, I mess up the OE springs and order aftermarket anyway – I am only out some time and springs I wouldn’t be using anyway, no extra money. You can read my detailed discussion on cutting springs and the progress HERE.

    One of the nuggets of information I came across was on Tech, where JasonWW described how he maintained a nice ride quality by modifying the upper spring mount and running aftermarket bump stops. This really intrigued me and seemed to make sense. By modifying the upper mount, you maintain most of the OE compression travel. Cutting the springs slightly bumps up the spring rate. Hopefully, those two sort of offset one another, and if not, the aftermarket bump stops are far more forgiving than the hard OE stops. Jason’s detailed discussion is HERE.

    Given the stock spring rate of 290ish lbs, cutting 1 coil should bump up the spring rate another 40-45 lbs, putting it at about 330-335. That’s 1LE spring territory. 1.5 coils would net approximately a 355lb spring rate. Still MUCH less than the 500+ offered in the aftermarket. Rears, it should be approximately 20lbs rate added for every coil cut.

    So, I tore into it. My car is very rust-free, however, to my dismay I found the upper mounts trashed – the shock nut, isolator, and mount were all rusted together, and I had to cut them apart. I found some replacement Moogs for relatively cheap and replaced them all.

    I bought the Ground Control bumpstops and cut approximately half an inch off them. I don’t recall exactly why I chose that amount, but I had some math and logic that with a ballpark guess led me to believe that’d be enough. I can’t stress enough how hard the OE stops are. These GC stops are exponentially more forgiving.

    I modified the upper mounts per Jason’s directions and started off cutting 1 coil off the front springs. The springs started with 10 coils, so in the pics below you’ll see 9 coils. This did net me approximately a 1” drop…it still was a little tall for my tastes.


    I then cut another half a coil and it landed right where I wanted it. I cut the rear springs to match the front – I actually don’t remember how much. I think it was approximately 1-1.25 coils.


    My rear bumpstops were shot. I had the black foam stops with the extra aluminum spacers that came stock on SS vehicles. The stops looked great, but tore off their mounts. I opted to use the black Energy Suspension poly stops made for Jeeps. I ditched the aluminum spacers and used a die grinder to clearance the energy units instead of modifying the mount on the car. I am sure they are ridiculously hard, but from what I can tell I haven’t hit them yet. That’s saying something for the shock/spring setup considering MI’s terrible roads. It’s more of a safety net for me, hopefully I never hit them. If I do, I’ll consider drilling some relief holes to provide a little more “give” in them.

    It's important you follow JasonWW's directions in the Mount Mod link and CUT THE END OF THE SHOCK SHORTER if you're going to mod the mount. I was reluctant to do so, figured I'd give it a try without, and if I heard noise I would cut it. Passenger side is fine, but it must have contacted the body on the driver's side as it slightly bent the threaded portion of the shock. Luckily, the shock itself seemed to be fine. Needless to say, mine are about 1/2" shorter now.
    I also added in a set of low-mileage UMI 3-point bolt-in SFC’s that I picked up from Conrad. I needed some new front sway bar end links, which I picked up stock units from O-Reilly. Overall, these modifications have really improved the ride. It’s not overly harsh, and it feels MUCH more smooth than with the Decarbons. I really think one would be hard pressed to make the car ride nicer than it does right now as a cruiser.

    I did have one “clunk” that was absolutely driving me nuts. I was hearing it on larger sharp bumps. After many months of trying to chase this down, I finally found it in June of 2014 – it ends up that the replacement sway bar end links were too long and the sway bar was contacting the frame. Most others don’t have this problem as it was contacting an extra brace present in the convertibles. Link to the discussion and pictures is HERE.


    In the end, the car rides great and looks great. I am happy with the results!

    BEFORE:


    AFTER:


    Last edited by Atrus; May 18th, 2015, 07:46 AM.

    Leave a comment:


  • Atrus
    replied
    FRONT LIGHTING:

    In Feb/March 2013, I did a HID retrofit into factory housings. I went with the Morimoto Mini H1's off theretrofitsource.com. I got the standard 3five bulbs in 5000k. The housings were ridiculously oxidized, so I bought the Mother's headlight restore kit. I also "de-nubbed" them. They aren't perfect, but they really look very presentable. I’m satisfied for the cost that I have into them.

    I got the standard 3five bulbs in 5000k. Install was fairly straightforward - separate the lend from the housing, grind off plastic "tabs" for OE bulbs in stock housings, bolt up projectors, and reseal lens. There are plenty of threads on LS1tech and on hidplanet. I used the butyl tape - I don't think I'd do that again. I'd rather use some good quality silicone next time.

    I also ordered the $20 GM correctional splitter, and it doesn't work on our cars. I ended up just bridging the wiring under the dash to keep low beams on with the highs (this is critical in an HID install). The only issue I still have is when I hit the high beams with the fogs on, the solenoids stay on until I turn the fogs off and then back on. Not a big deal.
    I’m very happy with the results – they look great IMO, and output much better than the factory setup.

    I wanted the fogs to match the HID color. The fogs are basically useless from a function standpoint anyway, and HID’s totally negate the need for them in the fbody. I thought about getting a cheap DDM kit, but didn’t want to deal with wiring the extra ballasts and the extra failure points. I ended up ordering “880” bulb LED replacements from superbrightleds. They really don’t output anything, but they generate little heat, use little power, and match the HID’s very well.

    I also had one of my amber incandescent marker bulbs go out, so I opted to put in some LEDs there too as my connectors were getting cooked. I ended up picking them up off ebay – much cheaper than superbright. They both use 5050 SMD leds. The 194 replacements were a T10 5 LED wedge, and the 357’s were a 13 LED setup. All together, these ran me $16. The T10 had a hot spot with the LED on the top, so I painted over it. It’s now basically 4 LEDs. This also required a new electronic flasher. Again, went to ebay to keep costs down and got one that also has the ground wire for it to audibly click when the turn signal is on.

    Overall, I think these all helped to modernize the lighting on the front end fairly nicely, and it was relatively low-cost. I’ve seen folks that have separated the turn signal housings and put LED strips in there – I think I may do that down the road to further modernize it and promote better visibility.


    Last edited by Atrus; May 18th, 2015, 07:34 AM.

    Leave a comment:


  • Atrus
    replied
    LED INTERIOR LIGHTING

    While I realize my Camaro is going on 14 years old, I wanted to keep it as modern as possible. One of the things that really bugged me about it was the color of the dash lighting – the “dirty green” just wasn’t cutting it for me, and I never liked the red odometer. It always looked out of place.
    I decided to upgrade to LEDs. I followed Sommer86’s writeup on the 6LE website to figure out which bulbs to use. I won’t get into all the trials I did, but just trust me that I worked and reworked these things several times, and spent easily 2.5x’s as much as I actually needed to…so, if you’re considering doing this, here’s a few pieces of advice that you should take at face value:
    - Warm White LEDs will give the car an aqua color backlighting. It’s not terrible, but I wanted bright clean white. Honestly, I sometimes now question whether it was worth all the extra effort to get it white!
    - You want to use Cool White LEDs if you are going for a bright white look
    - You CAN swap over all your switches, radio controls, etc
    - You CAN “clear” the blue tint from the stock cluster. You don’t have to buy the McNord cluster overlay
    - You CANNOT clear the stock headlamp/dimmer overlay. If you try, you will ruin it as the black background is painted on the back of a frosted piece of plastic – you’ll wipe the black off!
    - I felt that the OE HVAC overlay matched close enough, so I didn’t go with the McNord there either.
    - The LEDs are DAMN BRIGHT, and no, they do not dim well. I have a solution for a dimmer in the works, and it’s very doable – I don’t have an extensive electronics background. I’ll provide a separate update for it.

    So, let’s break this down:
    HVAC – Replace two bulbs per Sommer’s instructions.
    Door Switch Lights - Replace two bulbs (1 per door) per Sommer’s instructions.
    Headlight/Dimmer switch – Custom rework underway. Stay Tuned.
    Cluster – read on below…


    I opted to modify the stock gauge face. There are a couple of reasons why. 1) I didn’t want to drop the coin on a McNord unit. 2) The McNord units don’t display idiot lights as well. I have a ‘vert and want the visibility to be the best possible. 3) I think it’s kinda cool that it looks totally OE.

    I first recommend picking up a spare cluster off fleabay. Nice thing with this is you can literally leave your stock stepper motors, gauge face, odometer…the whole assembly intact. Takes the stress out of the process knowing you aren’t effing up your original. The circuit board can be unclipped from your original cluster and can be clipped onto the modified replacement cluster to retain your odometer reading. Note – make sure the cluster you purchase is compatible! I know ‘98’s were a different animal than ‘99+.

    To clear the face, disassemble the cluster. If you can’t figure out how to, you should stop right here as this is gonna be over your head. The green color comes from yellowish incandescent bulbs shining through a translucent blue filter “painted” on the back of the face. After removing the gauge needles and carefully peeling the gauge face off, you’ll need to clear the translucent paint off the back. I laid down towels and was VERY careful not to get any of the “stripping chemical” on the face. It’s important to work slowly and keep everything clean. I used “Goof Off”, but in retrospect, I don’t know that I’d recommend it. I later realized that it’s very caustic and actually etches the plastic. It does make short work of the process, however. I later picked up some “Goo Gone” (smells like oranges) and it seemed to be much less harsh. Basically, take your time and use q tips and a green scrub pad to lightly clear the stock blue (or red for Pontiac guys) film from where the text is on the face. If you want to be fancy ‘n stuff, you could even clear certain areas and leave others with the tint on there – for example, keep the speedo hash marks blue (they’d light up aqua) and clear just the numbers.

    Seems easy, right? Just rub the color off…well, the problem is the LEDs are so bright that when I was done, I saw a ton of pinhole light bleeds coming through where the black background should be. They drove me crazy. So, I almost scrapped the project. Then, I invested in some paint pens – craft stores have them. It’s not a Sharpie (I tried, the LED light will bleed through a Sharpie) – it’s a metal tube “pen” with a felt tip that dispenses paint. I got a fine point and a large point pen. I then had to trace around EVERY SINGLE LETTER/TEXT to get the light all blocked out. Color, lay it on the cluster and light the cluster up to test, color again…it sounds godawful, but it actually only took a few hours.

    I used an elmer’s tape glue thing (again, at Michaels/craft stores) to re-glue the gauge face to the clear backing.

    I also noticed that I had a dim “cold spot” on the left side of the tach (around 1000rpm) and on the right side of the speedo (at about 140mph). I noticed that on my OE cluster, the white “frame” of the cluster had a support rib there between the idiot light pods and the left turn signal. One of the two clusters I bought to experiment with didn’t have this rib. I ended up cutting it out. On the right side, the wiring for the odometer was the culprit – it was blocking the light. I ended up cutting a bit and moving the wiring and it resolved the problem.

    To obtain even lighting, I drilled a few holes around the perimeter and added in a few NEO3s. You can see them below:


    I did have some “light bleed” issues into the idiot lights. I finally figured out that it’s because of a gap that was between the rear circuit board and the white gauge cluster frame. I ended up just using some black RTV as a gasket. Worked like a charm. Light bleed looked like this:


    I also wanted to update the Odometer. I simply removed it, unsoldered the (3) red surface mount LEDs and soldered in (2) 3mm white LEDs. I followed these instructions.

    Lastly, I also added a bezel from a Firebird just to get rid of the plain “flat” look of the OE Camaro gauges.

    Here’s the end product:


    Last edited by Atrus; May 18th, 2015, 07:31 AM.

    Leave a comment:


  • Atrus
    replied
    So...I've been slacking the last two years and haven't updated this thread at all. I've wanted to use this to keep track of all the subtle changes I've done to the car. I've been keeping a list with some details offline, so I'll be working over the next few days to get this back up to date!

    Leave a comment:


  • Atrus
    replied
    Originally posted by erk2581 View Post
    Hmm Ive wanted to delete my auto headlights for awhile...them coming on early doesn't bother me...but there's times when having the car running WITHOUT the headlights on to...eh...attract unwanted attention? would be nice. Absolutely beautiful car. Three thumbs up from a fellow 4th gen SS owner.
    Thanks! Yeah, I like them to be off when I want them off as well. I disabled them in my '99 Prix when I had it too. Heck, when I get into my wife's G6, the first thing I do is turn on the fogs and turn off the DRL's. I don't even think about it, it's just habit.

    Leave a comment:


  • erk2581
    replied
    Originally posted by Atrus View Post
    DELETES - AIR, EGR, DRL, AUTO HEADLIGHTS


    This is a pretty boring update with no pictures, but I wanted to document what I did and what I used.

    I had a forum member who was generous enough to help me out disable EGR and AIR in the PCM via tunercat in early November before I tucked the car away for the winter.

    It took me basically two months, but I managed to get everything removed and the blockoff plates on. I used the following:

    (1) Dorman Expansion Plug - 10230 (1 3/8", Summit Racing)
    (1) Kooks EGR Block-Off Plate - 9125BO (Summit Racing)
    (2) Kooks AIR Block-Off Plates - 9126BO (Summit Racing)
    EGR and AIR Gaskets

    One thing I didn't consider is that these plates are most likely for Kooks headers - the holes were too small in diameter for the OEM bolts. I opened them up on my drill press, I believe I used a 5/16 bit. There isn't a lot of meat around the EGR bolt holes now on the outside edge, but the bolts have a flange on them and it looks like they'll seal just fine and be sturdy.

    Removing the EGR and AIR components was pretty straight forward - the only part I had a little issue with was the AIR solenoid on the back of the driver's side valve cover. I disconnected and capped the small vacuum line that runs to the rear of the manifold, and unclipped the wiring harness from the solenoid. I was trying to remove the bracket, but couldn't - there's a 10mm bolt near the valve cover, and a 15mm bolt on the rear of the head. I couldn't get to the 15mm bolt easily. It ends up that the solenoid and valve just "sit" on a tab on the bracket. Pull upwards towards the cowl and it'll come free. Sure, the bracket is still there, but it doesn't bother me much.

    I also deleted the autoheadlights and DRL's - they irritate me and come on too "early" - they are far too sensitive IMO. I can't take credit for the method - I used the detailed instructions listed on the SS#670 Modifications site. Basically, remove the module (located behind the radio on the right side of the cavity) and open the case. Solder in a wire to bridge the A and B pins on the smaller blue C2 connector.
    Hmm Ive wanted to delete my auto headlights for awhile...them coming on early doesn't bother me...but there's times when having the car running WITHOUT the headlights on to...eh...attract unwanted attention? would be nice. Absolutely beautiful car. Three thumbs up from a fellow 4th gen SS owner.

    Leave a comment:


  • Atrus
    replied
    DELETES - AIR, EGR, DRL, AUTO HEADLIGHTS


    This is a pretty boring update with no pictures, but I wanted to document what I did and what I used.

    I had a forum member who was generous enough to help me out disable EGR and AIR in the PCM via tunercat in early November before I tucked the car away for the winter.

    It took me basically two months, but I managed to get everything removed and the blockoff plates on. I used the following:

    (1) Dorman Expansion Plug - 10230 (1 3/8", Summit Racing)
    (1) Kooks EGR Block-Off Plate - 9125BO (Summit Racing)
    (2) Kooks AIR Block-Off Plates - 9126BO (Summit Racing)
    EGR and AIR Gaskets

    One thing I didn't consider is that these plates are most likely for Kooks headers - the holes were too small in diameter for the OEM bolts. I opened them up on my drill press, I believe I used a 5/16 bit. There isn't a lot of meat around the EGR bolt holes now on the outside edge, but the bolts have a flange on them and it looks like they'll seal just fine and be sturdy.

    Removing the EGR and AIR components was pretty straight forward - the only part I had a little issue with was the AIR solenoid on the back of the driver's side valve cover. I disconnected and capped the small vacuum line that runs to the rear of the manifold, and unclipped the wiring harness from the solenoid. I was trying to remove the bracket, but couldn't - there's a 10mm bolt near the valve cover, and a 15mm bolt on the rear of the head. I couldn't get to the 15mm bolt easily. It ends up that the solenoid and valve just "sit" on a tab on the bracket. Pull upwards towards the cowl and it'll come free. Sure, the bracket is still there, but it doesn't bother me much.

    I also deleted the autoheadlights and DRL's - they irritate me and come on too "early" - they are far too sensitive IMO. I can't take credit for the method - I used the detailed instructions listed on the SS#670 Modifications site. Basically, remove the module (located behind the radio on the right side of the cavity) and open the case. Solder in a wire to bridge the A and B pins on the smaller blue C2 connector.

    Leave a comment:


  • bigjon88
    replied
    Originally posted by Fish-man View Post
    Which autometric did u use?
    Centerline

    Leave a comment:


  • Fish-man
    replied
    Which autometric did u use?

    Leave a comment:


  • Atrus
    replied
    Originally posted by mcalus View Post
    Looks great! Any plans for the car? What did you do with your body moldings? I need the right rear quarter panel one
    I don't plan to go too wild with the car, being that it's a vert and all. Needs suspension (looking at SLP or Strano) and brakes this spring. I'll be putting a lid and 3 point SFC's on it this year. I want to put a catback on it, tune. Not really sure if I want to go LS6 intake/cam/headers. It'd be fun, but frankly, the car stock is enough to get me into trouble, and I am not out to race it being that it's a vert.

    I just had them package the moldings up. I am sure they'll never make their way back onto the car, but I plan to hang onto them just in case. I want to keep most, if not all, of the stock parts. I'm weird that way.

    Leave a comment:


  • mcalus
    replied
    Looks great! Any plans for the car? What did you do with your body moldings? I need the right rear quarter panel one

    Leave a comment:


  • Atrus
    replied
    Originally posted by meissen View Post
    Thread has been fixed and I also instituted a maximum characters per post so threads can't break like this again
    Awesome, thanks!!! I'll do my best to avoid breaking the forum again!!

    Leave a comment:


  • meissen
    replied
    Thread has been fixed and I also instituted a maximum characters per post so threads can't break like this again

    Leave a comment:

Working...
X