-
I put down 375 on a mustang dyno while my A4 was dying. And I told tuner I wanted a conservative tune. It shifts at 6100rpm and would make more power higher. Headers, off road y pipe, LS6 intake and cam. Car has 3.73 gears and a 2800 converter and I drive it on Nitto 555r dragradials. Beat a couple of new ZL1 Camaros on Woodward before the dream cruise. cam is so small you hardly know its there. you could daily this cam easily if you wanted. Granted, at $1600 for the complete exhaust its not cheap but a true dual exhaust sounds so good out the back compared to a y pipe exhaust. I am seriously thinking about buying the exhaust and tying it to my long tubes. -
@farmington - Don, so you are on stock manifolds and catback with a 224 cam? Any idea on what kind of power you're putting down?Originally posted by farmington View Post
Damnit, Don...now I am really interested in this system - reading the 20 page thread on tech. My wallet is not pleased. Last edited by Atrus; November 4th, 2015, 02:17 PM.
Leave a comment:
-
Look into the Hooker blackheart exhausts for these cars. True duals out the back will give it a MUCH nicer exhaust sound (than a Y pipe exhaust). The headers are 1 7/8" diameter but mid length so ground clearance should be good too. If I was in the market for an exhaust I would snap one of these up in a minute. Camwise, the little 224r I have in mine is a great all around street cam. great manners and a big jump in power.Leave a comment:
-
Once you go down this road it doesnt stop. Once you open that engine up its all over. Might as well plan on H/C/I long tube headers into a x-pipe with bullets and dumped under the car. A 9inch and some sticky tires.
Leave a comment:
-
So, over the past 3 years that I have owned the car, I've taken comfort in the fact that it was more-or-less just as quick as a new SS. I felt I at least was still relevant.
Now with the 6th Gen, I am feeling outdated in the performance department...the alleged stats for a manual are:
2.0L Turbo I4 - 275hp, 5.4s 0-60, 14.0 quarter
3.6L V6 - 335hp, 0-60 in 5.2s, 13.7 quarter
6.2L V8 - 455hp, 0-60 in 4.3s, 12.5 quarter
...and the autos are faster yet. I don't know if I could deal with an automatic V6 keeping pace or pulling on me. I feel like I'd have to turn in my mancard if some 16 year old cheerleader can dust me in the automatic she bought because it was "cute".
So, now I debate headers and a cam...concern over headers is clearance as the car is already pretty darn low. I also kinda like the stock catback, so I'd need to be selective about what I replaced it with...not sure if headers on a stock SS catback makes sense, even just due to the smaller i-pipe.
Cam, I'd just want something that doesn't sound like a sewing machine, and I want something with some longevity. I don't really want to change springs every 20-30k miles.
I like the reliability of my car - no exhaust clearance issues (with the road or with the chassis), no valvetrain issues. I don't want to sacrifice that.Last edited by Atrus; November 4th, 2015, 11:49 AM.Leave a comment:
-
I am finally back up to date on the car! Hopefully I can use this thread more as an actual build thread now with some dialogue instead of just documenting stuff I did previously.
Here's a pic from July of this year at my buddy's place out in the Irish Hills. I've made really subtle changes but I think the car is really looking good:

Leave a comment:
-
TIRES
I had managed to stretch out the BFG KDW’s that came with the car for 3 years. They had great tread left, but were starting to dry rot and were pretty old – it was a 2005ish manufacture date. As I put the car away in Nov 2014, I noticed a small sheet metal screw right in the corner. I took this as a sign fate was telling me to quit pushing my luck on them…I didn’t need a tire blowing out when I was doing something dumb at triple digits (in Mexico of course).
Consistent with my overall goal with this car, I wanted something relatively performance-related, but I also wanted something that would be quiet and comfortable. I read a ton of reviews, and the Continental ExtremeContact DW’s seemed to fit the bill. Ended up getting a decent deal on them in June with a rebate – just over $600 out the door.
Overall, they seem to be a great tire. Good traction, very low road noise, and they seem to ride comfortably. I think they made a noticeable difference on the car.
Old BFG:

Sheet metal screw:

Here’s the ride with new rubber:

Cool tread pattern:
 Last edited by Atrus; November 3rd, 2015, 08:48 AM.
Leave a comment:
-
Yeah, depends on your goals. This is a cruiser for me. It'll never see a track. So, no real interest in weight reduction. I am all about making it comfortable and fun to drive.Leave a comment:
-
Wow. That looks nice man! Funny thing, I've been thinking about a head unit swap too. My driver window motor is going too But I'll probably be doing manual windows.
Leave a comment:
-
SOUND INSULATION
In my quest to modernize and refine my SS, I decided that while I had the window motors out, I would install some sound insulation. I had read that a lot of road noise comes from the doors. I walked in with reasonable expectations…the car is a rattle-prone F-Body convertible. In no way, shape, or form will this thing be a vault. I get a lot of road noise, and the car just feels “empty” and not solid to me. With the top up, I really get a ton of road noise – I assumed it’s coming from the doors and trunk.
After I read…and read…and read some more, I concluded that I really wanted to use some good CLD tiles. I’ve read the conflicting reports on using home depot/lowes roofing material, etc. When it came down to it, I felt the extra expense was worth it when I took into account how messy removal of an inferior product could be. I certainly didn’t want to be scraping tar off my panels. I also didn’t want to deal with it melting, falling off, etc. I wanted to crack open the doors once…replace the window motors, complete the sound insulation, and hopefully never take the panels off again.
So, I followed Don Sambrook’s advice on the SoundDeadenerShowdown site. I ordered 40 of his CLD tiles and the maple roller (these all fit into one flat rate box). Total cost was $110 shipped. I really wanted to use his Closed Cell Foam and Mass Loaded Vinyl, but it was just too pricey for me. He does send samples of all these items with his tiles, and I readily admit they both seem like nice products – superior to what I used, but also much more costly. Again, I had to do a cost/benefit, and because the CCF and MLV are easily removed and would have been ridiculously expensive, I found local alternatives.
For CCF, I used 1/8” Polyethylene foam from The Foam Factory – they are located at 23 mile and Romeo Plank. It comes 60” wide and is priced well. As mentioned the CCF that Don sells is much nicer, but this seemed like it’d do.
For MLV, typical product used is 1lb/sq ft. I found something at Home Depot – DB-3…it’s gotten decent reviews, it’s cheap, and it ships for free if you order 2 rolls. It’s .75lb/sq ft. Again, I am in a ‘vert – I figured it’s got to help, and no matter what I won’t have vault-like silence.
So, I ended up cutting up the CLD tiles and throwing them in the doors….100% coverage isn’t necessary. I applied enough until I could tap on the outside of the panel and it sounded solid. I then cut a solid piece of both the CCF and the MLV and placed them over the door, secured in with a few hex flange head self tapping sheet metal screws. The door panels were a little cumbersome to get reinstalled, but with some trimming, a few beers, and some choice words, I got it done.
I added CLD tiles behind the quarter panel trim, on the wheelwells, and throughout the trunk – again, not at 100% coverage. Behind the quarter panel trim, I only installed the CCF…the MLV seemed like it’d be a pain to get to fit, and I figured I could always go back with it. In the trunk I completely layered the CCF and MLV over the entire parcel shelf, frame rails, trunk well, and rear wall.
I need to add in the CCF and MLV on the sides (quarter panels) in the trunk. I also would have to pull the carpet to do the floor of the passenger cabin and behind the rear seatback – I do plan on doing this.
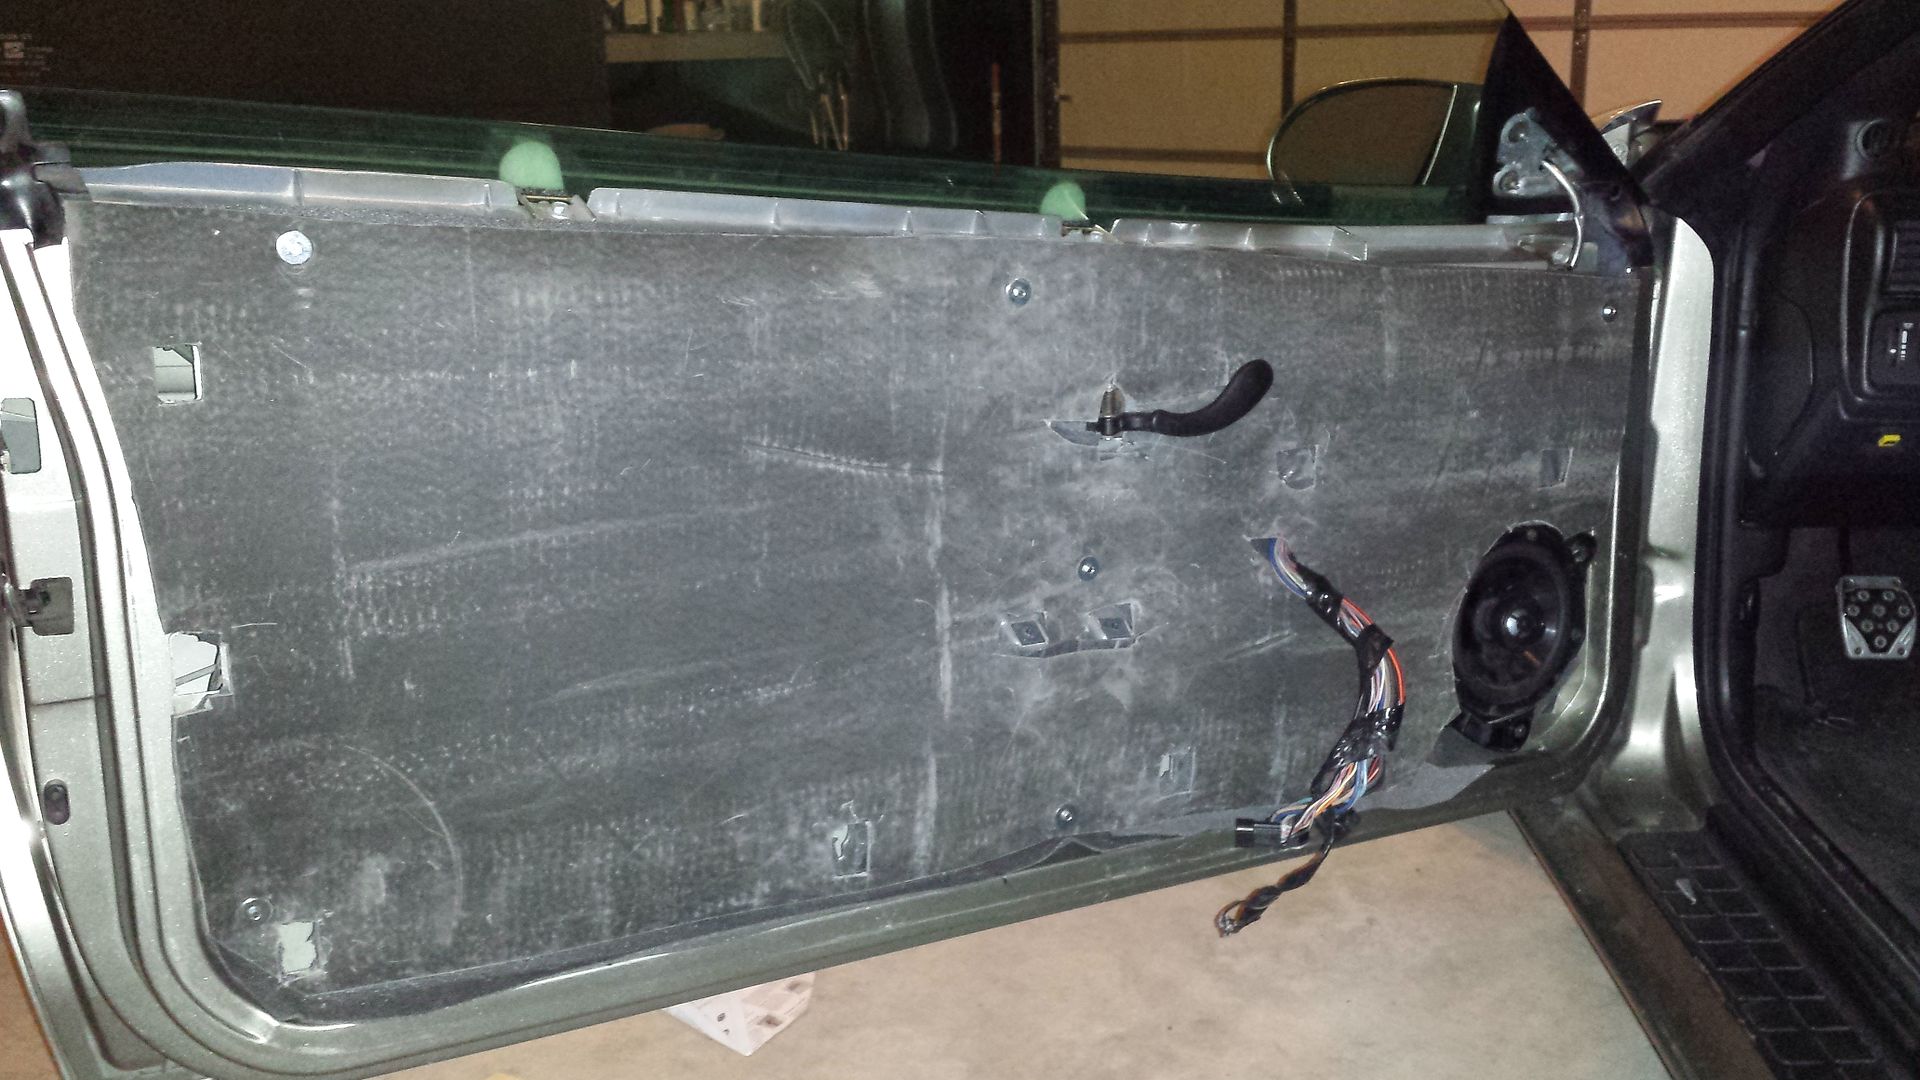
Ultimately, the doors shut much more solidly (still not like a luxury car “thump”, but much better than stock). Road noise has significantly decreased with the top up. I still get some, but I am sure getting the sides of the trunk done, behind the rear seatback, and the floor of the passenger cabin will help a lot. Previously, I was very aware of the irritating road noise…if I was out on a cruise with the family, I couldn’t hear my daughter in the rear seat. Now, I still hear road noise, but it is significantly reduced. I really look forward to completing the install. At the end of the day, I feel the couple hundred bucks was worth it…the car isn’t silent, but it’s much more pleasant. In my quest to modernize and refine my SS, I decided that while I had the window motors out, I would install some sound insulation. I had read that a lot of road noise comes from the doors. I walked in with reasonable expectations…the car is a rattle-prone F-Body convertible. In no way, shape, or form will this thing be a vault. I get a lot of road noise, and the car just feels “empty” and not solid to me. With the top up, I really get a ton of road noise – I assumed it’s coming from the doors and trunk.
After I read…and read…and read some more, I concluded that I really wanted to use some good CLD tiles. I’ve read the conflicting reports on using home depot/lowes roofing material, etc. When it came down to it, I felt the extra expense was worth it when I took into account how messy removal of an inferior product could be. I certainly didn’t want to be scraping tar off my panels. I also didn’t want to deal with it melting, falling off, etc. I wanted to crack open the doors once…replace the window motors, complete the sound insulation, and hopefully never take the panels off again.
So, I followed Don Sambrook’s advice on the SoundDeadenerShowdown site. I ordered 40 of his CLD tiles and the maple roller (these all fit into one flat rate box). Total cost was $110 shipped. I really wanted to use his Closed Cell Foam and Mass Loaded Vinyl, but it was just too pricey for me. He does send samples of all these items with his tiles, and I readily admit they both seem like nice products – superior to what I used, but also much more costly. Again, I had to do a cost/benefit, and because the CCF and MLV are easily removed and would have been ridiculously expensive, I found local alternatives.
For CCF, I used 1/8” Polyethylene foam from The Foam Factory – they are located at 23 mile and Romeo Plank. It comes 60” wide and is priced well. As mentioned the CCF that Don sells is much nicer, but this seemed like it’d do.
For MLV, typical product used is 1lb/sq ft. I found something at Home Depot – DB-3…it’s gotten decent reviews, it’s cheap, and it ships for free if you order 2 rolls. It’s .75lb/sq ft. Again, I am in a ‘vert – I figured it’s got to help, and no matter what I won’t have vault-like silence.
So, I ended up cutting up the CLD tiles and throwing them in the doors….100% coverage isn’t necessary. I applied enough until I could tap on the outside of the panel and it sounded solid. I then cut a solid piece of both the CCF and the MLV and placed them over the door, secured in with a few hex flange head self tapping sheet metal screws. The door panels were a little cumbersome to get reinstalled, but with some trimming, a few beers, and some choice words, I got it done.
I added CLD tiles behind the quarter panel trim, on the wheelwells, and throughout the trunk – again, not at 100% coverage. Behind the quarter panel trim, I only installed the CCF…the MLV seemed like it’d be a pain to get to fit, and I figured I could always go back with it. In the trunk I completely layered the CCF and MLV over the entire parcel shelf, frame rails, trunk well, and rear wall.
I need to add in the CCF and MLV on the sides (quarter panels) in the trunk. I also would have to pull the carpet to do the floor of the passenger cabin and behind the rear seatback – I do plan on doing this in the future.
Ultimately, the doors shut much more solidly (still not like a luxury car “thump”, but much better than stock). Road noise has significantly decreased with the top up. I still get some, but I am sure getting the sides of the trunk done, behind the rear seatback, and the floor of the passenger cabin will help a lot. Previously, I was very aware of the irritating road noise…if I was out on a cruise with the family, I couldn’t hear my daughter in the rear seat. Now, I still hear road noise, but it is significantly reduced. I really look forward to completing the install. At the end of the day, I feel the couple hundred bucks was worth it…the car isn’t silent, but it’s much more pleasant.
Unfortunately, I was too focused when doing the trunk and didn't snap any pics. Here's the driver's door.
Leave a comment:
-
WINDOW MOTORS & XPRESS DOWN
My driver’s side window motor was going – the window would stop while rolling it up. I thought it was a little interesting, being that usually the passenger motor is the one that goes. I figured the passenger one had already been replaced, but when I tore into it, both seemed to be the original motors.
Anyway, I ordered Dorman motors off Amazon. Installation was fairly straightforward using the shbox instructions. The pictures of the rivet locations were extremely helpful. I did opt to pick up some hex cap (allen head) bolts from the hardware store to facilitate an easier installation. It was easier than a phillips screwdriver to get the bolts in through the holes drilled in the door panel. Both motors work great now!
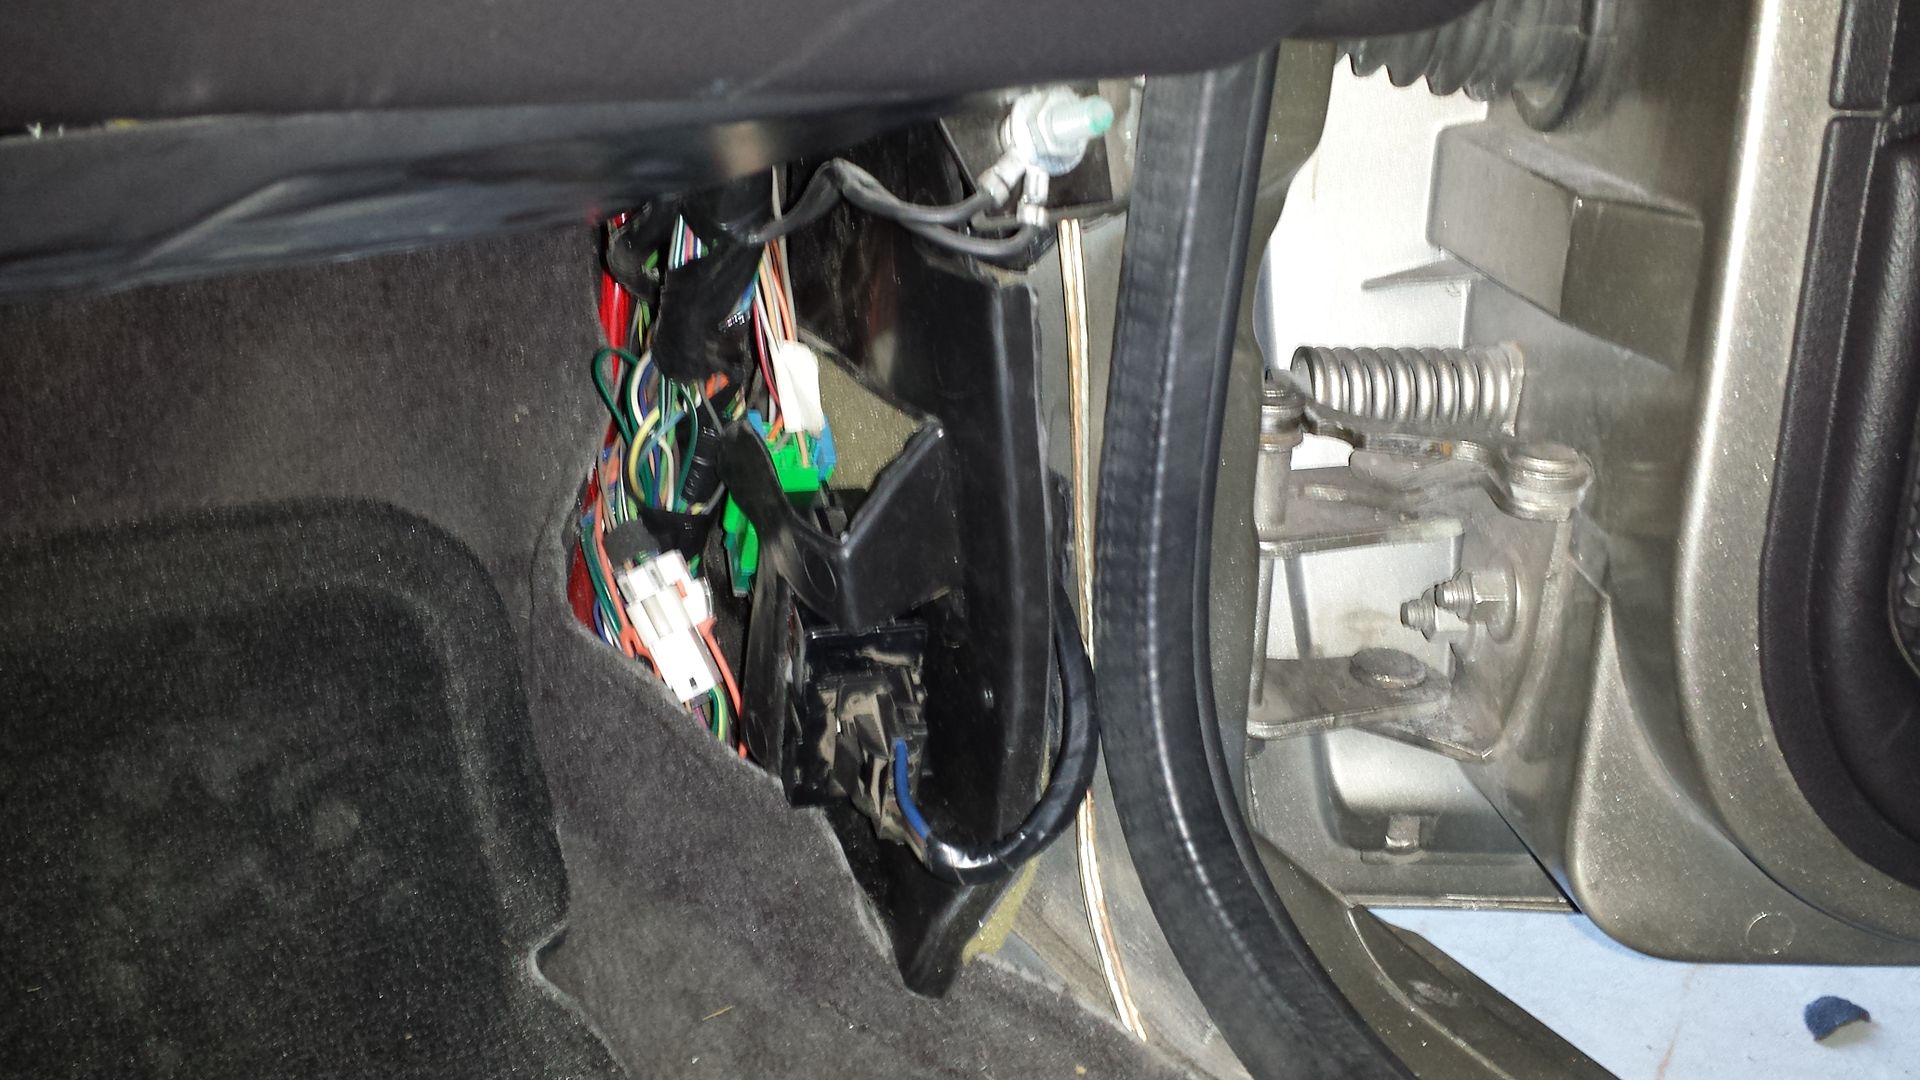
I also wanted to wire in the express down feature on the passenger window. A couple years back, I purchased a complete stock interior wiring harness and a stock express down module from a MiFbody member. It’s proven incredibly useful as I am able to harvest OE connectors and wiring.
Anyway, I followed the instructions on bfranker’s website, but I really didn’t want to cut into the stock wiring. I ended up creating a small harness using stock connectors and wiring off the extra OE harness that I had. This harness plugs into the OE wiring, and the OE switch plugs into it - it "splices" in my modified wiring in between the OE switch and door harness without having to cut anything.
I had to de-pin the window switch connector and flip the wires around. I also had to use a lock switch connector, which is the same pattern but uses smaller gauge wiring, and retrofit it with thicker OE window wiring from the extra harness. On that connector, I needed some copper male leads (the OE harness is female), so I ended up picking up some copper roofing nails and trimming them down. I trimmed up the heads so they wouldn’t touch, and I pushed the nails through the female holes in the OE connector. I then ran the wiring through the door and rubber boot, and tucked the module down into the passenger footwell – there’s a spot where it fits perfectly.
Unfortunately, I don’t have a lot of pics of the harness, but it really was straightforward. The express down feature works just as well as the driver’s side.
Here’s where I located the module – you can see it looping around the plastic/rubber piece. It’s totally hidden by the rocker molding once that was reinstalled:
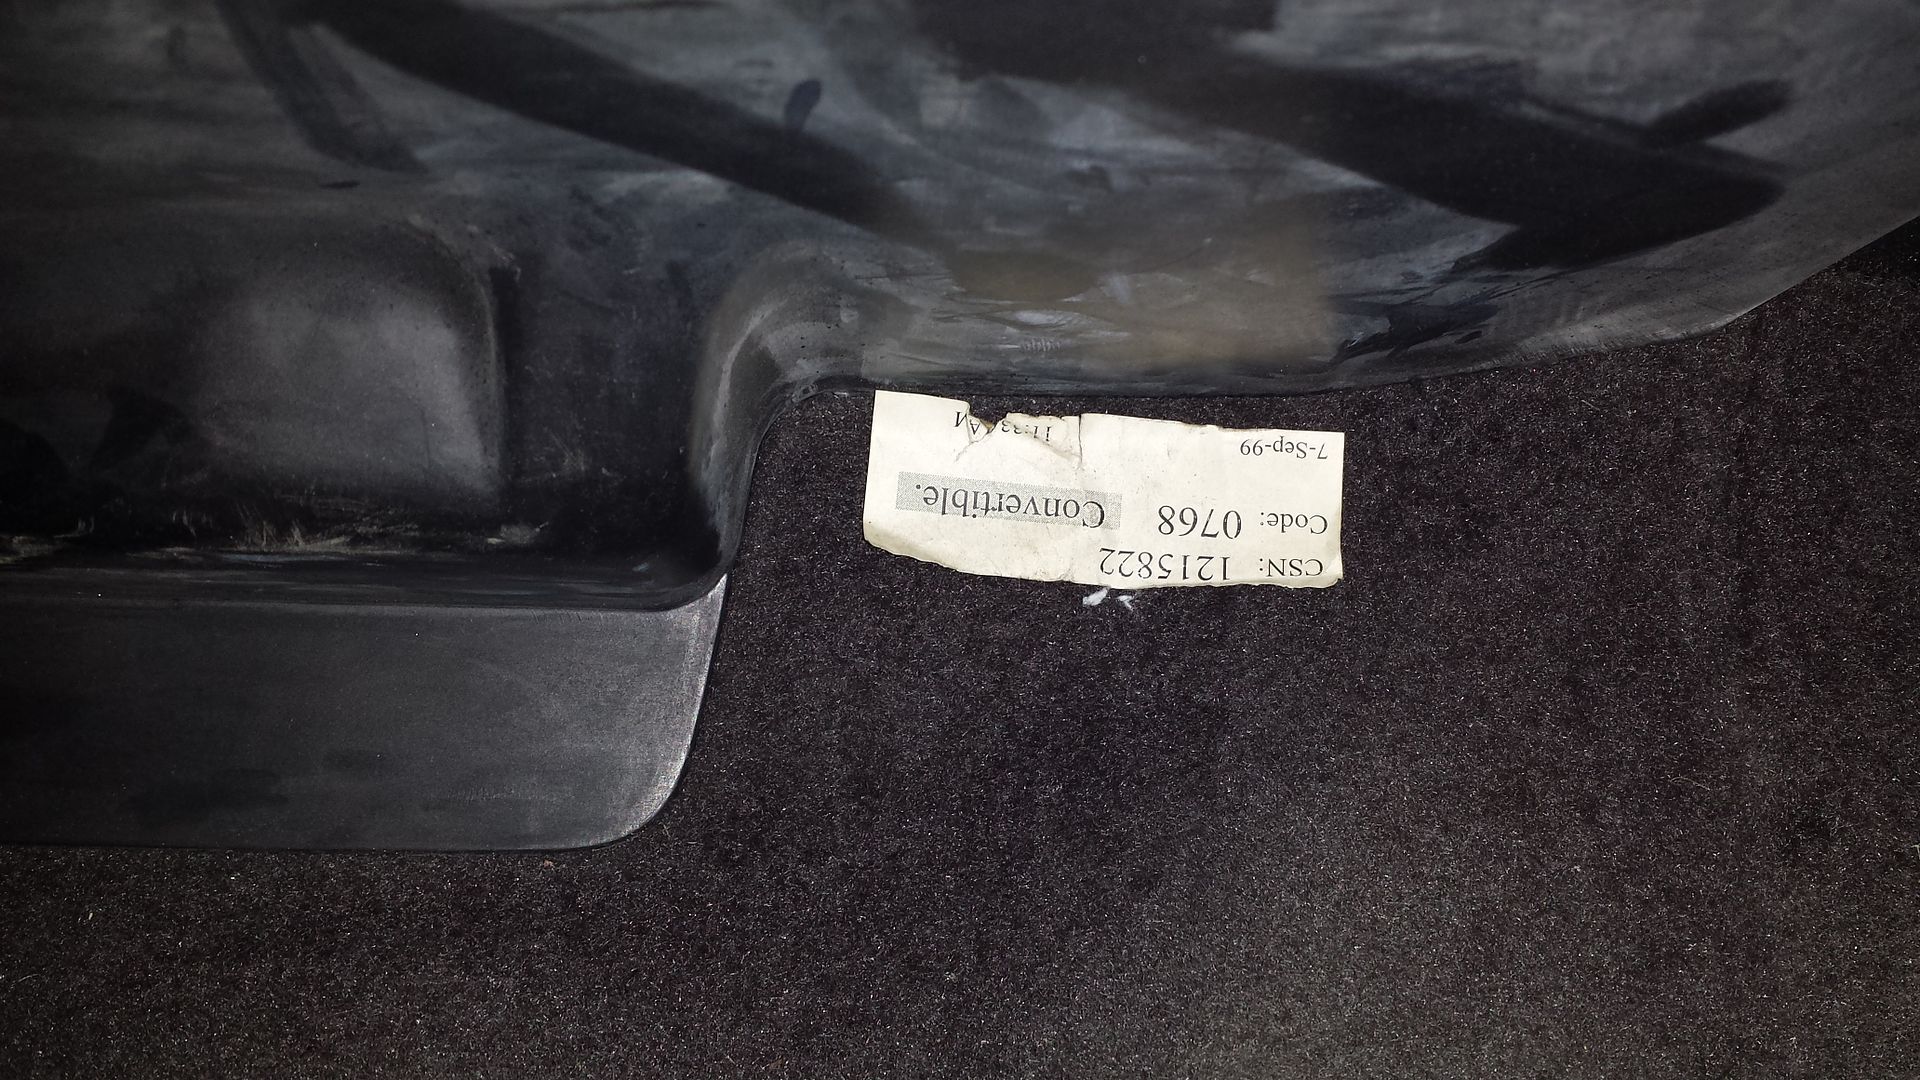
I also noticed this sticker on the carpet. 7-Sept-99. I thought that was pretty cool, as it was within the very first days of my freshman year of college. That's one of the things I like about this car...it's a car from my youth - the 4th gens were really cool when I was in High School...the LS1 was new and pretty much the hottest thing on the street!
 Last edited by Atrus; October 6th, 2015, 09:07 AM.
Leave a comment:
-
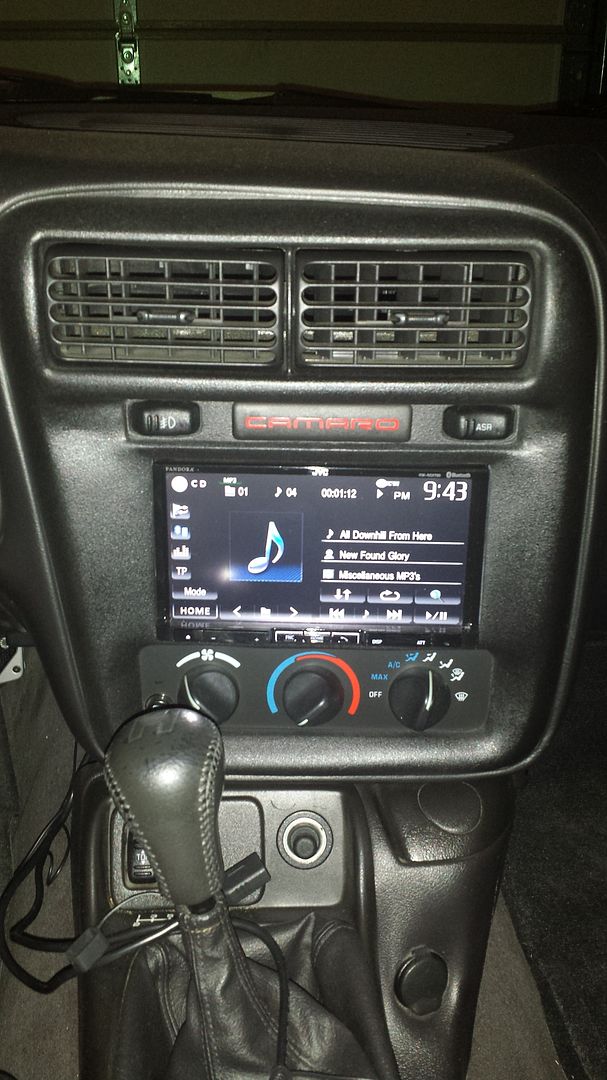
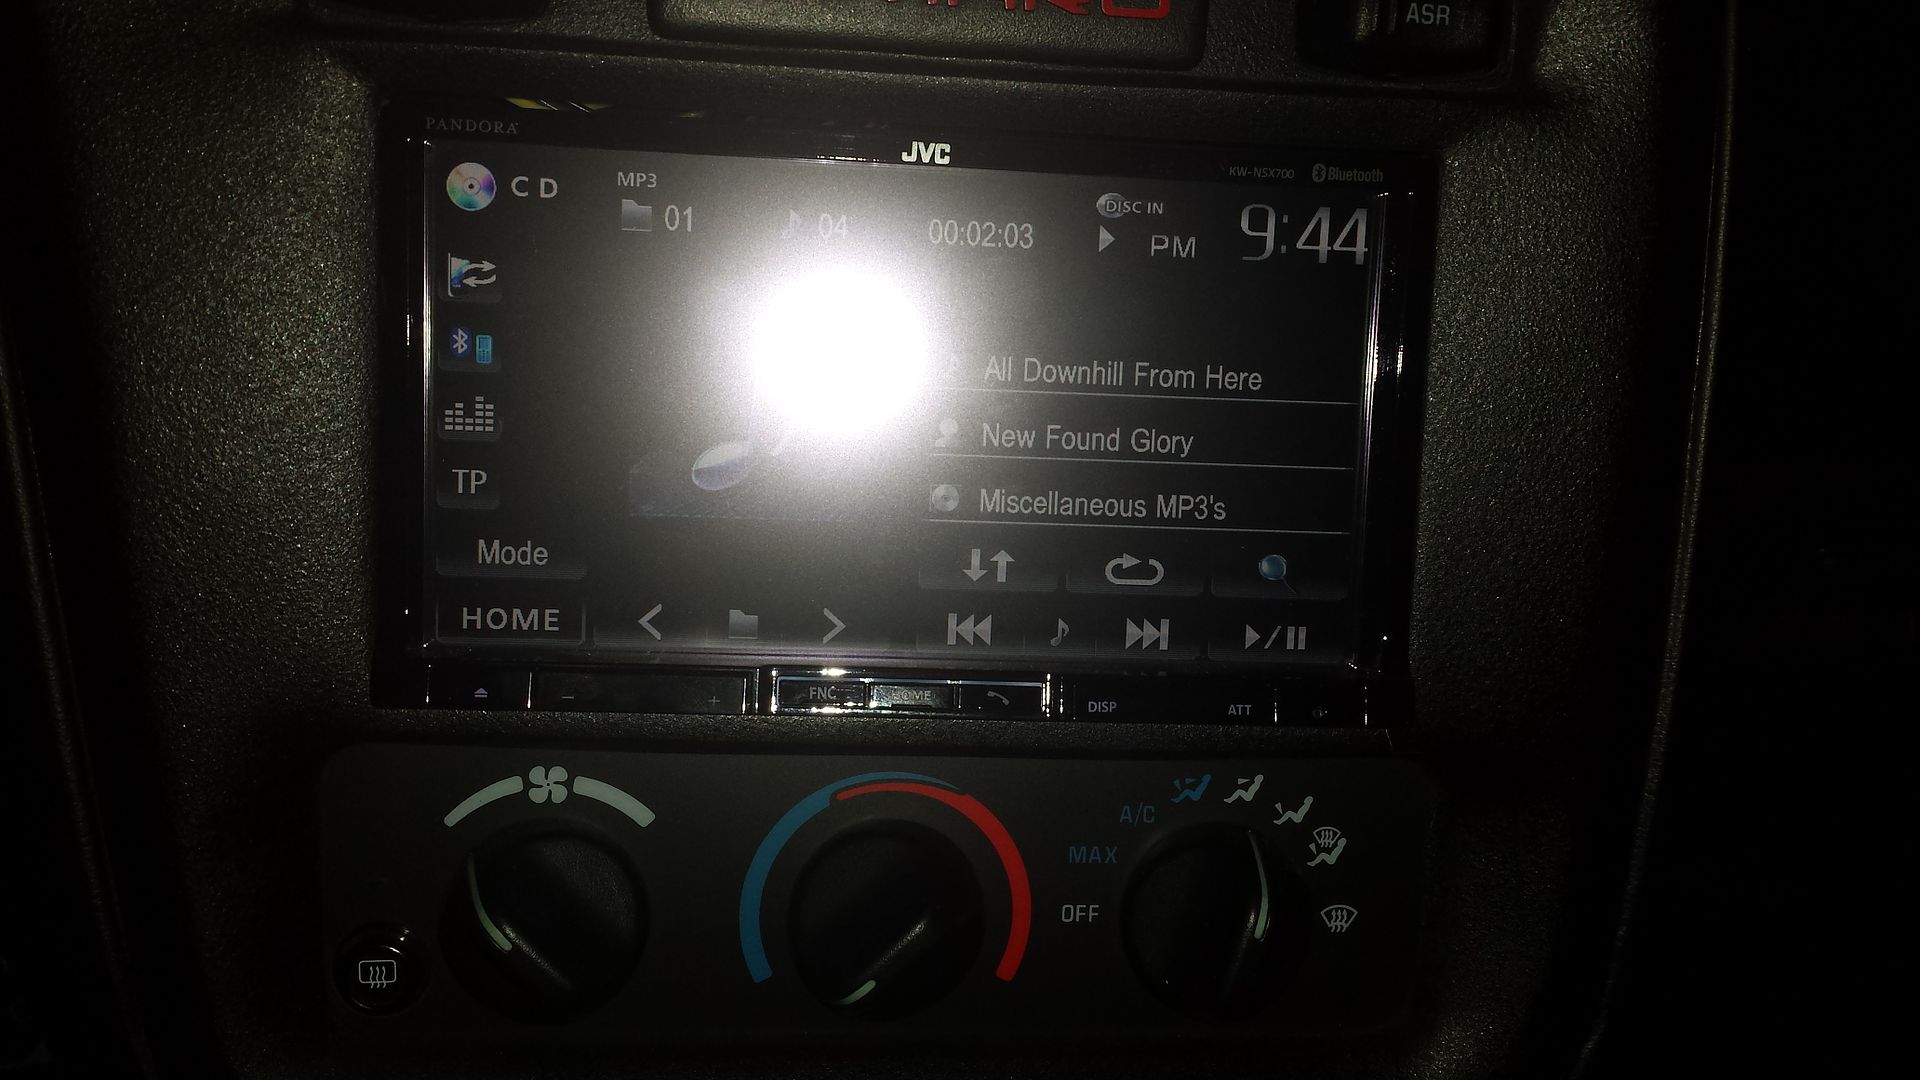
JVC HEADUNIT
I decided that the 1.5DIN Pioneer that came with the vehicle had to go. It’s a nice HU, but it’s outdated. I ended up choosing a JVC NSX-700. It’s got Bluetooth, Android integration, steering wheel controls. I picked up the PAC SWI-RC to enable my stock steering wheel buttons to work. I also picked up a spare radio bezel off ebay and sent it off to DD Mods to have it modded to fit the double din JVC. I kept my stock bezel unmodified.
Installation was fairly straightforward…I did have to trim the dash a bit to get the JVC to fit (behind the bezel, you can’t see it), and it certainly is a tight fit. I couldn’t get the DD Mods brackets to work, so I ended up fabbing my own. The PAC unit was straightforward to install using the instructions.
Overall, the radio is a nice upgrade, but I am not 100% thrilled with it. I had envisioned replicating my Android phone on the screen and having full usage, but it’s not quite that seamless. I’d like to have Google Maps, Amazon Music, SiriusXM (via the internet app), Pandora, Torque, and anything else I’d like to use at my disposal. I did install hacked software on the phone to give more functionality - the app list is very limited otherwise, to prevent distracted driving. I plan to mess with it some more to see if I can get Tasker to better integrate the phone, but ultimately, I have a plan in mind to better leverage the pure Android technology in the vehicle. For the time being, I do think this HU was a nice upgrade over the dated Pioneer and it’ll hold me over for a while. It definitely modernizes the interior, and the bluetooth is really handy when I am out rowin' gears.
Leave a comment:
-
Whew - I am actually almost up to date! Couple more updates and I'll be current.Leave a comment:
-
ST IGNACE 2013
Just had to include these pics...my "uncle-in-law" is fairly tight with some of the event organizers for the St Ignace show. He typically hosts a BBQ at his place after the show. We've met Linda Vaughn a few times, but she also brought along a friend in 2013.
That's me on the left of Linda:

And here's her friend Courtney with the SS:


Leave a comment:
-
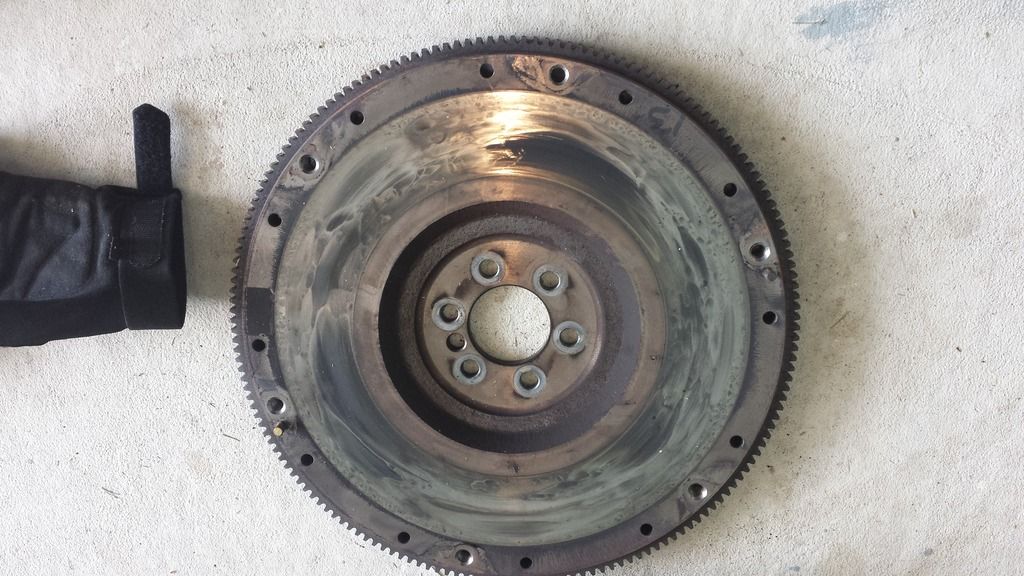
CLUTCH
Shortly after I completed my spring cleanup, in May 2013, I was driving home from work on M53 North. I came upon some traffic and put the car into Neutral. When I was ready to move again, the clutch pedal went to the floor and wouldn’t return. I couldn’t get the car into gear. I was in a construction zone…with no clutch…in rush hour. It was loads of fun.
I was in the left lane and somehow got it into gear and made it over to the right shoulder, and managed to limp it 3 miles to the next exit. In retrospect, I should have known this was coming. The first season I had it – 2012 – I was experiencing the high RPM lockouts at times. It just wouldn’t go into gear. Additionally, as soon as I had done the spring cleanup, I was out with a buddy cruising around one night and the car didn’t feel “right” – I ground the gears a few times. I promised him I knew how to drive a stick. Whether the fresh fluid from my spring maintenance did it, or the powerbleeder (most likely the culprit), or it was a coincidence, I’ll never know.
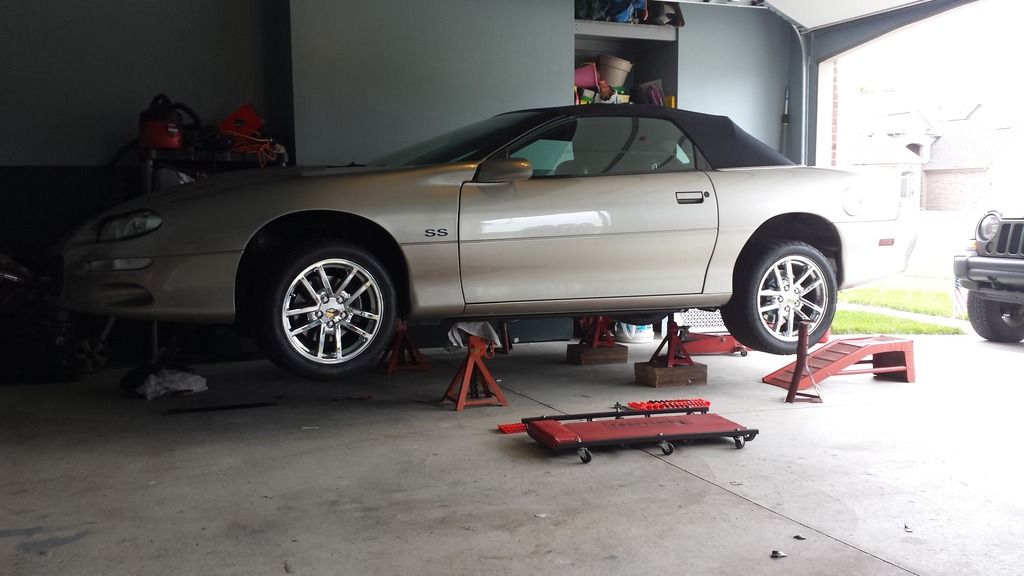
I got the car home later that night and decided with approximately 70k on the odometer it’d be in my best interest just to replace the entire system. I also weighed out my options against aftermarket, the LS1 replacement (really, an LS6 unit), or a LS7 unit. I finally decided on the LS7. The car’s a cruiser, and I wanted something that was comfortable to drive, that grabbed well, and that was pretty much guaranteed to have longevity. Being that I have no plans to make huge power, the LS7 seemed to fit the bill. I picked one up for a good price through an employee purchase program. I also picked up a new CMC and slave. Both came from Autozone. The CMC is just a random Autozone part, but the slave is branded “AP” and was made in Mexico – research shows that this is the same slave you’d get from GM, just significantly cheaper. I also opted to install the Tick remote bleeder, and I am damn glad I did!
I got it up on my old man’s truck stands on the front, and used some 2x10’s to raise my smaller stands up to the proper height on the rear:
Ready to go – let’s get this thing out:

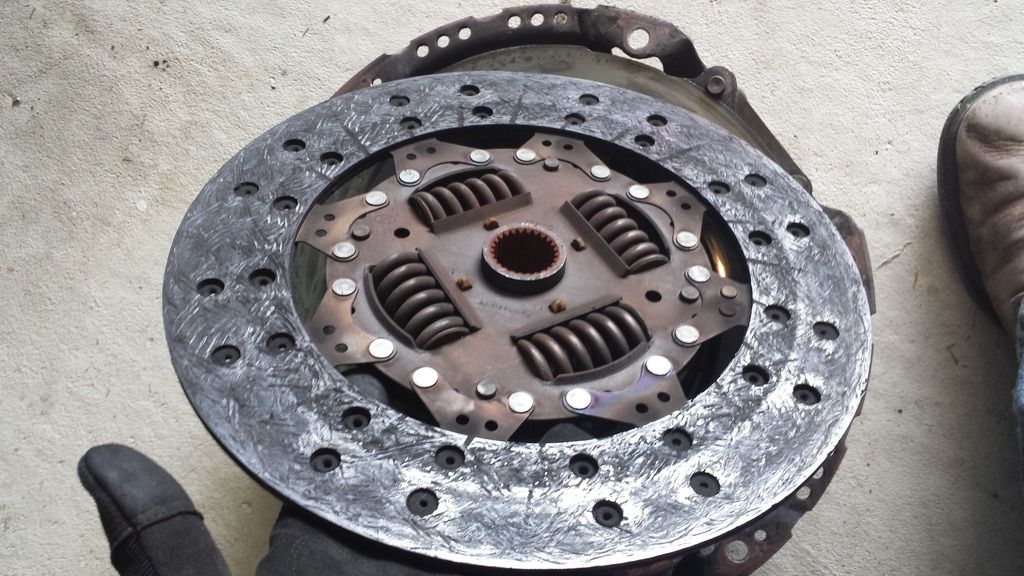
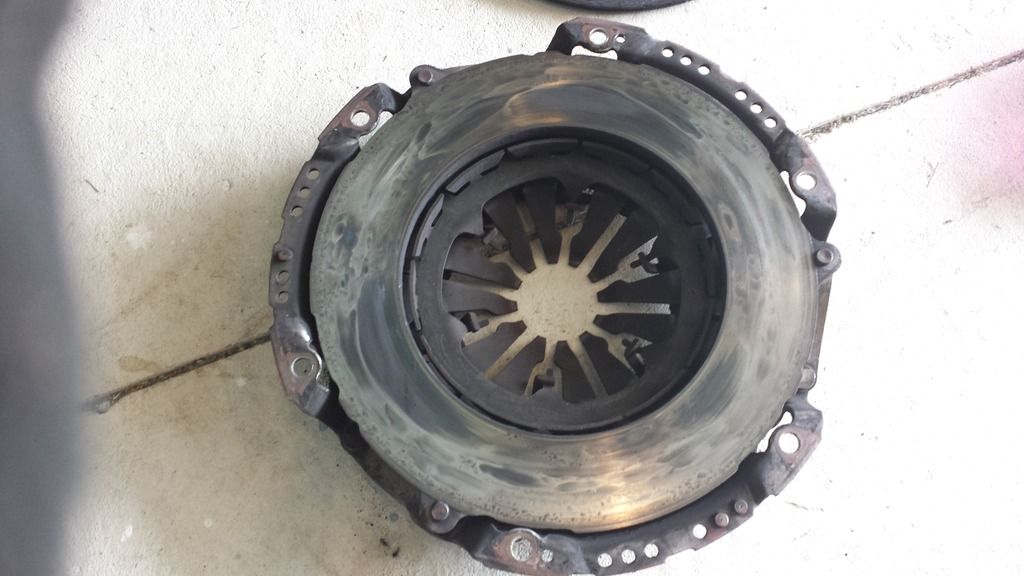
Here’s what the condition of the OE clutch assembly was…although it was the hydraulics that went, it was time to replace it!
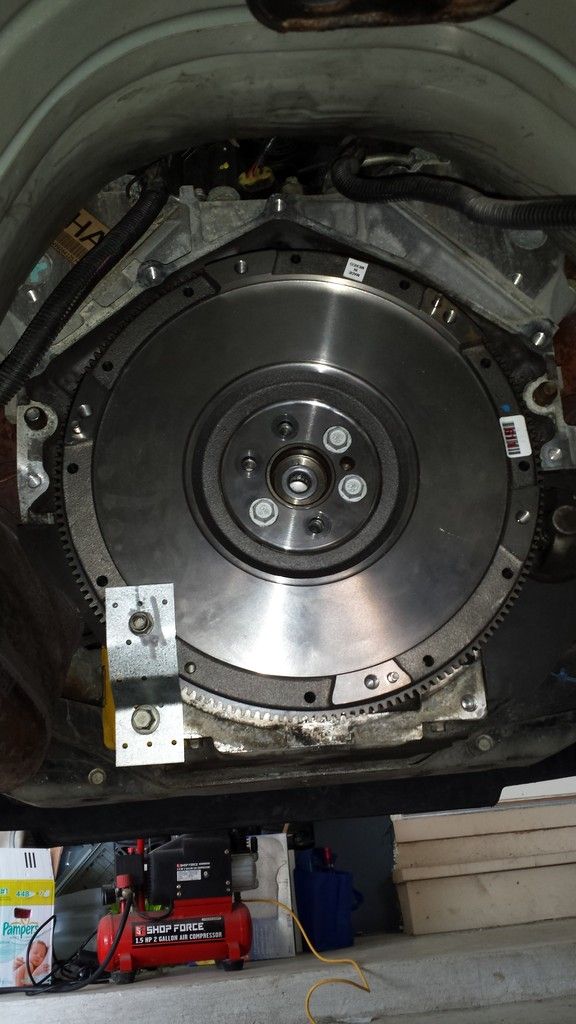
And after a few hours of work, I managed to get the trans out. Car wasn’t high enough to slip it out from under the car (it was on a trans jack), but I was able to slide it back to the rear axle to clear a working space.
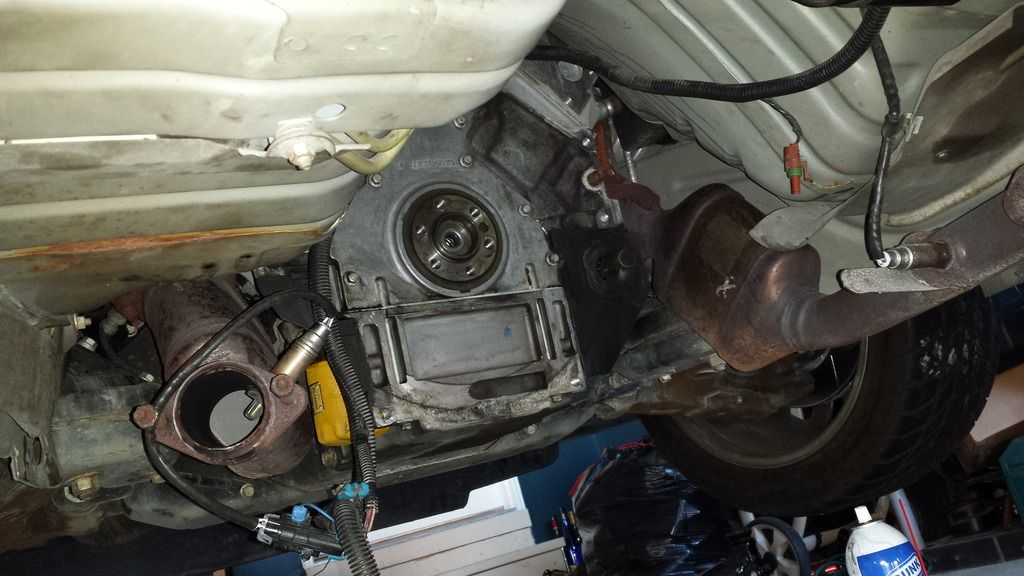
So, I won’t go into excruciating detail, but here are a few observations/experiences I had:
- Separating the trans from the bellhousing was a total PITA. Took me a while and a lot of prying, but I got it done.
- Similarly, reinstalling the trans was a major PITA. I did end up using the trans-to-bellhousing bolts to pull it back together, even though you’re not supposed to. I also did clean up and put anti-seize on the dowel pins.
- Removing the CMC is a major pain. Reinstalling it is easily 4x’s worse. I battled that thing for hours for the reinstall and my forearms looked like I got into a fight with a dozen cats. I got pissed off, walked away for 30 mins, and when I came back it miraculously just fit right in there. Anyone who has ever claimed beer doesn’t solve problems was proven wrong.
- The actual clutch alignment and install went rather smoothly, other than my shit torque wrench….
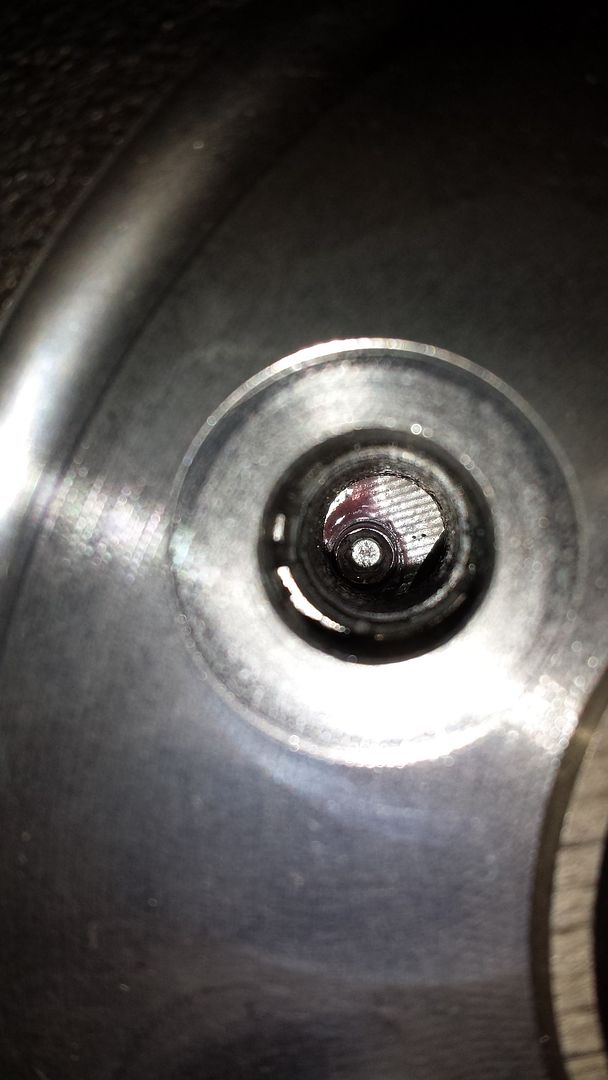
…because I managed to snap a flywheel bolt off in the crank. Great. So, I tried to use a bolt extractor, which was working great….until it snapped off. I was being really careful, but I probably should have used 1 size bigger. So, I managed somehow to drill out the broken extractor, and I went to use a larger size. All went well and the bolt came right out…but my dumbass didn’t realize that the flywheel bolt hole is a through hole on the crank and that mounting point at the end is a larger OD than what goes through the seal. Yeah, I drilled too deep and ended up with a 1/8” hole in my block. I saw small teeth in the hole and freaked out – luckily, I just nicked one of the bolts holding the endcap on, and I was seeing bolt threads. I tapped the hole I drilled and put in a small set screw with red locktite on it. Hopefully I don’t have any issues in the future. I think I am OK now.
My fix – I put this in before I realized they were just cap bolt threads I was seeing. I could have just as easily left it as-is.
Hole in block:
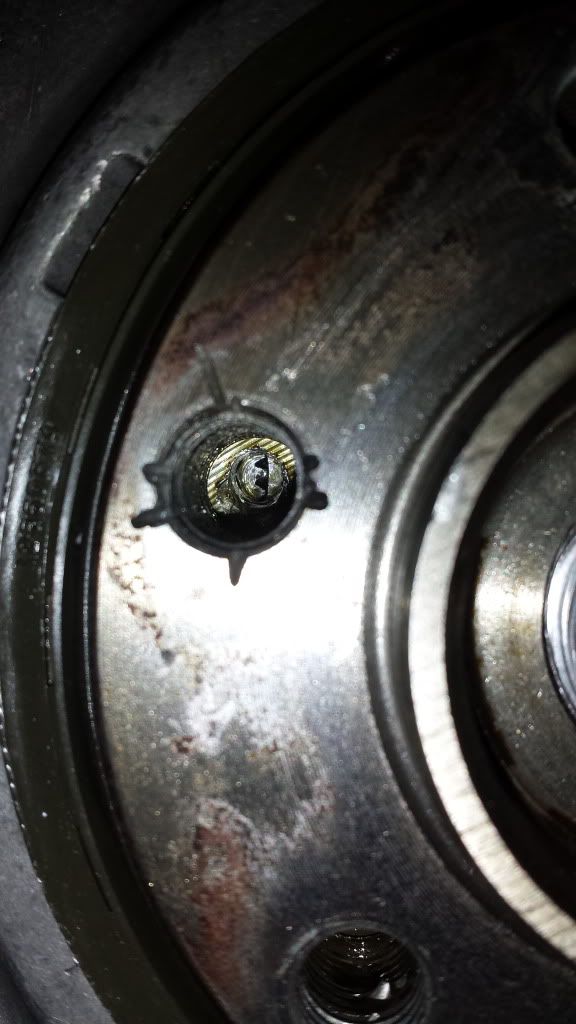
Set Screw in Place:
My nifty flywheel “holder”:
I bled the thing like mad, and I couldn’t get the trans to disengage up on jack stands. I bled the hell out of it again, and it seemed like it worked. I drove it one day and by the end of that day I couldn’t get it into gears easily again. Bled again…and again…and again. I was mostly using the Powerbleeder. Finally, the CMC just wasn’t feeling “right” – I returned it and got a replacement. Bled again, traditionally this time. And again…and it was “kinda” OK, but still didn’t feel right. I made one last crack at it, and used the Tick remote speedbleeder as a traditional bleeder – pump pedal, hold to floor, crack it, tighten it, and let the pedal up. Repeat. Repeat….after about 6 times of doing this, the pedal felt GREAT. It’s been smooth sailing since.
I really like the LS7. No high speed lock out, grabbier than my old worn out LS1 setup, and feels smooth and factory.Last edited by Atrus; May 18th, 2015, 07:54 AM.Leave a comment:
- Welcome to the Michigan FBody Association website.
The Michigan FBody Association is a centralized website for FBody enthusiasts to discuss what's going on in the Michigan area. MiFbody.com was created to allow for an easy one-stop place to find out what's going on in Michigan as far as FBody events, to find out what clubs are available in your immediate area, and for an easy place to post classifieds for items you want to sell! Our goal was to create a more close-knit community of FBody enthusiasts in the state of Michigan, and to bring Camaro and Firebird enthusiasts alike together for some amazing FBody events!
We are the host of the premiere all-FBody event in the Great Lakes area - the Annual Michigan FBody Meet & Greet Car Show.
The most important thing to know about the Michigan FBody Association is that we are NOT a club! The Michigan FBody Association is open to everyone, and is a community. Thus, we will have get togethers, casual cruises, events, and such like that, but this is not an exclusive club and it's 100% free to join this site! So what are you waiting for? Register now!
If you have any problems with the registration process or your account login, please contact us!
Powered by vBulletin® Version 5.5.4
Copyright © 2026 MH Sub I, LLC dba vBulletin. All rights reserved.
Copyright © 2026 MH Sub I, LLC dba vBulletin. All rights reserved.
Copyright © 2005-2018 Michigan FBody Association
Some features by delicjous
All times are GMT-5. This page was generated at 07:29 AM.
Leave a comment: