 Tweet
Tweet
Well, ive got to say, youve definitely beat me. Good job Brian!
-
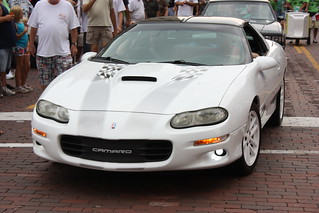
1999 Camaro - 6 liters of fury.....
-
Sadly, today we ended the day calling it quits.
First, on a positive note - Jon, thanks for coming over. Was cracking Angie and I up how much alike Dan [mcssmostwanted] and Jon are.
Warning, lengthy rant ahead. Scroll to bottom of posts for cliff notes on the bad, the good, and the "still to purchase."
So here's the break down of today's activities...
We had one hell of a time at Murrays and Autozone trying to figure out what radiator hoses we needed. At first, we "didn't know what radiator we had." We told Murrays and Autozone that we had a '95 Z28 and they both gave us a hose that looks like #14 in this pic:
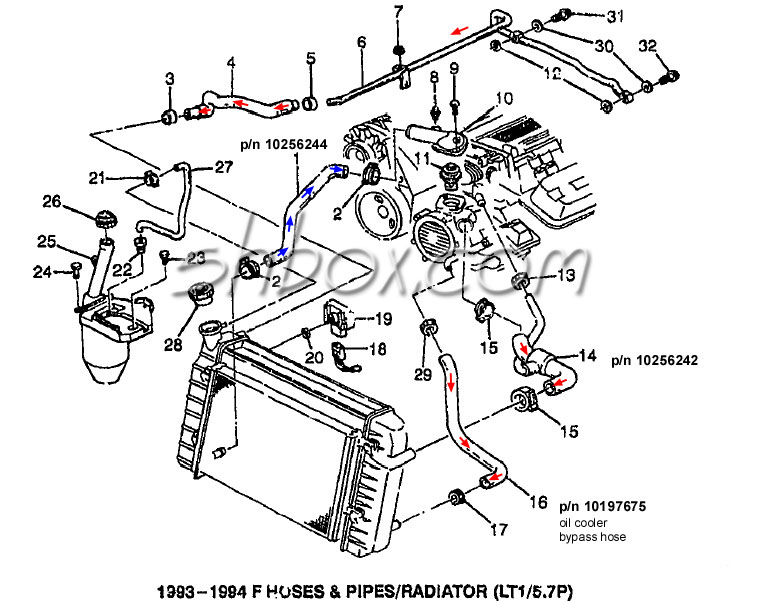
But we knew that we needed hoses that looked more like these:
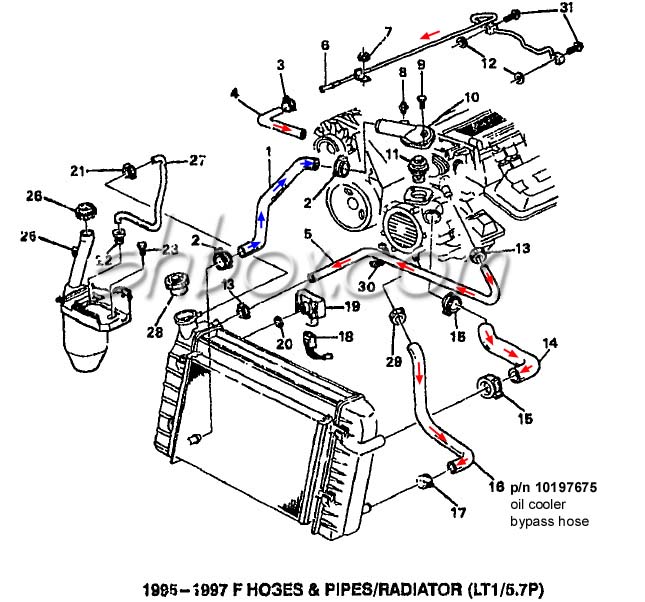
So, we ended up buying #1 hose on both (upper radiator hose), and we ordered the lower radiator hose (#5 on the 95-97 pic) from Murrays. And then last, but not least, we need to order the oil cooler bypass hose from the 95-97 picture. So, needless to say, the coolant system is not finished. That was rather frustrating - and I think Jon put it best while we were at Murrays - now that we know that no one carries the upper radiator hose... if you're driving and the hose dies, you're literally S.O.L for a few days until one of the companies orders one. Murrays said if we ordered it today we wouldn't have it until the 9th... Thankfully, we really only needed hose #5 from the 95-97 picture, but we figured if we're going to buy one hose we might as well replace all the rubber hoses for the radiator because we didn't know how old or what condition the upper and lower hoses already on our LT1 radiatior really are in.
After we got done at Murrays, we installed the radiator assembly and connected the upper radiator hose. That was about the only thing that went rather smoothly.
We then got to work on the radiator support. I've got a polished radiator support from BMR. Of course, the two outter bolts for the radiator support were broke off inside the hole. My dad was able to drill out the bolt on the passenger side, but the driver's side outer bolt he tried the easy out and sure enough... broke his 3rd easy out. So now I have no freaking clue what we're going to do to secure the driver's side of the 3 bolts for the radiator support. While it IS very secure with the 2 bolts (passenger and middle bolt) it looks weird missing the 3rd bolt. We tapped the threads on the two holes we did have and we went to ACE and bought some nice chrome button top bolts with chrome washers so it'd go with the polished radiator support.
Next we decided to tackle the driveshaft and U-joint. U-joint wasn't too bad - it was a pain getting it out but it did, then my dad assembled the new u-joint with a zirk(?) grease fitting. I then crawled under the car and made myself feel really smart. We're sitting there trying to slide the driveshaft in and it wouldn't budge. We haven't hooked up the shifter to the transmission yet so it's just the little knob next to the pan. After a little examination, I was able to pull the knob all the way to the rear (what I'm guessing was Park or 1st gear?) and the transmission then allowed us to rotate the driveshaft while I pushed it in. THAT B**** WOULD NOT GO IN... Finally I said "I wonder if what we have it in allows it to spin but doesn't allow it to go in..." Sure enough I clicked the knob forward once (either Neutral or 2nd gear) and then it started to slip in a little easier. We tried using a c-clamp to pull it together and that worked for about an inch or so but still wasn't enough. As much as I hate to admit it, we had to resort to using the good ol' sledge hammer to tap the ear of the u-joint until the driveshaft went in far enough to slip the u-joint on the rear-end side into place. That driveshaft just wanted to fight us every step of the way, because then we had to back the driveshaft out of the transmission a bit for the u-joint on the rear end to sit correctly and the damn thing didn't want to pull out at all.
Then my dad tackled the cross brace between the transmission and the rear end. We only had 3 of the 4 holes to use because the 4th hole had an easy out stuck in it (that was the 2nd break). I don't know what was going on, but my dad was cussing a lot so it wasn't going easy
Meanwhile, I was working on the battery connections to allow Steve to flash the computer tomorrow. I spent $20 buying what I thought was a really nice fused battery terminal (meant more for automotive audio setups) - has two studs and then a fuse between it and it's all enclosed in a clear plastic housing so it's well insulated. Well, OF COURSE... the eyelets for the fusable links were all too small for the stud. My dad and I tried drilling the eyelets bigger but of course that wouldn't work. It was already too late in the day to try to go and buy bigger eyelets so I had to resort to using a bolt and nut to just put all the positive connections together temporarily for tomorrow's computer flash. Used about 1/4th a roll of tape making sure it was really insulated so it wouldn't short out. Negative battery connection to chassis ground was straight forward - self-taping bolt with two washers and the negative battery terminal ground with two other eyelet cables inbetween the washers.
My dad said "Better hookup the computer before we plug the battery in." Well, we already realized on Saturday that the douschebag that removed the LT1 computer didn't unbolt the bracket, they basically just grabbed it on the bottom and yanked it right off - effectively breaking the two bolt locations for the bracket right off. Oh yeah, and the v6 computer is of course smaller than the v8 computer, so I have to buy a new computer bracket. But that's not the most frustrating part - the douschebags then used grips to yank the 4 plugs out of the computer. Two of the plugs had the tabs broken right off so when you go to push the plug on, GUESS WHAT... no "snap" sound, nothing to actually HOLD the plug into the computer. So, we had to use 4 zip ties to wrap all the way around the computer and put enough pressure on the computer's plugs to hold them "plugged in."
We then installed the battery - HEY THAT WENT WELL!
We then decided to tackle the shocks. We decided to be lazy and not install the lower rubber seat on the front shocks. It looks like all it really accomplishes is to get rid of noise and cushion a little bit. We'll buy new spring seats eventually but until then we decided to bolt the a-arms into position. OF COURSE... THAT WOULDN'T GO IN WITHOUT A FIGHT... After a lot of wrestling with the a-arms, we finally got the two bolts into the holes and nuts on them. The two holes that the bolts go into the shock from inside the engine bay wouldn't line up and I ended up crossthreading one of the bolts. Well, then to top it all off, the damned brand new piece that is the top seat for the shock and has the two threaded pieces that the bolts thread into... one of them completely separated from the shock tower, and the other one spins freely. We were able to get the one out but the crossthreaded one is at such an angle that I don't see how we can get any grip on the threaded piece to hold onto it while we unscrew the bolt.
And that's where we called it quits.
Cliff of the suckage:
- Whoever uninstalled the LT1 engine harness and computer was a complete douschebag and should be knocked out.
- Had a difficult time finding and ordering the right hoses for the radiator - still have a couple more hoses to order and figure out.
- Broke an easy out in one of the radiator support holes
- Driveshaft did not want to cooperate and fought with us every step of the way
- New positive terminal's studs are too big for the fusable link eyelets, thus useless until we get bigger eyelets soldered onto all the positive connections for the terminal
- Installing the a-arm assembly into the shock tower effin sucks.
Cliffnotes of the good:
- We got the radiator support partially installed (still have the plastic protective cover on it)
- Driveshaft is installed
- Cross brace piece between transmission and rear end is installed
- Rear LCA bolts tightened down
- Battery installed
- Positive terminal temporarily hooked up for tomorrow's computer flash
- Negative terminal permanently hooked up
Stuff to buy still:
- Oil Cooler Bypass Hose
- Front shock's lower spring rubber seat
- Plug for random sensor opening on the radiator on the passenger side... it's not there on the v6, there was no sensor in the radiator when we bought the LT1 radiatior. We looked at my dad's radiator to see what he had and there was infact a sensor installed in that location but the dumb thing wasn't even plugged in so a lot of good that sensor apparently does.

- Bigger eyelets for the positive terminal links
- Carbide/diamond tipped drill bit to drill out the easy out & bolt for the radiator support
- Cruise control cable
- Power steering reservoir to power steering pump hose
- Computer bracket
Last edited by meissen; March 29th, 2009, 10:09 PM.- Brian Meissen
Owner, MiFBody.com
Administrator, LTxTech.com

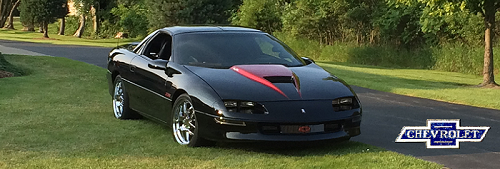
1994 Camaro LT1 Transplant - 357ci LT1, cammed, stalled, and driven.
2022 Camaro LT1 - "Cherry Bomb 2"Michigan FBody Meet & Greet Car Show 2022
June 4th, 2022 - 9am to 3pm!!!
The HUB Stadium, Auburn Hills, MIComment
-
that is one heck of a post brian. haha. i read the cliffs. so is it still going to start tomorrow?2000 Trans Am l 1967 Firebird
sigpic
Comment
-
Gone but not forgotten: 1986 Chevrolet Camaro IROC-Z
"You shall ride eternal. Shiny and chrome."Comment
-
Brian,
hate to be captain obvious here but universal hose works just fine for that oil cooler bypass. Thats what i did. No need to pull your hair out looking for that special one.-Joel
1995 Z28 M6 - AI226/234 - autocross ricer
1984 Scottsdale K10 - 305/4bbl/4spd
WTB List:Midwest Chasis DS LoopComment
-
Your getting close B, hang in there!
The sensor in the radiator is the low coolant sensor.

VicePresident of West Michigan Firebird Club
A.K.A The Maverick
http://www.cardomain.com/ride/660128/1
93 TA Currently Under Construction AGAIN
2007 2500 Chevy Silverado Crew Cab w/ 6.0L & 3.73'sComment
-
Brian, beating the driveshaft into the tailshaft of the trans scares the crap out of me, it should just slide right in. I hope nothing was damaged.
O yea, and **** radiator hoses. I just like you made SEVERAL trips to the autoparts store today, and still dont have what I need...........
The sensor on the radiator is most likely a low coolant sensor, its on alot of GM vehicles and a buildup of old dexcool causes them to VERY comonly fail, which is why most people unplug them, otherwise you get a low coolant light on, even though its not low.
Dont get your hopes up on that bit getting the easy out out. We went through several carbide and diamond tiped bits, with zero resutlts. We ended up using the oxy acetlyne torch on it to littlerally melt it out. After my last expirence with easy outs. I threw them all away. Your best bet (with out totally trashing the nice paint job you just did) would be to take it somewhere where they can weld a nut to the easy out and back the easy out out of the hole, they just totally drill the bolt/hole out and retap it for a larger thread or go the helicoil route.
This shit blows dont it....1999 Camaro - 6 liters of fury.....
Comment
-
Also, where did you get those diagrams from? I need the same ones for an ls1 car.1999 Camaro - 6 liters of fury.....
Comment
-
dont forget to add stuff for the trans cooler!!!! and when you start it make sure the transmission is in park... cya tomorrowThe Original
Originally posted by 81DaytonaPaceCarComment
-
It's looking iffy. I posted a Monday RSVP thread but the basics to get it started would be:Originally posted by 6pontiacs7 View Post
Finish radiator hoses
Fill engine and radiator with coolant
Fill transmission with fluid
Recheck the driver's side spark plug wires to make sure they're fully seated
Hook up shifter cable to the transmission
Hook up transmission cooler to the AC radiator or whatever the AC radiator looking thing is.
Run the lines from the transmission cooler to the transmission hard lines that would normally go to the radiator
And I think that's it? Not *too* bad but all time consuming none the less. All depends how much my dad can get done tomorrow as I have to work and my boss already told me I can't take tomorrow off because I took a half day on Thursday and all day Friday off.
Definitely, we'll probably have to do that. We talked about doing that in Murrays but of course they didn't have the damn inner diameter hose we needed.Originally posted by JoeliusZ28 View Post
Weird... do the v6's not have that sensor? On my v6 radiator the snout the sensor slides into is there but inside the snout it's blocked off. We'll have to make sure we plug it in on my dad's car too since his Formula didn't even have the sensor plugged in.Originally posted by Phantom383 View Post
Everyone keeps saying it should just slide in but now with my experience trying to get the driveshaft out of the transmission before we took it to Mike and getting the driveshaft back into the transmission I just do not believe it. There's no way in hell the driveshaft can just slide right in - atleast not mine.Originally posted by sman View Post We didn't beat, though, just tapped.
Shbox.com - but all of his stuff is LT1 based.Originally posted by sman View Post- Brian Meissen
Owner, MiFBody.com
Administrator, LTxTech.com
1994 Camaro LT1 Transplant - 357ci LT1, cammed, stalled, and driven.
2022 Camaro LT1 - "Cherry Bomb 2"Michigan FBody Meet & Greet Car Show 2022
June 4th, 2022 - 9am to 3pm!!!
The HUB Stadium, Auburn Hills, MIComment
-
if your drive shaft did not just easily slide in something is wrong.. u should never have to tap on it to get it in.. mine slides in and out no problems at all
Comment
-
i probably still have mine leftover, but im not at home to dig it out
-Joel
1995 Z28 M6 - AI226/234 - autocross ricer
1984 Scottsdale K10 - 305/4bbl/4spd
WTB List:Midwest Chasis DS LoopComment
-
 The driveshaft wouldn't come out when we took the trans to Mike and it wouldn't easily slide in either. Keep in mind we were at a horrible angle with the car barely up off the ground so that very well could've been most of the issue. Just getting the driveshaft to slip in through the seal on the end of the tailshaft was a tight fit.
- Brian Meissen
The driveshaft wouldn't come out when we took the trans to Mike and it wouldn't easily slide in either. Keep in mind we were at a horrible angle with the car barely up off the ground so that very well could've been most of the issue. Just getting the driveshaft to slip in through the seal on the end of the tailshaft was a tight fit.
- Brian Meissen
Owner, MiFBody.com
Administrator, LTxTech.com
1994 Camaro LT1 Transplant - 357ci LT1, cammed, stalled, and driven.
2022 Camaro LT1 - "Cherry Bomb 2"Michigan FBody Meet & Greet Car Show 2022
June 4th, 2022 - 9am to 3pm!!!
The HUB Stadium, Auburn Hills, MIComment
-
when we pulled the drive shaft out of my buddy's 85 camaro it was ***** to get out and installThe Original
Originally posted by 81DaytonaPaceCarComment
-
thhe diagram came from shbox.com very usefull site lots of wire diagram & cooling etc.Originally posted by sman View Postsigpic
1998 Trans Am Convertible A4 - WS6 hood, WS6 air lid, WS6 rims, drilled/slotted rotors.Comment


Comment