Announcement

Collapse
No announcement yet.

"The Project" Begins - Car Build

Collapse
X
Collapse
Who has read this thread:
 
  • Filter
  • Time
  • Show
Clear All
new posts

  • ENGINE REBUILDING HAS BEGUN

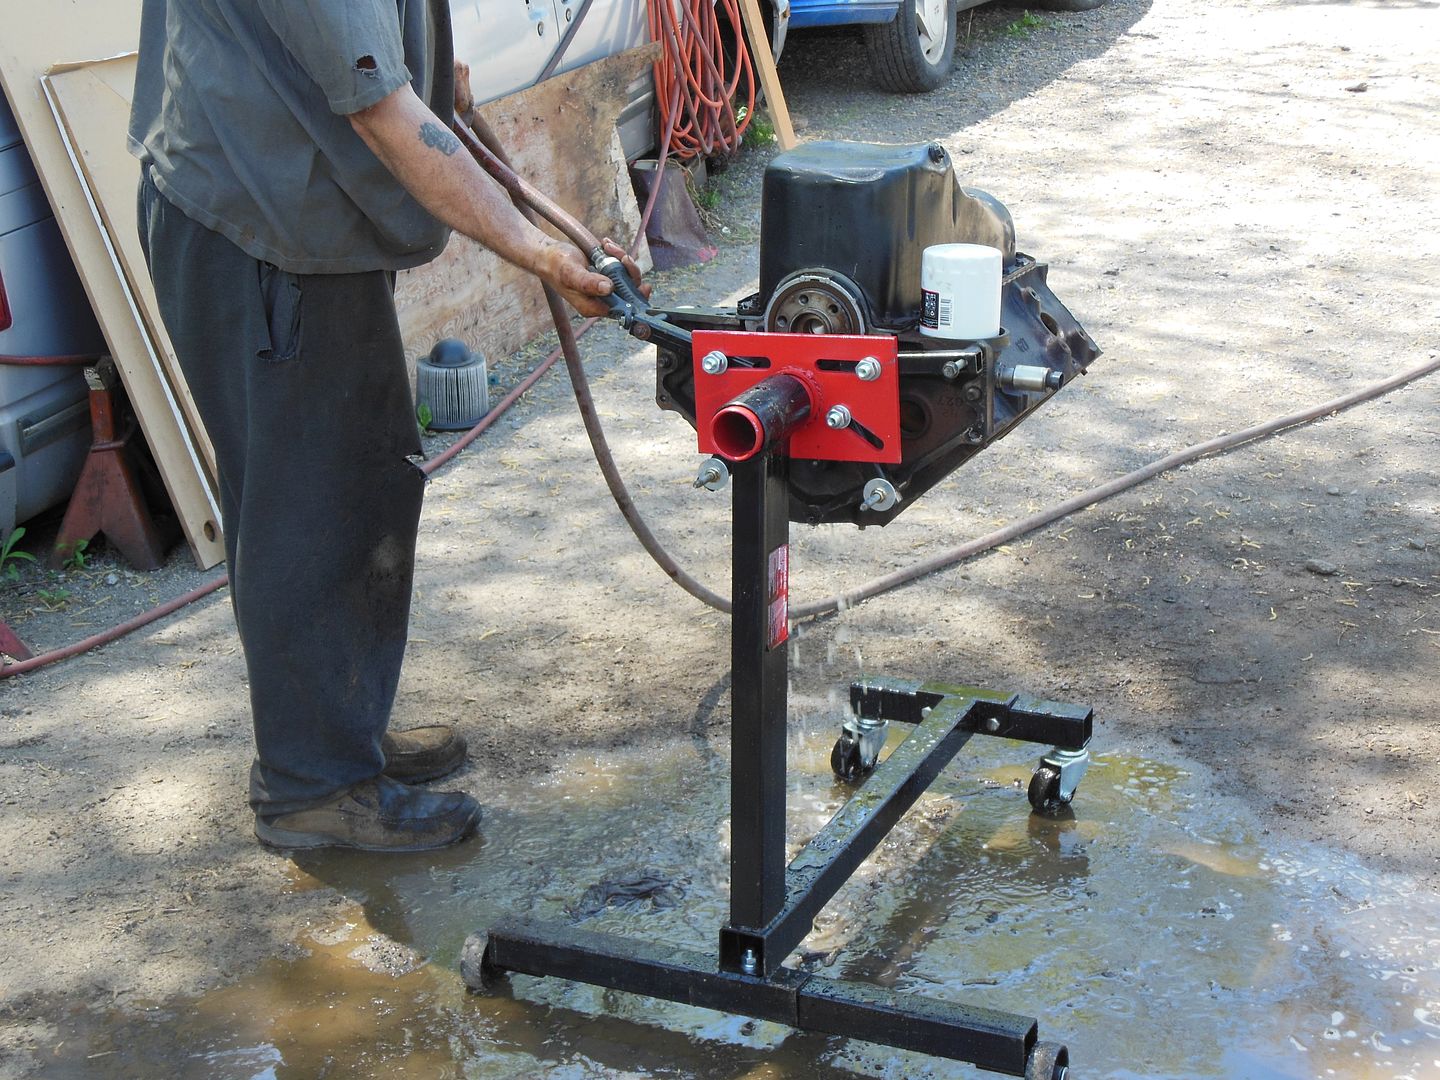
    Engine Flush Time....Pulled the old engine plugs to have a look inside and decided it badly needed an engine flush. Went old school with some CLR in a spray gun and the water hose. NOW, its nice and clean with new Melling freeze plugs installed.

    Also, applied some engine oil to the cyclinder walls and turned the engine over by hand a few time to lubricate.


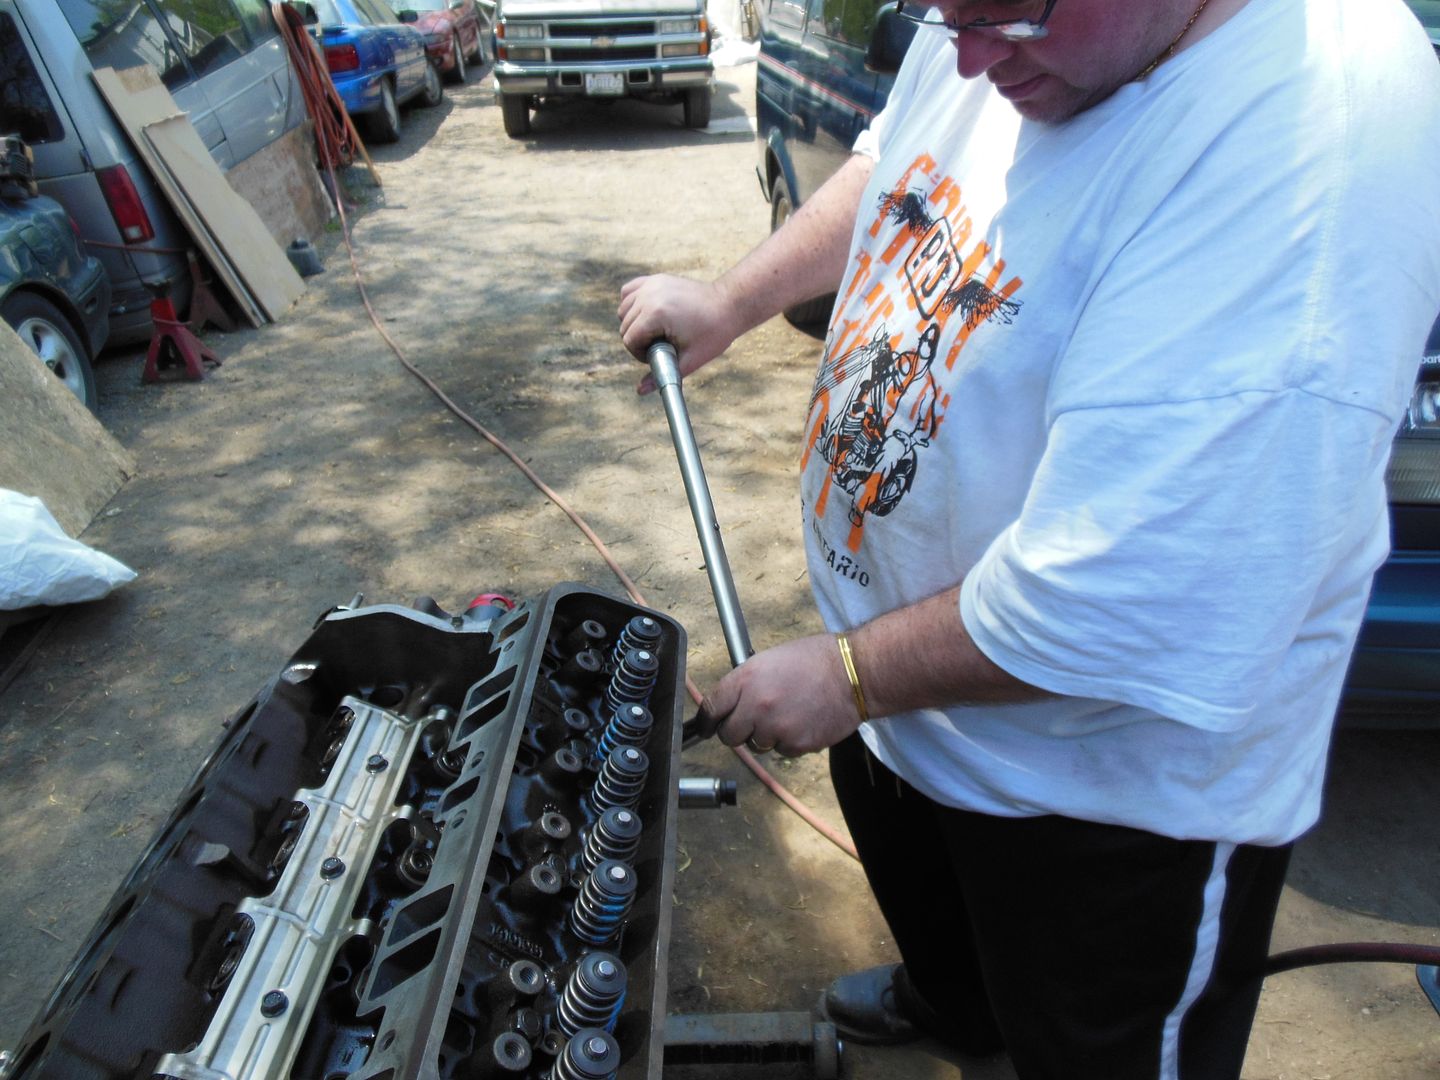
    Heads Done....Finished installing the posi valve seals, added some shims and installed the Comp Cams beehive springs on the exhaust side. Also, cleaned off the old head bolt sealant and put a steel wire to the threads. Installed thin gaskets and torqued the head bolts to 65 ft/lbs. Always a good idea to double check each bolt after torquing them down. Can never be too careful.

    PROOF I WORK ON MY ENGINE!!!


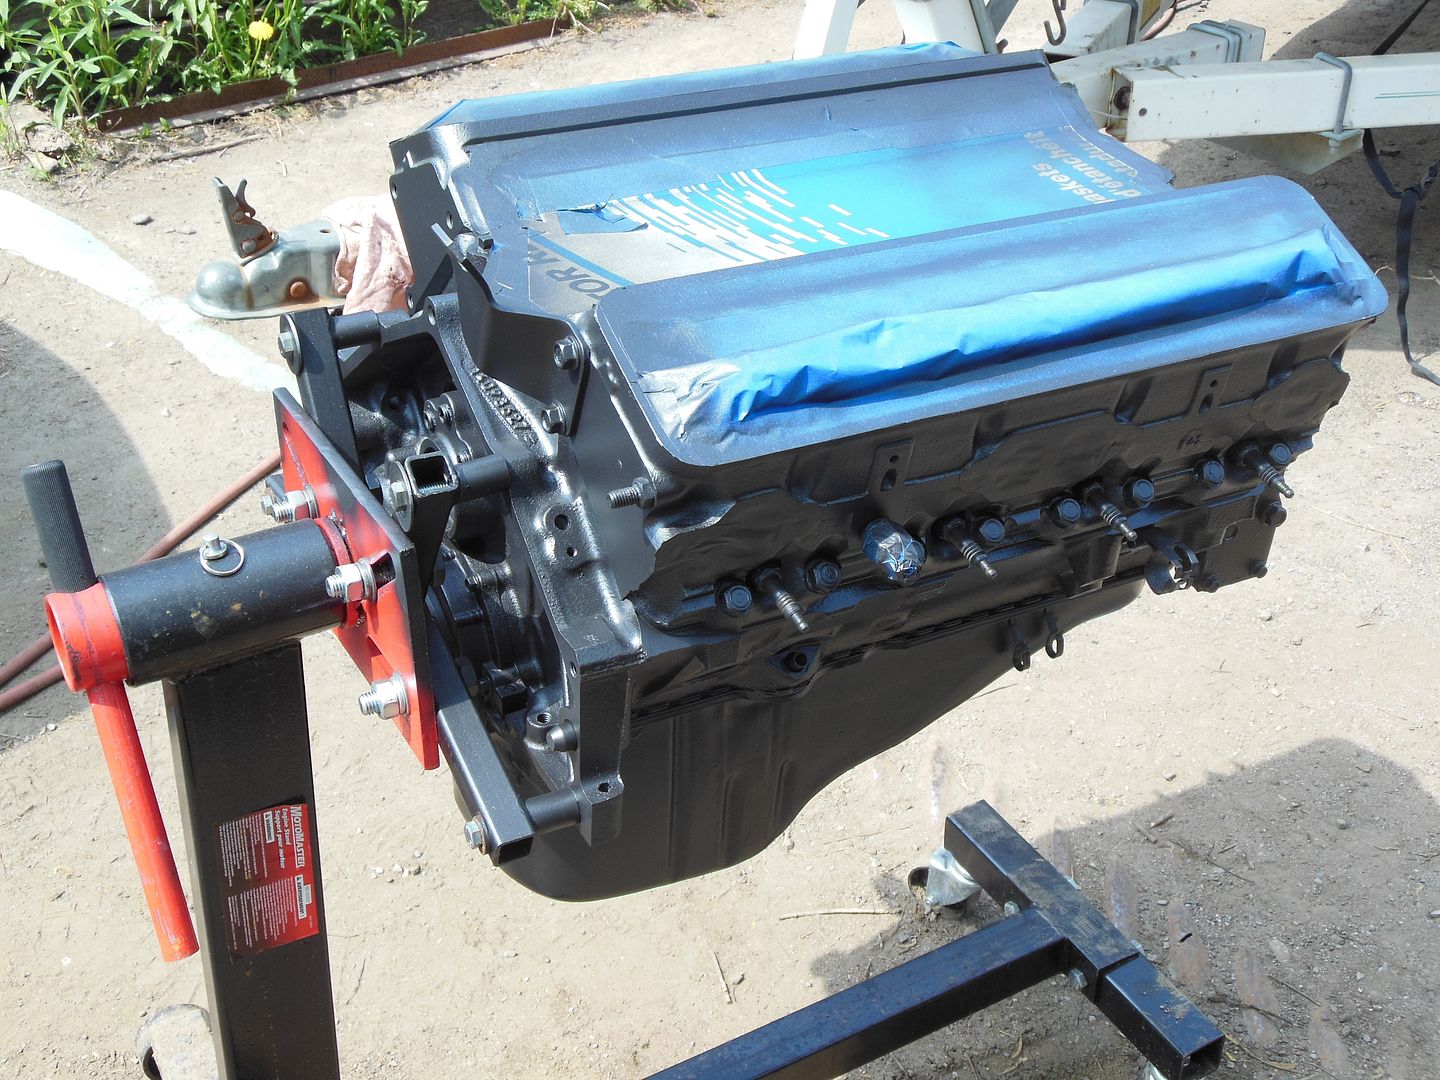
    Taped up all the holes, and hit the block with some metallic engine enamel. Reinstalled the motor mounts and put a cover over the engine.

    Next week...mounting the engine to the k-member....fingers crossed.


    Just rolling with the dog pound..

    Comment


    • Sweet! Looks good!
      - Brian Meissen
      Owner, MiFBody.com
      Administrator, LTxTech.com


      1994 Camaro LT1 Transplant - 357ci LT1, cammed, stalled, and driven.
      2022 Camaro LT1 - "Cherry Bomb 2"
      Michigan FBody Meet & Greet Car Show 2022
      June 4th, 2022 - 9am to 3pm!!!
      The HUB Stadium, Auburn Hills, MI

      Comment


      • Engine and parts mock up today.

        Close up of the posi valve seals and Comp Cams beehive springs.


        Drilled out the spot rivets on the engine mounts, sanded down and painted the mounts , then installed the Energy Suspension bushings.


        Installed the powder-coated accessory brackets and starter. Starter needed little grinding to get it just right.

        When installing the K-member, best not to fully tighten the engine mounts. You might need a hammer and pry bar to install the main bolts.

        Loosely fitted the headers and pipes to see how they would fit and look at the clearance. Need to see if there is enough room to mount the AIR module between the oil pan and headers. Want to move the module from the top of the motor to the bottom and clean things up. Thinking of using some high temp braided hosing from a Cadillac so the tubes don't melt from the header heat.


        Just rolling with the dog pound..

        Comment


        • Why not ditch the AIR?
          All it does is inject air into the exhaust to light off the cats faster.
          Originally posted by Yoshi94
          Mines about an inch bigger than Kyles. I need to get one of those
          Originally posted by ryanwarby01
          Put it this way, if you have a money tree a LT1 is a wood chipper!
          sigpic

          Comment


          • hes in canada i think he needs to pass inspoection and all that jazz.
            91 Trans am, 305, Lt1 cam, 24lb injectors, headers, SLP LM2, SW chassis, massive panhard, lowered, modded TPI, Tuned, 4.10s, Lincoln locked
            85 Z28 406/th400?/3.42 4th gen disc rear/4th gen dash
            00 Tahoe Z71........Stock
            97 K1500 lt4 cam, 1.6s, MPFI, Solid axled, IROKs,------winter beater

            Comment


            • Originally posted by Fox Slaughter View Post
              Why not ditch the AIR?
              All it does is inject air into the exhaust to light off the cats faster.
              Originally posted by TylerT/AZ28 View Post
              hes in canada i think he needs to pass inspoection and all that jazz.
              I could probably pass the mandatory emissions test without the AIR but the Ministry of Transportation also do random visual inspections and it needs to be there or instant $300 fine.

              There have been cases of plain clothes inspectors going to car shows and then pulling over cars they think will fail.


              Just rolling with the dog pound..

              Comment


              • Started working on relocating the A.I.R. pump. Originally was going to move to near the battery but came up with a better idea.

                All it took was cutting the back of the tubing, then adding some new tubing, make a few bends, have a coffee , bend some more, mock up to make sure the A.I.R. is tucked up close to the block, make a bracket, make a better bracket , have lunch, bend some more, fit headers for clearance.....AND VOILA...fits perfectly

                I will be running the tubing from the headers and A.I.R. pump thru the back of the motor with copper fittings and tubing.

                Here are the pics....Before


                Making the tubing, fittings and brackets


                DONE...just have to paint the tubing with some hi-heat silver paint.


                Just rolling with the dog pound..

                Comment


                • Cool! Really sucks you have to have the air pump at all - the whole time I was reading it I kept thinking "Damn the best thing to do would be to delete it" but at the same time I remembered you needed it for emissions in Canada
                  - Brian Meissen
                  Owner, MiFBody.com
                  Administrator, LTxTech.com


                  1994 Camaro LT1 Transplant - 357ci LT1, cammed, stalled, and driven.
                  2022 Camaro LT1 - "Cherry Bomb 2"
                  Michigan FBody Meet & Greet Car Show 2022
                  June 4th, 2022 - 9am to 3pm!!!
                  The HUB Stadium, Auburn Hills, MI

                  Comment


                  • Originally posted by meissen View Post
                    Cool! Really sucks you have to have the air pump at all - the whole time I was reading it I kept thinking "Damn the best thing to do would be to delete it" but at the same time I remembered you needed it for emissions in Canada
                    You're right...when it comes to the Gov't, if you can't beat em...hide it.

                    Putting the engine harness in place and lengthening some of the sensors for the AIR pump, charcoal canister and a few others that will be modified in the next few weeks. Thankfully , I kept the old engine harness so extra correct wires are no problem.

                    Also need a visual to see how to hide and rework as much of the harness as possible. All part of trying to clean up the look a bit.


                    Last edited by The Project; June 16th, 2013, 02:00 AM.


                    Just rolling with the dog pound..

                    Comment


                    • Started working on the front of the engine yesterday. Would have gotten further but forgot the bracket bolts. Also decided to go with a new water pump just to make things easier.

                      3rd gen fuel tank just wasn't cutting it so I went out and picked up a 4th gen tank and fitted with new Racetronix fuel pump and Racetronix wiring harness. Will utilize the 4th gen charcoal canister which will eliminate the factory canister and clean up the engine bay even more. Fuel neck was modified (lengthened) with some Aeroquip fuel hose to help fit the 3rd gen gas opening. Also picked up some new tank straps which I covered with bed liner to prevent rusting.


                      Modified the stock coil holder to accept the MSD coil and keep the original height. Just grind the spot welds, separate the holder, notch the metal bracket to accept the MSD coil, then paint the holder and reassemble.


                      Just rolling with the dog pound..

                      Comment


                      • So this was the plan…install the Comp Cams screw-in studs, CM rods and Magnum roller rockers. We put everything together and then discovered there was a LOT of space between the rods and rockers. At first I thought I had dropped a lifter but then realized that ALL the rockers had space. Checked the Com Cams website to see if I bought the wrong parts. YUP…all parts were correct. Quick call to Comp Cams helpline and discovered that since we went to screw in studs, we need to shave the stud boss down the height of the base of the stud (DOH!!). :arg:

                        Before the problem……they look SO GOOD


                        So…I had two options; A) remove and strip the head, send out to machine shop, reassemble head. B) Buy a Comp Cams stud boss cutter and do it myself. Went with "B". Called Performance Improvements and found out cutter is special order and the sales rep has NEVER sold a cutter EVER!!! Guess not a lot of people are DIY guys or don’t install screw in studs on stock iron heads.

                        Beginning the shave the boss down. Had to remove about 1/8” of material. Used the cordless drill on slow speed and kept measuring. Also had to extend all the stud threads as I didn’t go deep enough originally.


                        Install complete…they look GREAT now. Too bad I’ll never see them again…hopefully. Lots of Clevite assembly lube used and turned each cyclinder by hand to ensure rockers were tightened at top-dead-centre. Lock nuts were hand tightened then given a 3\4 turn and jam nuts tightened as well.


                        Went to install the valve covers and found out they didn't want to fit. Seems the baffle and centre bolt supports don't like the Comp rockers. A bit of grinding and putting the pliers to the baffle and they now fit. Just a great way to end two week ends of work.

                        Decided to go with a new water pump to avoid any headaches. As I was buying a new aluminum rad, it seemed like a no brainer. Water pump painted and front pulleys installed.

                        Starting to come together.


                        New Mishimoto rad….LOTS of BLING!! Will run with 4th gen fans to keep everything COOL.


                        Just rolling with the dog pound..

                        Comment


                        • Sent my fuel rail to Arkansas Polishing to get polished and have the lines Powder coated. The powder color is very close to that of the value covers color so should like killer when installed. Two thumbs up for Arkansas Polishing, this guy does some nice work.

                          Before Pics...some alum pitting


                          Polished and Powder Coated


                          New Bosch 22 lb Injectors and a few other new items waiting to be installed


                          Just rolling with the dog pound..

                          Comment


                          • Tranny rebuild time!!!!

                            Pulled the trans apart on Saturday and gave it the once over. Seems to look pretty clean inside with no excessive signs of wear.


                            All the old parts will be put the "hot tank" for a good clean with all new internals going in next week.

                            Pics of the servos and "The Beast"


                            Just rolling with the dog pound..

                            Comment


                            • Hm trans stuff.

                              *looks in garage* yup mine is still in pieces.
                              Originally posted by Yoshi94
                              Mines about an inch bigger than Kyles. I need to get one of those
                              Originally posted by ryanwarby01
                              Put it this way, if you have a money tree a LT1 is a wood chipper!
                              sigpic

                              Comment


                              • Had a little setback with the trans rebuild.


                                Decided to clean and paint the throttle body. Used a half can of Throttle Body Cleaner and some q-tips to get into the corners. Now its nice and clean.


                                Also, added a new IROC Z plate I picked up from ebay a while back. Overall, pretty happy with the results. Used VHT Chassis paint in satin black.


                                Just rolling with the dog pound..

                                Comment

                                Working...
                                X