 Tweet
Tweet
keep up the great work
-
'91 Camaro Modded, LSx, House of Kolor Intense White, lowered, GS chrome 18" wheels, 14" Brembo CTS-V on all 4 corners, LS rear end, FP suspension components
" When in doubt...throttle out ! "
ENVYsion Entertainment Group -
Got the car over to the shop to start the teardown on the undercarriage.
Kmember, a-arms, heat shields and brackets went off the the sand blaster. They will be coated in POR-15 after they get stripped of 20 plus years of rust and dirt.
Engine accessory brackets and spindles were sent to Fireball for powder coating.
The entire front suspension was disassembled. Sway bars, links and bushings went to the scrap yard as I have all new pieces going in. Same for the fuel and brake lines but I saved the clips just in case.
All the bolts and nuts were kept and cleaned up. They were soaked in CLR for three hours, cleaned with a nail brush, soaked in PO 15 Marine clean (1:1 dilution) for another two hours and then rinsed and dried. It was a lot of cleaning but worth the effort. I will repaint the bolt heads so they look pretty.
Reassembly will begin soon.
Before pics of the parts

K-Member and Arms back from the sand blaster

Bare front end - dis-assembly complete

Discovered a few issues. Will have to address some unforeseen rust before we reassemble.


How she sits now...waiting.


Just rolling with the dog pound..Comment
-
Spent the day painting parts and applying the POR-15 to the a-arms and k-member.
Good idea to wear gloves when using POR-15. Long sleeves are an idea as well. Took a fair bit of work to apply the coating to the inside of the k-member. Dollar store foam paint brushes came in useful. Glad I got three sets.
Decided the best way was to hang twine and metal hangers from the garage beams and let the parts sit just below chest height to be painted. Used a small LED flashlight to ensure no spots were missed. Very easy to miss a spot or put too little in some areas. I gave the parts two coats to ensure they stayed looking good for some time.

Bolts getting painted...finally put the wifes shoe boxes to good use.

Just rolling with the dog pound..Comment
-
looking good keep up the good work.Comment
-
Well its been a busy weekend so far. The seam filler in the wheel wells are crumbling with age. Had to clean the seams so we could apply some primer and reseal. I hit the seams and all the rust on the front of the car with the sandblaster. This stuff gets EVERYWHERE.
Me with the sandblaster...it get HHHOT under the mask. Wonder if I can get a Gatorade sponsorship

Seams primered

Other sports getting blasted and cleaned

While blasting the pass side I noticed a fair bit of rust in the wheel well. Decided to pull the fender to see what the deal was. Unfortunately the bottom of the fender was rusted beyond repair so I'll have to replace. Also noticed a few holes that will have to be cut our and some new metal weld up. Can actually feel the carpet in one hole.

Since the fender was off, I decided to pull the front end and have a look.
Might as well give a clean and new coat of paint, clean all the fasteners and tighten everything up. Maybe I should start with the reassembly and not go in reverse.
Did notice that the car was hit on the drivers side in a previous life. Actually found a door pin in the bottom of the fender. Also noticed that some bolts and clips are missing from the front end that that the wheels have been moved back (no alignment after the accident) which explains the rubbing on the inner fenders. LOTS of work to do.....
Here is how I left her.


Back at it tomorrow.....lots of little jobs to get done and reassemble. The car is worse than I thought especially being in the garage for the past 5+ years. Still...better to get all these little things looked at now as the car is partially disassembled than wait 'till alter and have to take the car apart again. Not sure when it will get done. I honest ly thought I would be driving it by now. Now maybe it will be done by Christmas.
Just rolling with the dog pound..Comment
-
I love the pics. Nice work! How well did the POR-15 stick to the clean metal? I have heard reviews of people have a b**** of a time getting it to stick or it chipping off from freshly blasted metal. But the parts look great!
'69 Camaro LS1/T56 project - Sold
'97 Trans Am in pieces - LT1/T56- Traded for DD
Comment
-
So far it worked fine. I called POR and they said no need to prep sandblasted metal. I also handled the parts with gloves so no dirt or oil from my hands.Originally posted by 69LS1 View Post
Just rolling with the dog pound..Comment
-
Looking good, and thats a great idea with shoe box, i used to used a rock tumbler with play sand for cleaning old bolts and small hardware worked good.'91 Camaro Modded, LSx, House of Kolor Intense White, lowered, GS chrome 18" wheels, 14" Brembo CTS-V on all 4 corners, LS rear end, FP suspension components
" When in doubt...throttle out ! "
ENVYsion Entertainment GroupComment
-
Sam and I never really had any issues getting it to stick to anything. We didn't really have any bare metal though when we did it on his Monte, so we used POR's MetalReady (after their Marine Clean degreaser) to prep all the surfaces. Did the entire floorpan (including trunk floor) inside, the underside of the trunk floor, the underside of the floor above the rear end, the rear end, and the entire frame. Never had an issue with it staying on, tough stuff.Originally posted by The Project View PostGone but not forgotten: 1986 Chevrolet Camaro IROC-Z
"You shall ride eternal. Shiny and chrome."Comment
-
Here's a few pics of the collision damage to the driver side. Not as bad as I thought but had to pull the fender to see. Also noticed some small rust spots that got blasted clean.

How I left it on Saturday. I blasted down both sides of the frame rails and underneath.

So far we have rust 200 lbs (4 bags) of recycled glass for blasting. One more bag should do the trick as I want to blast the rear before applying the POR15. I have to reblast the rad cradle clean as I notices some more...you guessed it rust. I also noticed pin hole rust coming through where the fender meets the battery tray.
Some pics of more pin hole rust on the pass dies.

I'm glad I covered the front windshield as the glass gets EVERYWHERE. My front door squeaks so bad, I think its haunted.
I'm also painting all the brackets, heat shields (including the gas tank ones) and all accessories. As the car is completely stripped, it cheaper to address all these things now than wait a few years to do a lot of this over again.
Heat shields blasted and sprayed in a Zinc primer and then some high temp header paint.


Decided to disassemble, clean and repaint the entire headlight assy. I noticed a "Made in Canada" stamp on the header piece. Pretty cool.

Headlight buckets blasted and painted with black chassis paint

Same black chassis paint used on the brackets and housing.

Headlight housing painted black as well. Looks killer over the stock grey.

Also decided to paint the AIR pump as I was bored and had the materials. Came out pretty goods. Sanded it down with some 180 grit, Zinc primer and silver header paint.

As I have to paint the replacement fender, I decided to ditch the factory hood and will prep fit and install the Harwood Show series Cowl Hood in my basement. Only cost and extra gallon of paint.
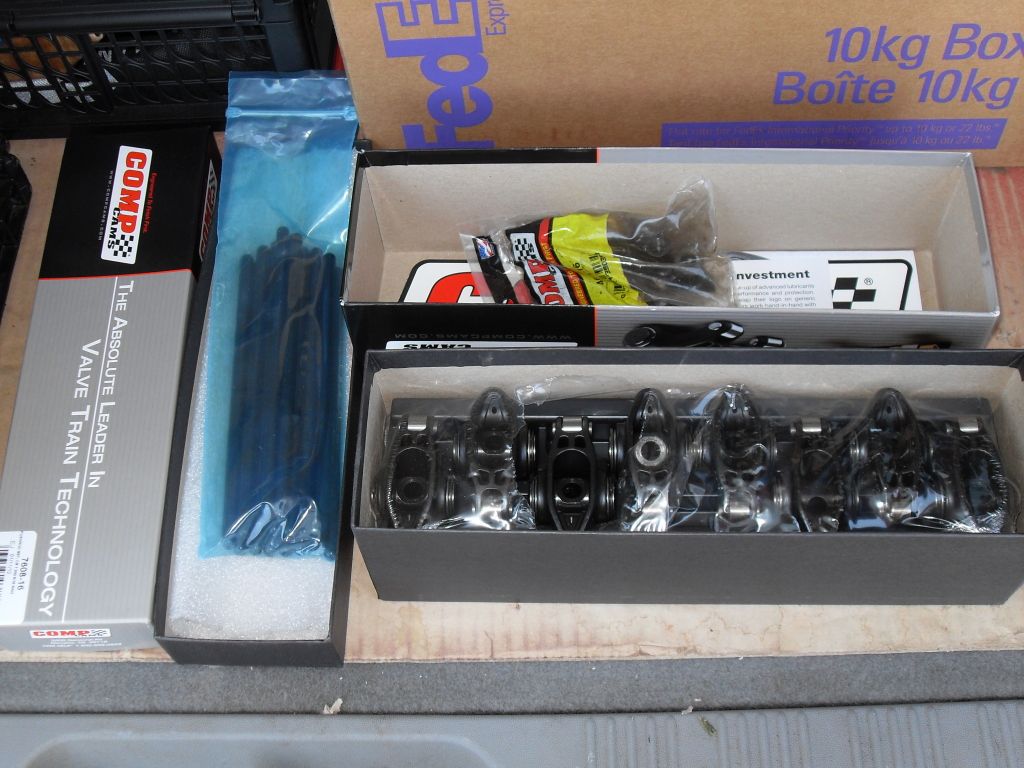
Should be starting the reassembly soon. I picked up a few goodies for the engine to help the ZZ4 cam. Comp Cams Chrome Moly Rods and Magnum full roller Roller Rockers.
Just rolling with the dog pound..Comment
-
Awesome project man.Comment
-
Very cool - I wish I would have sandblasted before painting my underbody!- Brian Meissen
Owner, MiFBody.com
Administrator, LTxTech.com

1994 Camaro LT1 Transplant - 357ci LT1, cammed, stalled, and driven.
2022 Camaro LT1 - "Cherry Bomb 2"Michigan FBody Meet & Greet Car Show 2022
June 4th, 2022 - 9am to 3pm!!!
The HUB Stadium, Auburn Hills, MIComment
-
Thanks guys...appreciate the kind words.
Finished blasting and applied primer to all the panels and underside. Started cutting out the rust spots and will weld in replacement pieces next week. Still need a final sanding before we repaint the engine bay and then begin to reassemble.
Rust cut out


Engine bay primered.


Just rolling with the dog pound..Comment
-
Rust issues are finally coming to an end.
Picked up some flat sheet metal and started test fitting pieces and cutting into shape.
Next step was to tack weld in place and finished off with the mig and a grinder. The pieces look pretty good.
Started to apply the seam sealer with a tube gun (white). After it cured, we went back over with paint on seam sealer (black) to ensure all the air holes were covered.
All the rust holes have been cut out, patched and sealed.
Next weekend, we start prepping the engine bay for paint....then its reassembly time. Hopefully have the car running by the end of the month.


Just rolling with the dog pound..Comment
-
Prepping to get the engine bay painted and started thinking about how and where to mount the wiper fluid and rad overflow bottles. I bought stainless steel bottles to save space and have a cleaner look. Also wanted to move the AC accumulator (dryer) as the pass side seems to look "busy".
Here is what I came up with...Steel box fitted inside the battery tray, holes cut for the bottles and brackets made to mount everything to. Since the bottles are stainless steel, I'll put some tubing around the opening.
I also cut and welded in some angle iron for brackets and drilled a hole in the mount to secure to one of the threaded holes in the battery tray. Didn't want to weld the box in place.
Lastly, sanded the boxes with some 180 grit and hit the new boxes with some primer.
Pretty happy with the results......
Box cut and ends folded ready for welding

Test fit...Wiper fluid lines and pump will be hidden.


AC dryer test fit


Plasma cutter made quick work of the hold cutting.
Stock holder for the AC dryer will be reused but removed the stock mounting bracket and fabbed up something easier.
Now working on re-routing the AC lines and A.I.R. pump while still meeting emissions.
Just rolling with the dog pound..Comment


Comment