
 Tweet
Tweet
Kyle, maybe you can explain this. I know when you put a new diff in, that you have to paint the gears and check for the correct shims. How the hell do you do that?
-
2011 Mustang GT
20" Satin Black AMRs with 305/35 & 275/35 MT Street Radials, Saleen Grille, CS Lower Valance, Roush Axleback, GT500 Spoiler, resonator delete
In Progress: Brembo 6-piston brake upgrade
-
Well if you are replacing the pinion & ring gear there is quit a bit that has to be done to get the correct mesh.Originally posted by my95z28 View Post
1. You have to set the correct depth for the pinion and that is given to you on a new set.
The depth is from the cap line to the top of the pinion.
A depth mic is the best tool for this.
To adjust that you have to remove the bearing from the pinion and place shims under it to get the right messurement and you will need a press or a bearing seperator to do that.
Always get a shim set when doing gears!!!
2. A good starting point is the shims that were in you rear before.
Take and set your shims in the rear, attach your bearings to the carrier
and drop it in place.
If it's sloppy add shims to push the ring gear away from the pinion, this should fit tight.
Put your caps on and tighten the bolts down to the propper setting.
3. You will need a dial indicator for this step.
Take the indicator and set it up on a tooth.
rotate the carrier all the way forward and zero out the indicator and then roll it backwards and see what your reading is.
A standard Chevy rear should have no more than .010 (Ten Thousands) play front to back and no less than .008 (Eight Thousands).
This clearance is for the rear end lube that is about .004 (Four Thousands) thick.
Too tight and she'll burn up, too loose and you will blow up.
So depending on what you find with this step will determin where you need to add & remove the shims.
4. Once you have your carrier set you can paint up a few teeth (5-10) with the compound that is provided.
You can also get it at Auto Zone if you don't have any.
This will help you see the depth of the teeth from the pinion to the ring gear.
You want to see a half moon shape (mesh) on your ring gear.
If you don't see this then your pinion could be too high or too low.
Then you will have to adjust the pinion again and do it all over again.
If you are just replacing the ring gear then you only have to do steps 3 & 4.
Your pinion should be o.k. but if you blew up your rear you should be doing everything from bearings to gears.
This isn't job I would do with the rear in the car unless you have a lift!!
Any questions?

VicePresident of West Michigan Firebird Club
A.K.A The Maverick
http://www.cardomain.com/ride/660128/1
93 TA Currently Under Construction AGAIN
2007 2500 Chevy Silverado Crew Cab w/ 6.0L & 3.73'sComment
-
Here is an idea of the separator you would need for the Pinion bearing:

And here is a style of gauge that you would need to set the pinion depth:
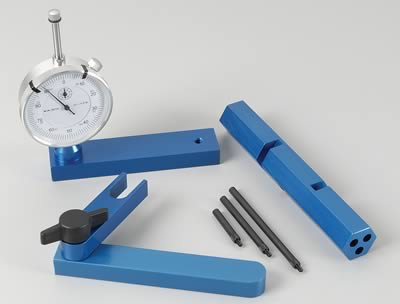
I got all these pics from Summit's site.
CS3 might even be able to get some of this stuff if you would need it.
Here are the links to these tools from Summit:
Pinion depth tool:
http://store.summitracing.com/partde...5&autoview=sku
Bearing separator:
http://store.summitracing.com/partde...5&autoview=sku
VicePresident of West Michigan Firebird Club
A.K.A The Maverick
http://www.cardomain.com/ride/660128/1
93 TA Currently Under Construction AGAIN
2007 2500 Chevy Silverado Crew Cab w/ 6.0L & 3.73'sComment
-
Damn, I wish that there was a writeup with pictures on how to do this. I have a completely new Torsen diff, bearings, pinion seal and gears. I don't want to throw a ring gear in there with the pre-existing pinion since they are run together so they don't whine. Thank you very much!!
2011 Mustang GT
20" Satin Black AMRs with 305/35 & 275/35 MT Street Radials, Saleen Grille, CS Lower Valance, Roush Axleback, GT500 Spoiler, resonator delete
In Progress: Brembo 6-piston brake upgrade
Comment
-
may want someone with experience help you with it if its your first timeOriginally posted by my95z28 View Post2011 Ford Raptor SuperCrew
SVT Beadlock Wheels
Roush Intake, Corsa Exhaust
20" and 40" Light Bars
2000 Camaro Z28
Stripped Down Drag Car Build
Project 1999 Camaro Z28
2009 G8 GT Stryker Blue Metallic-SHEGONE
Crate LS3, LS9 Cam, LSA Supercharger, Metco Solid Isolator
RotoFab Intake, HSRK, Camaro Trans Pan
ZL1 HX, ZL1 Fuel Pump, CTS-V Lid, LSA Injectors
Pat G - 93 Octane Tune
Kooks 1-7/8" Longtubes, High Flow Cats, X Pipe, Solo AxleBacks
CTS-V Calipers, Brembo Pads
H&R Lowering Springs, Whiteline Bushings, FE3 Struts/Shocks, Camaro 20" Wheels
HIDs, LED Conversion, Atari Gauges, Tint, Roof Carbon Fiber Wrapped, Innovative Wideband
2.55 Lingenfelter Pulley and Injectors waiting to go on!
sigpicComment
-
Yah, I'm thinking that I'm either gonna hold off for an awesome write-up or pay someone to do it when it warms up.
2011 Mustang GT
20" Satin Black AMRs with 305/35 & 275/35 MT Street Radials, Saleen Grille, CS Lower Valance, Roush Axleback, GT500 Spoiler, resonator delete
In Progress: Brembo 6-piston brake upgrade
Comment
-
i was going to do a gear swap myself but i have a lot of confidence that ill **** it up lol...so ill probably be taking it somewhere2011 Ford Raptor SuperCrew
SVT Beadlock Wheels
Roush Intake, Corsa Exhaust
20" and 40" Light Bars
2000 Camaro Z28
Stripped Down Drag Car Build
Project 1999 Camaro Z28
2009 G8 GT Stryker Blue Metallic-SHEGONE
Crate LS3, LS9 Cam, LSA Supercharger, Metco Solid Isolator
RotoFab Intake, HSRK, Camaro Trans Pan
ZL1 HX, ZL1 Fuel Pump, CTS-V Lid, LSA Injectors
Pat G - 93 Octane Tune
Kooks 1-7/8" Longtubes, High Flow Cats, X Pipe, Solo AxleBacks
CTS-V Calipers, Brembo Pads
H&R Lowering Springs, Whiteline Bushings, FE3 Struts/Shocks, Camaro 20" Wheels
HIDs, LED Conversion, Atari Gauges, Tint, Roof Carbon Fiber Wrapped, Innovative Wideband
2.55 Lingenfelter Pulley and Injectors waiting to go on!
sigpicComment
-
The 1st gear swap I did was on my 98 GMC with an open carrier.
Took me all of 4hrs to do my 1st time.
I do have plans to rebuild a rear I have here in my garage in the spring some time.
I'll document it
VicePresident of West Michigan Firebird Club
A.K.A The Maverick
http://www.cardomain.com/ride/660128/1
93 TA Currently Under Construction AGAIN
2007 2500 Chevy Silverado Crew Cab w/ 6.0L & 3.73'sComment
-
 That will help A TON! I am positive that I can do it with pics.
2011 Mustang GT
20" Satin Black AMRs with 305/35 & 275/35 MT Street Radials, Saleen Grille, CS Lower Valance, Roush Axleback, GT500 Spoiler, resonator delete
In Progress: Brembo 6-piston brake upgrade
Comment
-
Oh yeah, and PB Blaster is amazing here...
When I got my fuel pump swapped, the guy sprayed everything with PB Blaster the night before and let it soak in, then proceeded with disassembly starting at 5AM...Gone but not forgotten: 1986 Chevrolet Camaro IROC-Z
"You shall ride eternal. Shiny and chrome."Comment
-
great write up thanks alot i blew my rear end a month ago and will be replacing it this week and this will help alot thanksComment
-
If you have any questions PM me.
VicePresident of West Michigan Firebird Club
A.K.A The Maverick
http://www.cardomain.com/ride/660128/1
93 TA Currently Under Construction AGAIN
2007 2500 Chevy Silverado Crew Cab w/ 6.0L & 3.73'sComment
-
will do thanks alotComment

Comment