 Tweet
Tweet
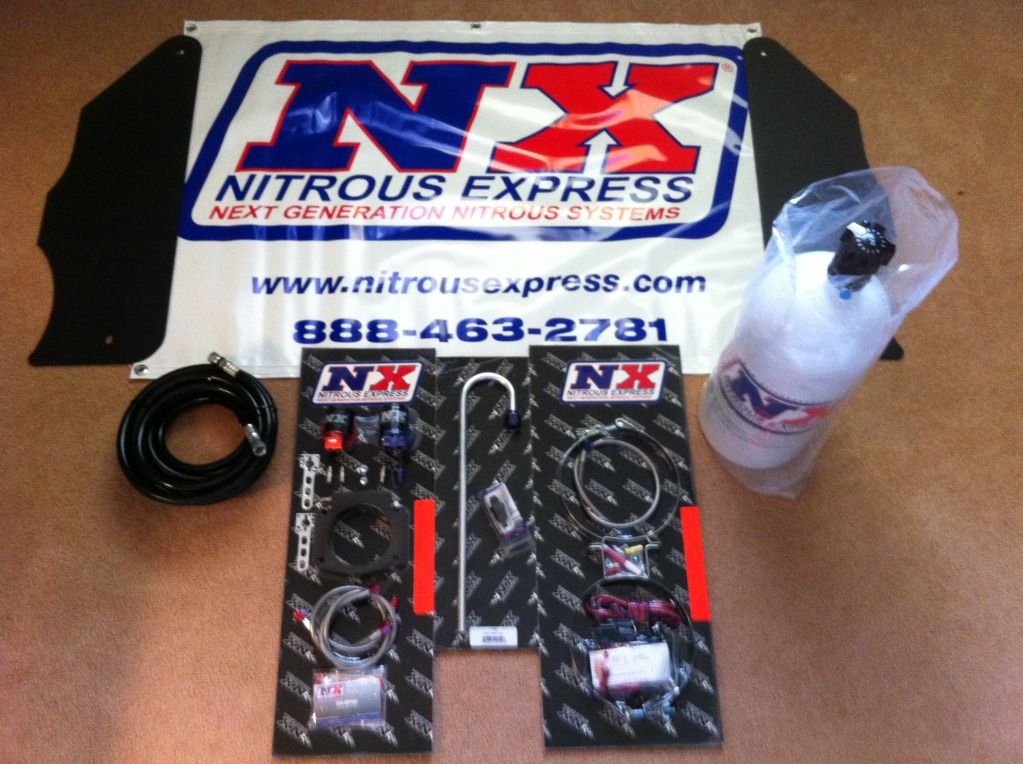
Here is a build thread showcasing the Nitrous Express 90mm Plate Kit system.
Parts utilized:
Nitrous Express 90mm Plate kit
Nitrous Express Electronic TPS WOT switch
PCMforLess Bottle Bracket

*Disconnect negative battery cable.
Mounting the bottle.
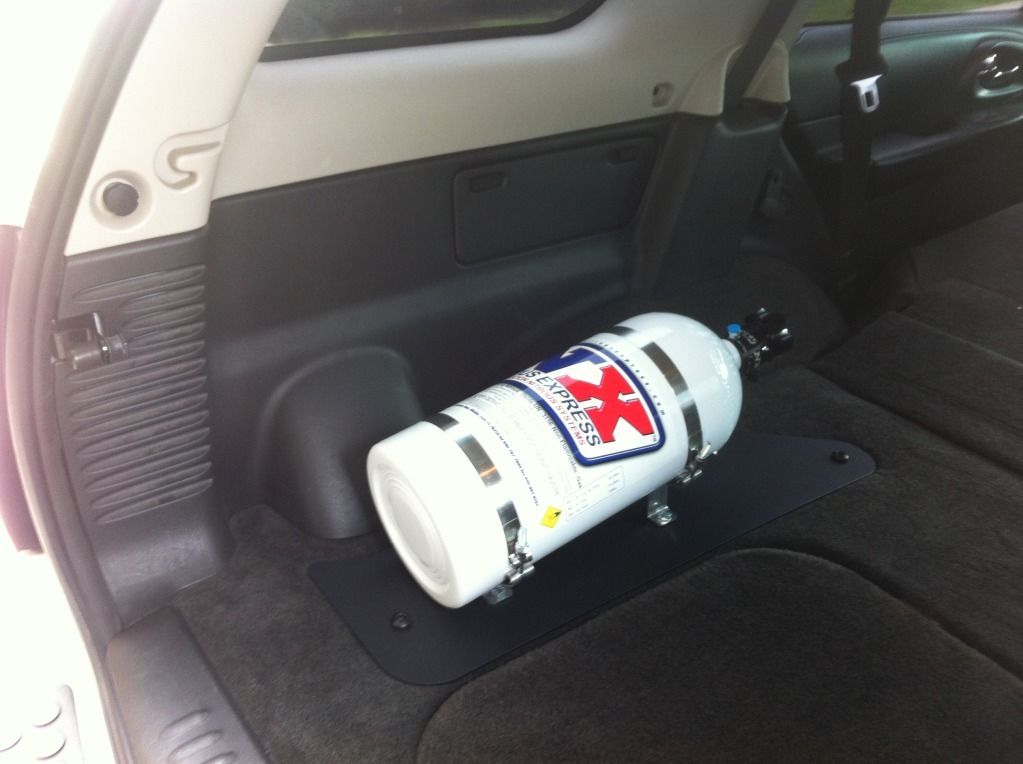
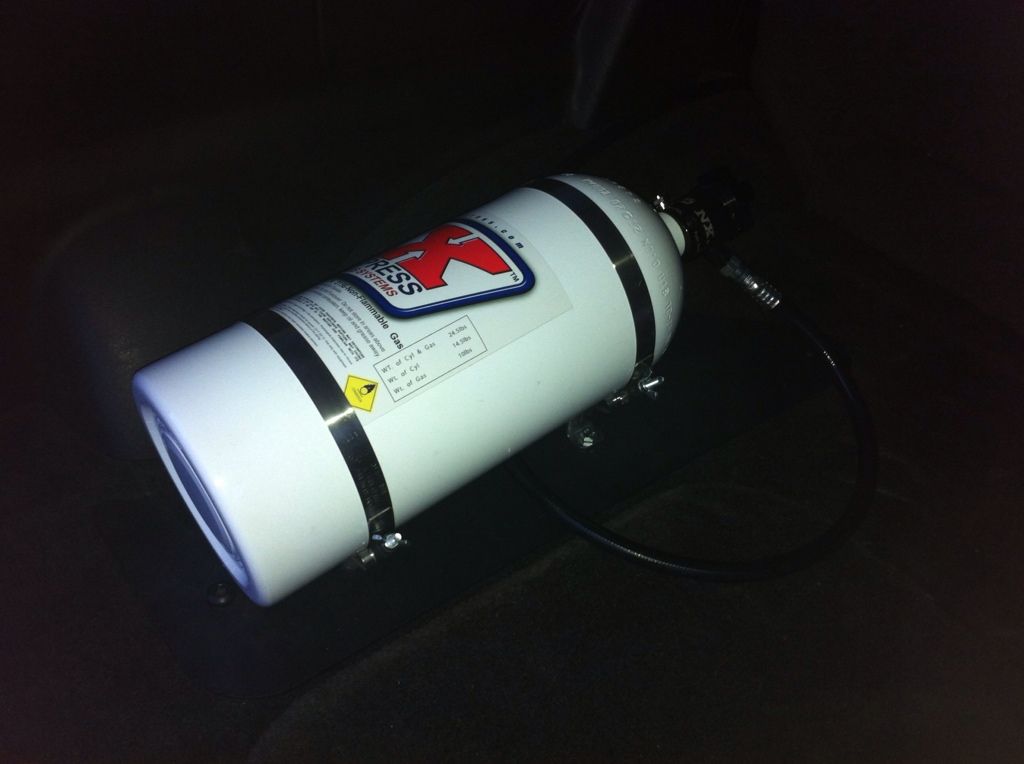
-Attach the bottle brackets to the bottle. Set the bottle with the bottle brackets attached onto the PCMforLess mounting plate and mark where you want the bottle to sit on the plate. Then drill the plate, and run 2 bolts per bottle bracket through the bracket and plate and secure with a nut on the other side. I went to home depot and picked up the 4 nuts and bolts for this. I bought bolts that were short enough to barely stick through both the bottle brackets and plates to get a nut on so it wouldn't protrude far into my carpet.
-Using the PCMforLess bracket, remove the 2 torx screws holding down the 2 far left hold down brackets in the rear. Set the brackets aside. Place the plate into position and secure reusing the factory torx bolts.
Running the Nitrous Feed Line.
-The kit supplied a slightly longer than needed line, so I did a loop around the bottle and then back up towards the front of the car. I started hiding the line in the rear passenger side kick panel. I then ran it under that kick panel, under the front drivers side kick panel, and up through the grommet in the drivers footwell into the engine bay.


Mounting the Solenoids.
-Using the supplied brackets and bolts, I attached the brackets to the solenoids and bent the brackets at an angle as seen in the pictures. I then attached the Nitrous solenoid on the rear coil pack of the drivers side. I did the same for he fuel solenoid, however on a passenger side coil pack.
*Tip: After getting the solenoid where you want them, remove them and attach your nitrous and fuel lines accordingly to the solenoids with the supplied red thread sealer from NX and tighten down snug. Then re-mount the solenoids.


Running the Lines.
-Then I ran the fuel feed lines from the Schrader valve on the passenger side fuel rail. When you are ready to spray, you will want to remove the Schrader valve from inside this fitting on the fuel rail to get the fuel flow to the solenoid from the rail.
-I ran the fuel line from the solenoid to the plate down with the engine harness, under the intake and throttle body, and up on the drivers side into the plate.
-The Nitrous feed is already connected from the line ran from the bottle.
-I ran the nitrous to plate line down the drivers side engine harness and up next to the fuel supply line to the plate.


Mounting the Plate.
-Remove the CAI from the car.
-Using a 10mm socket, remove the 2 nuts and 2 bolts on the throttle body.
-Then remove the 2 throttle body studs. A very small socket can be used on the end of the stud to remove them. Set the TB aside.
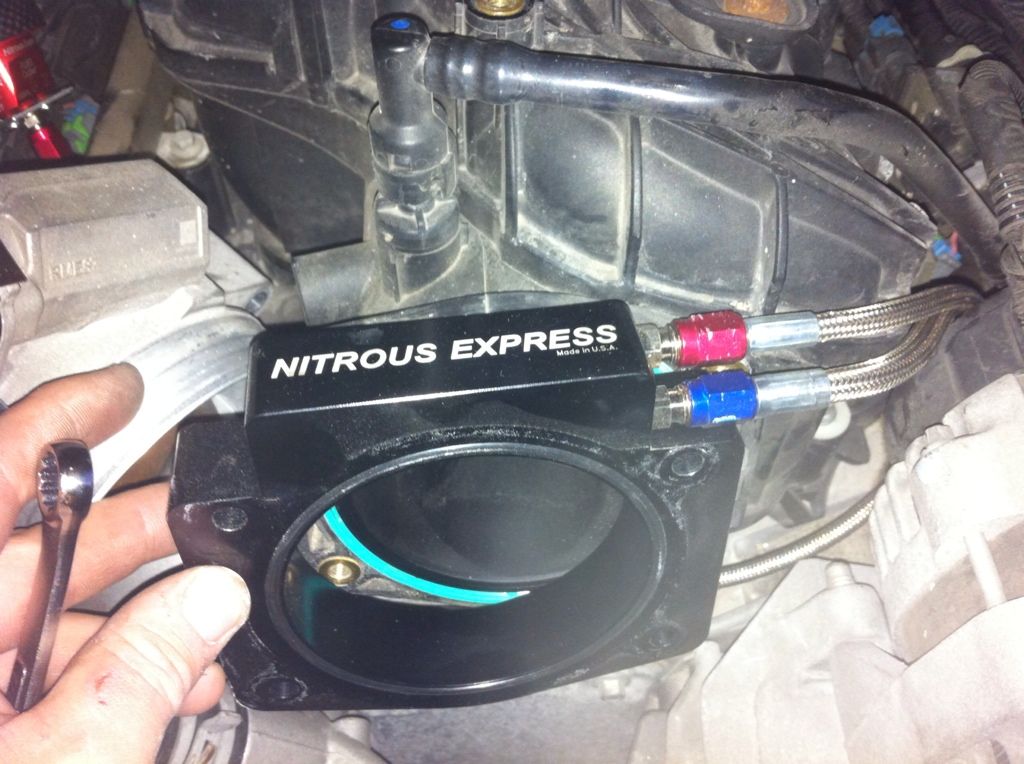
-Attached the fuel and nitrous supply lines to the NX plate. Be sure to insert your jets here accordingly to how much HP shot you wish to spray.

-I went to Home Depot and picked up 4 new bolts ~1" longer than factory so we can mount the TB back on with the NX plate spacing it out.

-Then mount the NX plate and the TB back onto the intake and bolt down using your new, longer bolts.

Wiring the power and ground to the Nitrous and Fuel solenoids.
-Run the 2 wires from the fuel solenoid together behind the intake manifold. These will be roughly 2 feet in length to reach a little past the Nitrous solenoid where you can T them together. The 2 wires from the Nitrous solenoid were shortened to roughly 5" long. 1 wire from the Fuel solenoid was T'd in with 1 wire from the Nitrous solenoid for both wires creating 1 power and 1 ground line to power both solenoids. Run each, the power and the ground wire, behind the fuse box where the power wire will now connect to the Green wire from the Relay. Keep running the ground wire along side the power/green wire down the far side of the fuse box to the battery area. You can connect the ground using a ring terminal to the factory ground location on the drivers side inner fender between the fuse box and battery location.


Wiring the TPS WOT switch.
-You can shorten and connect to each other the pink wire from the TPS switch to the red wire from the relay.

-You can then ground the black wire from the TPS switch to the same ground location on the inner drivers side fender you used to ground the solenoids.
-You can then run the Red wire from the TPS switch into a fuse, then from the fuse into the cabin of the TBSS. Inside the cabin, you will connect this wire to the Arming switch. You will then Ground the 2nd post of the arming switch.


-The white wire you will want to extend to roughly 7' long. You will want to route this up the driver side of the car and behind the engine, the up the passenger side fuel rail area to the TPS wiring at the Throttle Body. You will see a purple and a green wire. One is rising TPS, the other is falling. You will want to connect to one or the other depending on your TPS unit, in this case we used the rising wire.

-The last post to the arming switch you will run back up into the engine bay (alongside red wire from the previous picture) in to the fuse box where you can connect to the unused 12v switched power. I used an add a connection fuse set-up, used a 10amp fuse, and connected into the unused fuse location under fuse #53 on my 2007.

Optional: If you are running a Window Switch, you can connect the 12v switched power to this same location.

Wiring the Relay:
-You will shorten and using a ring terminal connector, attach the Black wire to the power post on the fuse box.

-You will ground the white wire, again you can use the same previous location on the inner drivers side fender.
-The Red wire is already connected to the Pink wire of the TPS switch.
-The Green wire is already connected to the power wire from the 2 combined solenoids.
Secure your TPS switch and Relay.
-I mounted them to the backside of the battery cover.

To clean up the look, use some nice, small, black wire look and electrical tape to hide your wires.


Reinstall your engine cover for the clean, hidden look!


You are now ready to play! Test your system by reconnecting the negative battery cable, keying on the truck, and flipping your arming switch on. Follow instructions from the TPS to program the module. With the car off, the nitrous bottle closed or empty, go WOT and listen for your relay to kick on when your pedal goes WOT. Also check to make sure it is firing the solenoids, you can feel and hear a click from them.
*If you are still running a mechanical cooling fan, be sure to check your fan clearance to your CAI elbow and the plate have spaced it out.

*For absolute BEST pricing on a brand new kit, accessories, or other kits, please send me a PM for the best possible pricing!*
Jon
Huron Speed
Parts utilized:
Nitrous Express 90mm Plate kit
Nitrous Express Electronic TPS WOT switch
PCMforLess Bottle Bracket
*Disconnect negative battery cable.
Mounting the bottle.
-Attach the bottle brackets to the bottle. Set the bottle with the bottle brackets attached onto the PCMforLess mounting plate and mark where you want the bottle to sit on the plate. Then drill the plate, and run 2 bolts per bottle bracket through the bracket and plate and secure with a nut on the other side. I went to home depot and picked up the 4 nuts and bolts for this. I bought bolts that were short enough to barely stick through both the bottle brackets and plates to get a nut on so it wouldn't protrude far into my carpet.
-Using the PCMforLess bracket, remove the 2 torx screws holding down the 2 far left hold down brackets in the rear. Set the brackets aside. Place the plate into position and secure reusing the factory torx bolts.
Running the Nitrous Feed Line.
-The kit supplied a slightly longer than needed line, so I did a loop around the bottle and then back up towards the front of the car. I started hiding the line in the rear passenger side kick panel. I then ran it under that kick panel, under the front drivers side kick panel, and up through the grommet in the drivers footwell into the engine bay.
Mounting the Solenoids.
-Using the supplied brackets and bolts, I attached the brackets to the solenoids and bent the brackets at an angle as seen in the pictures. I then attached the Nitrous solenoid on the rear coil pack of the drivers side. I did the same for he fuel solenoid, however on a passenger side coil pack.
*Tip: After getting the solenoid where you want them, remove them and attach your nitrous and fuel lines accordingly to the solenoids with the supplied red thread sealer from NX and tighten down snug. Then re-mount the solenoids.
Running the Lines.
-Then I ran the fuel feed lines from the Schrader valve on the passenger side fuel rail. When you are ready to spray, you will want to remove the Schrader valve from inside this fitting on the fuel rail to get the fuel flow to the solenoid from the rail.
-I ran the fuel line from the solenoid to the plate down with the engine harness, under the intake and throttle body, and up on the drivers side into the plate.
-The Nitrous feed is already connected from the line ran from the bottle.
-I ran the nitrous to plate line down the drivers side engine harness and up next to the fuel supply line to the plate.
Mounting the Plate.
-Remove the CAI from the car.
-Using a 10mm socket, remove the 2 nuts and 2 bolts on the throttle body.
-Then remove the 2 throttle body studs. A very small socket can be used on the end of the stud to remove them. Set the TB aside.
-Attached the fuel and nitrous supply lines to the NX plate. Be sure to insert your jets here accordingly to how much HP shot you wish to spray.
-I went to Home Depot and picked up 4 new bolts ~1" longer than factory so we can mount the TB back on with the NX plate spacing it out.
-Then mount the NX plate and the TB back onto the intake and bolt down using your new, longer bolts.
Wiring the power and ground to the Nitrous and Fuel solenoids.
-Run the 2 wires from the fuel solenoid together behind the intake manifold. These will be roughly 2 feet in length to reach a little past the Nitrous solenoid where you can T them together. The 2 wires from the Nitrous solenoid were shortened to roughly 5" long. 1 wire from the Fuel solenoid was T'd in with 1 wire from the Nitrous solenoid for both wires creating 1 power and 1 ground line to power both solenoids. Run each, the power and the ground wire, behind the fuse box where the power wire will now connect to the Green wire from the Relay. Keep running the ground wire along side the power/green wire down the far side of the fuse box to the battery area. You can connect the ground using a ring terminal to the factory ground location on the drivers side inner fender between the fuse box and battery location.
Wiring the TPS WOT switch.
-You can shorten and connect to each other the pink wire from the TPS switch to the red wire from the relay.
-You can then ground the black wire from the TPS switch to the same ground location on the inner drivers side fender you used to ground the solenoids.
-You can then run the Red wire from the TPS switch into a fuse, then from the fuse into the cabin of the TBSS. Inside the cabin, you will connect this wire to the Arming switch. You will then Ground the 2nd post of the arming switch.
-The white wire you will want to extend to roughly 7' long. You will want to route this up the driver side of the car and behind the engine, the up the passenger side fuel rail area to the TPS wiring at the Throttle Body. You will see a purple and a green wire. One is rising TPS, the other is falling. You will want to connect to one or the other depending on your TPS unit, in this case we used the rising wire.
-The last post to the arming switch you will run back up into the engine bay (alongside red wire from the previous picture) in to the fuse box where you can connect to the unused 12v switched power. I used an add a connection fuse set-up, used a 10amp fuse, and connected into the unused fuse location under fuse #53 on my 2007.
Optional: If you are running a Window Switch, you can connect the 12v switched power to this same location.
Wiring the Relay:
-You will shorten and using a ring terminal connector, attach the Black wire to the power post on the fuse box.
-You will ground the white wire, again you can use the same previous location on the inner drivers side fender.
-The Red wire is already connected to the Pink wire of the TPS switch.
-The Green wire is already connected to the power wire from the 2 combined solenoids.
Secure your TPS switch and Relay.
-I mounted them to the backside of the battery cover.
To clean up the look, use some nice, small, black wire look and electrical tape to hide your wires.
Reinstall your engine cover for the clean, hidden look!
You are now ready to play! Test your system by reconnecting the negative battery cable, keying on the truck, and flipping your arming switch on. Follow instructions from the TPS to program the module. With the car off, the nitrous bottle closed or empty, go WOT and listen for your relay to kick on when your pedal goes WOT. Also check to make sure it is firing the solenoids, you can feel and hear a click from them.
*If you are still running a mechanical cooling fan, be sure to check your fan clearance to your CAI elbow and the plate have spaced it out.
*For absolute BEST pricing on a brand new kit, accessories, or other kits, please send me a PM for the best possible pricing!*
Jon
Huron Speed

Comment