-
There's an "in-process" 3/4 front shot of the Camaro on Page 1, Post #29 of this thread, about 1/2 of the way down. Bright Rally Red Camaro coupe, no T-tops, crank windows, V6 & M5 originally. Very clean car to start with. -
Great thread... A+! Do you have any pics of the car that will be receiving the motor?Leave a comment:
-
looks awesome, keep up the good work, your taking your set backs very well..
Leave a comment:
-
Update:
Turns out, the valve spring tool I bought is the proper one, but you need to exercise EXTREME caution when using it. It doesn't self-center on the valve when bolting it down. You have to move the spring and tool back and forth with your fingers and with a screw driver to get it to go down straight.
With that, my awesome wife went to Home Depot and picked me up some emery cloth while I chopped down the jungle that was growing in the backyard. After I finished that up, I successfully repaired the valve stem!!! After smoothing the gouges down, I mic'd up the area to see how much I took off. Thankfully, I took off .002" at the most when compared to another valve in the same area. I doubt this will make a difference with the stem seal, so I'm calling it fixed!!
After figuring out all the tricks of using the LS1Tech Tim valve spring tool, I blew through all the other valves:

LS7 lifters and LS2 lifter buckets installed:

Heads installed (valve covers temporarily installed):

It seems like every couple of steps forward I've been taking with this project, I manage to get knocked back a step as well. This happened again today. After successfully checking the preload of my valvetrain with a couple stock 7.400" pushrods, I installed the Texas Speed and Performance 7.400" hardened pushrods and began installing the brand new rockers that came with the heads. After getting through half of the rockers on the passenger side head, rocker #14 would NOT rock back and forth. The needle bearings on my brand new rocker are seized!! What the hell?
I guess it's not too big of a deal. The stock LS1/6 rockers have really crappy needle bearings in them. There's a great deal of people that end up destroying a rocker which effectively attempts to grenade the rest of the engine by spilling all of the tiny little needle bearings into it. Not cool. Regardless, I ordered this:
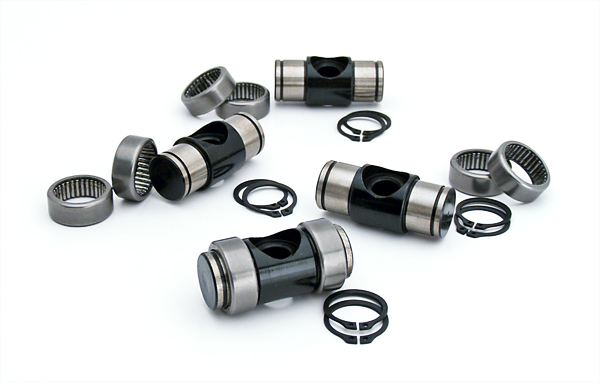
Comp Cams makes an upgrade kit for the trunion in the rocker. The kit comes with better needle bearings and sided races so that the needles won't come out of them in the event of a failure. This will solve the problem of the seized rocker as well as provide me with the best bearings out there for the stock rockers.
I'd go with roller rockers, but there's no way in hell I'm spending $375-$500 on a decent set. No thanks.
So yeah, I'm at a stand still with the engine yet again until at least Tuesday, but I guess it could be much worse. In the meantime, I will finally be putting up the fuel tank, doing more brake line plumbing, and getting the rear suspension somewhat put together.
One last thing. Check out the coolant passages on the back of the heads:

I looks like they're blocked off from the factory. I take it I don't need the plugs from my LS1 (you can see one in the picture)?Leave a comment:
-
Thanks for all the great comments guys. I really do appreciate it.
Yeah, one of the reasons why I'm going apeshit with pictures is because it's really hard to find someone who's gone through the whole process.
Does anyone know what the stem minimum diameter is for the stock valve stem seals? My thoughts at this point are to take some emery cloth and sand down the gouges. I will then use a micrometer to check the diameter. If it's within the limits, is should still be good and I can continue on.Leave a comment:
-
very cool, your progress is very good, just remember two things..
1. Do not sweat the small stuff, you can get past it
2. see rule number one. remember this stuff, it helps you get through the dayLeave a comment:
-
Nice pic's and I also enjoy these threads. Keep up the good work.Leave a comment:
-
 Guest repliedSorry to hear that Andy. I know I have had my share of "learning pains" with Scarlett. Just have to scream a little, figure out a fix, and do it. Break a leg buddy. Can't wait to see the car at the West side M&G.
Leave a comment:
-
Thanks for taking all of the pictures and putting them in here. Its nice to see a step by step thread.
Good luck, it will be worth it.Leave a comment:
-
That definitely sux big-time. Sounds like you have a good plan to get through this detour. Hang in there!Leave a comment:
-
Devastating update:
Today started off great. I went to Livernois Motorsports again and picked up the proper ARP head studs along with a pretty sweet ARP crankshaft pulley bolt. The cool thing about the pulley bolt is that it's not torque to yield like the stock crank bolt. The stock crank bolt needs to be torqued to 37ft/lbs and then turned 140 degrees. Without a degree indicator, it's damn near impossible to get exactly 140 degrees. The ARP bolt needs to be torqued to 247ft/lbs and that's it. Simple enough with a standard 1/2" torque wrench.
After the trip to Livernois, I ended up hitting Frentz and Sons in Royal Oak for some M16x2.00 threaded rod. Here's my massive pulley install tool:

I didn't even bother cutting down the threaded rod, so it's like three feet long. lol. After yanking on the bolt for what seemed like an eternity, it finally stopped moving. Glancing at the position of the pulley, things did not seem right (still too far off the crank) so I bolted up the alternator and checked to see if the two pulleys lined up:

Looking good, so I stopped worrying. I was finally able to put on the ARP pulley bolt:

Once finished up, I studded the block:

So far so good. Getting excited, I busted out the new LS7 lifters and started soaking them in oil:

I figured the amount of time it would take me to change out the valve springs on the heads would allot enough time for the lifters to soak up some oil. Earlier today, I received my valve spring tool from some guy named Tim in Livonia who sells the tool on LS1tech.com for $30 (compared to the $100+ everyone else wants for more complex tools that do the same thing). I followed the directions to the T that were included with the tool. After wrenching down the tool for the first time, I immediately knew something was wrong. I couldn't move the valve keeper closest to me and the retainer was pushing on the valve stem instead of going straight down...........mother ****. Here's the damage:

As you can see, the keeper was pushed into the stem, effectively gouging the metal and destroying it. After throwing a small fit and gathering my thoughts, it immediately dawned on me what happened. Tim definitely sent me the valve spring tool used on the LT1 instead of LSx heads (he offers both designs)!!! Placing the tool over the next valve shows the problem in plain sight:

The pivot point for the tool's stud is too close to the valve end of the tool. I'm kicking myself for not seeing this as I was wrenching down the tool.
So now I still have an opened up engine with an ls6 head that has a toasted valve. The metal is so gouged at this point that it can't be pulled out of the head without severely scratching up the valve guide. You can feel the grooves scrape past the valve guide seal and then abruptly stop the valve from sliding out when it hits the very top of the guide. Again, mother ****!!
Here's the plan to rectify this problem:
1. Contact "Tim from Livonia" and get him to send me the proper tool. I'm not sending back the LT1 tool as compensation for destroying my valve.
2. Buy a new valve and guide seal.
3. Carefully sand down the gouges in the bad valve stem and remove the it from the head without damaging the valve guide.
4. Since the head is brand spankin new, I will check the ability for the new valve to seal by bluing the seat.
5. If the seal is bad, I will hand lap the valve.
6. Continue on getting through this nightmare.
I'm beginning to think at this point that I should of just left the damn engine alone and thrown it into the car. This better be worth it....Leave a comment:
-
Awesome progress! Thanks for sharing the pics and project progress - really enjoy these type of threads!Leave a comment:
-
Made some progress on the motor today, but not as much as I had hoped. I started off by removing all of the accessories:

I then yanked out the huge crank pulley bolt and pulley:

Stock LS1 upper valvetrain was removed:

The 241 heads are super clean for a 103,000 mile motor:


The pistons were a little carbon caked, but the cylinder walls look fantastic (cross-hatch marks still visible, no stratches, pits, rust, etc.):


I found some uber awesome tools to scrape gaskets at Harbor Freight:

I think it was $7.99 for five different sized ones. When the plastic edge gets dull, just scrape them along a sharp edge of the block's deck and they're like new again.
After a couple hours, I had both decks gasket free, the pistons cleaned, cylinder walls oiled to prevent rusting, and all of the head bolt holes cleaned and chased:

At this point I whipped out my ARP head bolts and began looking at what's in the box and the instructions. To my disbelief, Texas Speed sent me the 12 point head bolts for an LSX block, not a 2001 LS1 block! Not cool. To get things buttoned up quickly, I will be heading to Livernois Motorsports tomorrow to pick up the proper set of head bolts since they're the same price as Texas Speed. To be determined what I'm going to do with the LSX head bolts since they're about double the valve of what I paid [ ]
]
Moving on, I yanked the old stock cam:

And the TSP 228R was put back in the hole:

Months ago, I picked up a brand new LS2 timing gear set due to people saying it's stronger than the stock LS1 junk. Here's the proof:


As you can see, the chain is significantly thicker, which makes me feel all warm and fuzzy inside.
Everyone *****es about getting the timing gear on properly. I'm not sure what the huge deal is considering I nailed it the first time:

A can of POR15 caliper paint is the perfect front main seal installer:

As it stands, the heads still need to be mounted (due to not having the proper head studs) and the timing cover needs to be installed completely. I wasn't able to install the cover because I stupidly forgot to grab an M16x2.00 threaded rod when I had the chance. That of course is needed to install the crank pulley which in turn centers the timing cover as it's pressed on.
Tomorrow's goals:
Grab the proper head studs
Find an M16x2.00 threaded rod
Complete engine mods
Work on something else (like brake lines since I got my hydraulic flare tool in the mail today)Leave a comment:
-
nice i just installed that rear end cover on my car about 2 weeks agoLeave a comment:
- Welcome to the Michigan FBody Association website.
The Michigan FBody Association is a centralized website for FBody enthusiasts to discuss what's going on in the Michigan area. MiFbody.com was created to allow for an easy one-stop place to find out what's going on in Michigan as far as FBody events, to find out what clubs are available in your immediate area, and for an easy place to post classifieds for items you want to sell! Our goal was to create a more close-knit community of FBody enthusiasts in the state of Michigan, and to bring Camaro and Firebird enthusiasts alike together for some amazing FBody events!
We are the host of the premiere all-FBody event in the Great Lakes area - the Annual Michigan FBody Meet & Greet Car Show.
The most important thing to know about the Michigan FBody Association is that we are NOT a club! The Michigan FBody Association is open to everyone, and is a community. Thus, we will have get togethers, casual cruises, events, and such like that, but this is not an exclusive club and it's 100% free to join this site! So what are you waiting for? Register now!
If you have any problems with the registration process or your account login, please contact us!
Powered by vBulletin® Version 5.5.4
Copyright © 2026 MH Sub I, LLC dba vBulletin. All rights reserved.
Copyright © 2026 MH Sub I, LLC dba vBulletin. All rights reserved.
Copyright © 2005-2018 Michigan FBody Association
Some features by delicjous
All times are GMT-5. This page was generated at 03:48 PM.
Leave a comment: