Announcement

Collapse
No announcement yet.

Repainting to keep myself busy

Collapse
X
Collapse
Who has read this thread:
 
  • Filter
  • Time
  • Show
Clear All
new posts

  • Repainting to keep myself busy

    well I have been meaning to repaint my interior pieces again. it needs to be done every other year or so. And each time I get a little better at it and it lasts a little longer. I was gonna wait until spring, and some pieces will have to wait, but I decided to get the majority of it out of the way so when spring arrives I can work on other stuff.

    Heres some pics of the work so far.


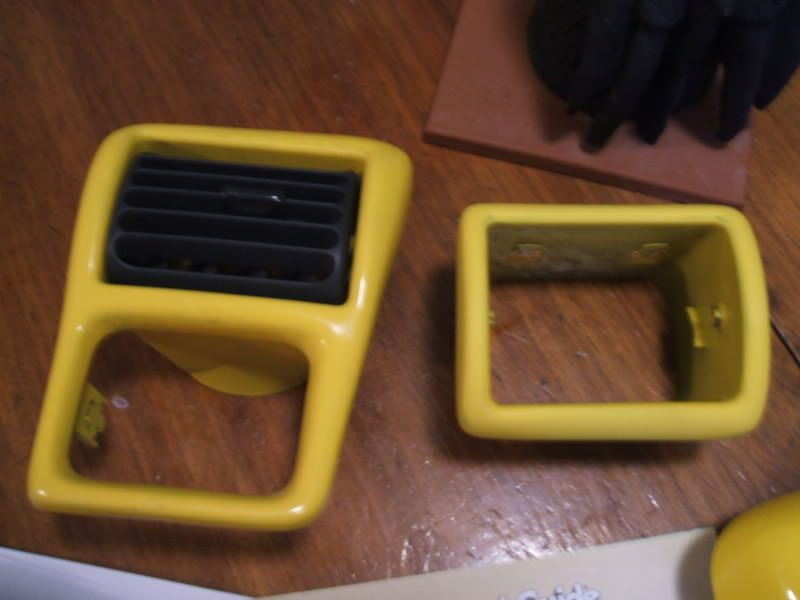
    The piece on the left is the old paint, not very shiny anymore the piece on teh right is sanded and ready for repaint.


    This is the same pic without the flash, for some stupid reason having the flash off makes the auto focus turn off so its a bit fuzzy but the flash makes everything brighter then it is. So I tried to avoid using it.


    This a repainted piece thats curing right now, Even after its dry I need to leave it alone for a few days to let it totally harden. You have no idea how frustrating it is to put a piece back on only to discover you just pressed a finger print into it because it wasnt totally cured. MUCHO SHINEO!


    This is one of the door handles, the flash was on for this pic so you can see how it makes the yellow look way brighter then it actually is.


    So whatta guys think? Ive been thinking of offering this to people that want it done, but Its kinda finicky work and I dont wanna put my name on anything I cant perfect.
    The Chevy Camaro was built with a single purpose in mind which it executes flawlessly...Going very very fast in a straight line until your hair catches on fire.


  • #2
    lookin' good! I was thinking of doing that on my 97 I had with silver but I thought Id get to frustrated sanding out the texture of the parts.

    1999 Pontiac Trans Am - LS1 - M6 - ITSSLOW - 12.998@109.59 - SOLD
    1994 Chevrolet Camaro
    - 3.4L - M5 - ITSSLWR - 16.558@85.38
    2003 Chevrolet Blazer
    2005 Yamaha R6
    2001 Yamaha YZ426F

    Comment


    • #3
      Originally posted by KuruptWS6spd
      lookin' good! I was thinking of doing that on my 97 I had with silver but I thought Id get to frustrated sanding out the texture of the parts.
      Thanks, Yeah its a pain the first time around but all in all its not that bad if you use a heavy grit sandpaper or a small sander , dremel or something like that. I did it by hand using 100 grit then progressivly finer grits.
      The Chevy Camaro was built with a single purpose in mind which it executes flawlessly...Going very very fast in a straight line until your hair catches on fire.


      Comment


      • #4
        Originally posted by YoshiBear
        Thanks, Yeah its a pain the first time around but all in all its not that bad if you use a heavy grit sandpaper or a small sander , dremel or something like that. I did it by hand using 100 grit then progressivly finer grits.
        How long did it take? I was thinking like 6-8 hours of nothing but hand sanding. I'm worried about putting deep scratches with a demel. I want to do like silver6_maro did with his console.

        http://www.mifbody.com/vbulletin/vbp...p?do=big&p=857

        1999 Pontiac Trans Am - LS1 - M6 - ITSSLOW - 12.998@109.59 - SOLD
        1994 Chevrolet Camaro
        - 3.4L - M5 - ITSSLWR - 16.558@85.38
        2003 Chevrolet Blazer
        2005 Yamaha R6
        2001 Yamaha YZ426F

        Comment


        • #5
          it looks badass... maybe ill do it with mine but red?? how long does it take to do everything.. its not like i have anything better to do at school

          sigpic
          No longer your average SS

          Comment


          • #6
            What kind of paint did you use? Did you just sand it smooth first or apply a filler then sand?


            1997 Trans Am

            www.fquick.com/transampimp

            Comment


            • #7
              Well not quite 6-8 hours of sanding but maybe 15-45 minutes per piece depending on size, grit, and level of anal retentiveness.

              The first time I just used krylon fusion paint, and thats the trick really since it bonds to plastic like nothing else and comes in a butt load of colors but I learned to coat it with clear enamel afterwards to improve shine and duribilty.


              When you remove the pieces remember the easiest way to get them out so you dont scratch them when you put them back it.
              For a virgin piece expect about 20 minutes of sanding ( the plastic sheds its texture relativly easy.) If your not sure if its worth the effort get a practice piece first and see how it goes. that way if you dont like it you arnt commited .

              I used to do several pieces at once but I learned to just do one at a time so I can pay more attention to detail. I can finish one piece in about 4 hours

              For a whole project I would say about a week start to finish if you just do it in your spare time.

              For the first coat just do a light misting and then wait for 30 seconds, this will give the paint something tacky to bond to. Now do a light coat and wait 15 minutes then another coat, 15 minutes, another light coat. ( A light coat should be till the paint just starts to look shiny when wet ) repeat until your happy with it. Its better to do five light coats then three thick ones. If somthing gets in the paint DONT TOUCH IT. wait for thirty minutes then try to very lightly sand it out with 400 grit sand paper. if you feel the paper sticking stop sanding. since your gonna put on clear afterwards worry more about it being smooth and even then shiny.

              When your happy with the color, add at least three coats of clear enamel
              to shine it up and protect it. After your done let the piece dry for a hour or so then put the piece somewhere warm and safe to let it cure for about three days then start working on the next piece.

              Be careful when putting the pieces back in, as you know alot of the interior pieces are a little tricky to get out without at least a little force and it will really piss you off to scratch the paint after all the work you put into it. For certain pieces it might even be better to have a friend around to help, for instance its almost impossable to not scratch the cluster bezel with the steering wheel tilt stick unless you can hold it back all the way, and you try doing that while putting the piece back in with only two hands.

              I know it sounds like alot but this is just all the stuff Ive learned through trial and error , and there no reason for you have to learn it the hard way. Its really not that bad a project if you take your time

              and its the mod that gets the most attention from other people.

              Originally posted by transampimp
              What kind of paint did you use? Did you just sand it smooth first or apply a filler then sand?
              Just sand it smooth, its easy

              One more thing, when doing the side vents do lighter coats or lightly sand the edges between coats. these pieces have a large ammount of slope and the paint has a habit of pooling around the edges.
              Last edited by SlipStreamZ28; February 15th, 2007, 04:26 AM. Reason: Automerged Doublepost
              The Chevy Camaro was built with a single purpose in mind which it executes flawlessly...Going very very fast in a straight line until your hair catches on fire.


              Comment


              • #8
                that looks awsome, great job!
                sigpic

                Comment


                • #9
                  i dislike colored panels inside a car. no offense to yuou at all. i just think its kinda tacky


                  Comment


                  • #10
                    Looking good, but not liking the yellow. Did you soak the parts in Mineral Spirits first to get most of the Armor All off?

                    Comment


                    • #11
                      Lookin good, but I don't like the color choice personally. I think a teal would've looked cool to match the exterior. But, this is comin from mr black and red.
                      - Brian Meissen
                      Owner, MiFBody.com
                      Administrator, LTxTech.com


                      1994 Camaro LT1 Transplant - 357ci LT1, cammed, stalled, and driven.
                      2022 Camaro LT1 - "Cherry Bomb 2"
                      Michigan FBody Meet & Greet Car Show 2022
                      June 4th, 2022 - 9am to 3pm!!!
                      The HUB Stadium, Auburn Hills, MI

                      Comment


                      • #12
                        Originally posted by SouLTeRRoR
                        Looking good, but not liking the yellow. Did you soak the parts in Mineral Spirits first to get most of the Armor All off?
                        No just plain sanding takes everything off, I rinse the piece off with water afterwards to make sure I get all the sanding dust off but thats it.

                        Originally posted by meissen
                        Lookin good, but I don't like the color choice personally. I think a teal would've looked cool to match the exterior. But, this is comin from mr black and red.
                        Dark green and teal? I cant see it myself but then again I wasnt sure yellow would look good either but while its a little loud I think it worked out well. It would look alot better if I didnt have a tan interior, but I dont know If I want to track down all the black interior parts...although I have thought of doing the same paint thing to those ( gloss balck not yellow)...but that would be one giant headache.

                        Old picture

                        Last edited by SlipStreamZ28; February 15th, 2007, 03:29 PM. Reason: Automerged Doublepost
                        The Chevy Camaro was built with a single purpose in mind which it executes flawlessly...Going very very fast in a straight line until your hair catches on fire.


                        Comment


                        • #13
                          hmm doesn't look as bad in the picture as I thought. In any case, keep up the customization work! I love seeing stuff like this done.
                          - Brian Meissen
                          Owner, MiFBody.com
                          Administrator, LTxTech.com


                          1994 Camaro LT1 Transplant - 357ci LT1, cammed, stalled, and driven.
                          2022 Camaro LT1 - "Cherry Bomb 2"
                          Michigan FBody Meet & Greet Car Show 2022
                          June 4th, 2022 - 9am to 3pm!!!
                          The HUB Stadium, Auburn Hills, MI

                          Comment


                          • #14
                            If your really all about matching colors up perfectly, go to your local paint store and ask them if they have plastic bonding paint for cars. All you do is spray an adhesion promoter on all the parts, and then spray the paint on the parts after about 45 minutes. It bonds to vinyl , and all plastic parts. I did this on my cavalier, and it never chipped off.
                            sigpic
                            2002 Camaro v6: Cobalt metalic blue
                            "Blue Devil"
                            Alpine cda-9851, 2- RE 6.5" component sets, 1 RE sx15" subwoofer, 1 Alpine MRV 1005d amplifier, Knuconcpets rca's, Memphis audio wiring, and 100 sq ft of FAT MAT extreme... got for 147 db at the windshield before fat mat new numbers soon to come.

                            Comment


                            • #15
                              Not a bad idea cobalt, My buddy was telling me they came out with this two part system that actually etches itself into the plastic, or dyes it basicly. Im waiting for him to look it up for me to find out who makes it.
                              The Chevy Camaro was built with a single purpose in mind which it executes flawlessly...Going very very fast in a straight line until your hair catches on fire.


                              Comment

                              Working...
                              X