 Tweet
Tweet
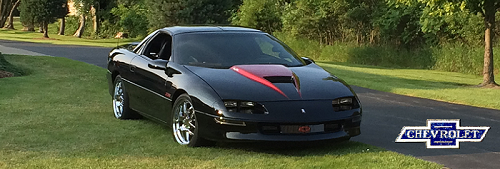
lookin good now finish er up
-

-
Comin' along, just need to get the ac vents to finish 'er.- Brian Meissen
Owner, MiFBody.com
Administrator, LTxTech.com

1994 Camaro LT1 Transplant - 357ci LT1, cammed, stalled, and driven.
2022 Camaro LT1 - "Cherry Bomb 2"Michigan FBody Meet & Greet Car Show 2022
June 4th, 2022 - 9am to 3pm!!!
The HUB Stadium, Auburn Hills, MIComment
-
looking good brian... that looks like more work than id want to deal with for sure!!
then again i like my 93-97 style dash... except for the squeaks.-Joel
1995 Z28 M6 - AI226/234 - autocross ricer
1984 Scottsdale K10 - 305/4bbl/4spd
WTB List:Midwest Chasis DS LoopComment
-
Lookin real good man, I noticed in a different pic you had a double din in their, can you guid me through what i'd have to do cause im interested in puting a double din navi in mine.Comment
-
That's just what it looks like without the HVAC and radio in there, it's really single din.- Brian Meissen
Owner, MiFBody.com
Administrator, LTxTech.com
1994 Camaro LT1 Transplant - 357ci LT1, cammed, stalled, and driven.
2022 Camaro LT1 - "Cherry Bomb 2"Michigan FBody Meet & Greet Car Show 2022
June 4th, 2022 - 9am to 3pm!!!
The HUB Stadium, Auburn Hills, MIComment
-
Yea i kno its a 1.5 din but dont you have a double din in yours?Originally posted by meissen View PostComment
-
Oh, on the old dash? That was a custom bezel that I fiberglassed.- Brian Meissen
Owner, MiFBody.com
Administrator, LTxTech.com
1994 Camaro LT1 Transplant - 357ci LT1, cammed, stalled, and driven.
2022 Camaro LT1 - "Cherry Bomb 2"Michigan FBody Meet & Greet Car Show 2022
June 4th, 2022 - 9am to 3pm!!!
The HUB Stadium, Auburn Hills, MIComment
-
Well, the AC ducts are on their way finally. Was not cheap, but I need them so it's worth it.
Look at how huge this box is! Shipping alone was $42.- Brian Meissen
Owner, MiFBody.com
Administrator, LTxTech.com
1994 Camaro LT1 Transplant - 357ci LT1, cammed, stalled, and driven.
2022 Camaro LT1 - "Cherry Bomb 2"Michigan FBody Meet & Greet Car Show 2022
June 4th, 2022 - 9am to 3pm!!!
The HUB Stadium, Auburn Hills, MIComment
-
god damn B! let me know if you need a hand?2005 Goat - Grass fed.
1996 Camaro RS Vert. - Parted out and sold!Comment
-
Sweet! Can't wait to see some updates on this project.Comment
-
I would not have the patience for that crap....Comment
-
looks like xmas all over againOriginally posted by meissen View Post
13th!!! Annual Michigan FBody Meet & Greet Car Show 2017
June 10th, 2017 - 9am to 3pm!!!
Bakers of Milford, Milford, MI

Classics only cost alot if you add up what you spend!
sigpic
"The winner ain't the one with the fastest car, it's the one who refuses to lose."- Dale Earnhardt -
Comment
-
Well, my dad and I tackled quite a bit today. I didn't take any pictures because pictures would look like *LESS* progress than more. My dad had some reading to do about the gauges so I started by taking apart the carPC and setting it up on my computer desk in the basement. It's funny seeing a 100% fully working computer with no cover or anything on. I have the motherboard sitting on some anti-stiatic material and then the power supply is sitting next to it with the hard drive and a CD-rom drive on top of the power supply. Then I have the carPC's old bezel with screen sitting on the desk with a box of cards propping it up high enough to see the screen.
Anyway, while I was doing this, my dad started on the gauge harness. It was actually -decently- easy to do. We used a wiring schematic from Ryan R's CarDomain site. It was a life saver for the wiring. The wires for 93-96 are pretty much the same for 97+ gauge clusters. Basically, all we had to do is take a pair of needle nose pliers and grip the wire from the back of the 93-96 harness and yank it out. It clips into place, so you have to grab the pins at just the right spot to push in the clips while you yank it out. Once the pin is out, ya just use the wiring schematic to put it into the right spot in the 97+ harness. The worst part of this was that not all of the pins would clip into place.
Once we went through all 24 wires, we plugged the gauge cluster in for the first time. Overall, VERY COOL! The gauge cluster works for the most part. The "Check Gauges" light comes on and we can't get it to turn off. Everything *looks* like it's OK, and we don't know what actually triggers the "Check Gauges" light, so we're not sure what needs to be trouble shooted. The speedo, tach, battery meter, water temp, oil pressure, and fuel gauge all work perfectly. I'm sure the speedo will still need to be recalibrated due to the 17" rims, but it's more accurate than the old gauge cluster is because of taking the needle off on the old gauge and putting back on incorrectly.
We noticed that not all of the bulbs were working when you turn the headlights on, so we took it inside and tested all the bulbs. Of the 9 or so bulbs, about 6 of them were burned out. Well, this is the really interesting part, 93-96 gauge bulbs are IDENTICAL to the 97+ bulbs. Thus, I was able to take my old red LED bulbs that I had from the 94 gauge and actually put them right into the 97+ cluster. I was a few LEDs short, but had extras in the basement. I ran down and grabbed those, and the 194 LEDs that I bought are direct plug-in for the 97+ gauge. For 93-96 bulbs, I had to actually break the glass bulb out of the holder, put the LED in place, and then solder the LED's connectors to the holder. 97+ you can just slide it in just like any other 194 lightbulb.
We went back outside and tested it, sure enough the gauges lit right up and I was able to see all red!!! Reminds me of the Pontiac gauges, it's perfect. Looks stock during the day, bright red at night.
Well, we went to do a test fit when we found something really wrong. The wiring harness is not long enough to reach where the 97+ gauge sits. From 93-96, the gauge harness actually plugs into the side. In 97+ gauges, the harness plugs into the back directly in the top center of the cluster. Seemingly, the 97+ harness apparently is 6 inches longer for the gauges. So, the next project will be lengthening the gauge wires 6 inches.
Just to make sure we couldn't rearrange the harness a little, we actually removed the 97+ dash from the car again. My dad and I have come to the conclussion that the ONLY good way to reinstall the dash will be to get a steering wheel puller and pull the steering wheel completely out of the car. There is simply not enough room for it.
In any case, once the dash was out, it was easier to put the gauge "in place" and go for a test drive. So, we put the car back together (the ttops back in, rolled the windows up, closed the hood) and I took the car for a spin around the block and up to the corner intersection, then turned around and drove her back home.
In any case, it doesn't seem like much progress but there actually was plenty of progress to be had. If y'all are lucky, I'll run upstairs, plug the gauge cluster in, and snap some pics of the cool red-ness.
OH and another thing. Man, GM was smart when they designed the 97+ gauge cluster. Everything simply snaps in place. In 93-96, everything screws together with stupid torx bolts. On the 97+ cluster, I can take everything apart without any tools by simply pushing the tabs back and unsnapping it. I can get to the needles, I can get to the back bulbs, everything. For the 93-96 when I went to steal the LED bulbs out of it I had to go get a torx screw driver just to take the cover off to get to the bulbs. Major pain in the ass.
But yeh, so that's my update for today. I've decided to stick with the 40gb hard drive and not worry about upgrading it to 80gb. I still have 23gb free, so it's not like I'm crunched for space. Before I reinstall the carPC, though, I am definitely going to mirror the 40gb hard drive onto one of the 80gbs as backup just in case.Last edited by meissen; February 23rd, 2008, 10:27 PM.- Brian Meissen
Owner, MiFBody.com
Administrator, LTxTech.com
1994 Camaro LT1 Transplant - 357ci LT1, cammed, stalled, and driven.
2022 Camaro LT1 - "Cherry Bomb 2"Michigan FBody Meet & Greet Car Show 2022
June 4th, 2022 - 9am to 3pm!!!
The HUB Stadium, Auburn Hills, MIComment
-
nice story lol! Umm yea tried to skim and that didnt work ended up reading it all. Sounds good but you have to post some pics!!2011 Ford Raptor SuperCrew
SVT Beadlock Wheels
Roush Intake, Corsa Exhaust
20" and 40" Light Bars
2000 Camaro Z28
Stripped Down Drag Car Build
Project 1999 Camaro Z28
2009 G8 GT Stryker Blue Metallic-SHEGONE
Crate LS3, LS9 Cam, LSA Supercharger, Metco Solid Isolator
RotoFab Intake, HSRK, Camaro Trans Pan
ZL1 HX, ZL1 Fuel Pump, CTS-V Lid, LSA Injectors
Pat G - 93 Octane Tune
Kooks 1-7/8" Longtubes, High Flow Cats, X Pipe, Solo AxleBacks
CTS-V Calipers, Brembo Pads
H&R Lowering Springs, Whiteline Bushings, FE3 Struts/Shocks, Camaro 20" Wheels
HIDs, LED Conversion, Atari Gauges, Tint, Roof Carbon Fiber Wrapped, Innovative Wideband
2.55 Lingenfelter Pulley and Injectors waiting to go on!
sigpicComment
-
That's sounds like a hell of a lot of work. Damn, I'm glad I like my interior...lol
Now u just need to drop an LSx in there.98 Trans Am WS.6
Cam
Heads
Intake
Full exhaust
More mods to comeComment


Comment