

 Tweet
Tweet
Disclaimer: This article is being re-hosted on Michigan FBody Association. The site does not claim ownership of the articles in this section if this disclaimer is included. If you are the original owner of this article and wish for it to be removed, simply use the "Contact Us" link at the very bottom right corner of the web page and we will promptly remove the article.


Disclaimer: This article is being re-hosted on Michigan FBody Association. The site does not claim ownership of the articles in this section if this disclaimer is included. If you are the original owner of this article and wish for it to be removed, simply use the "Contact Us" link at the very bottom right corner of the web page and we will promptly remove the article.
REAR DIFFERENTIAL OIL CHANGE
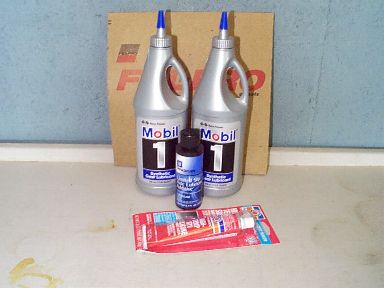
For this project, you'll need the following:
- 2 quarts of Gear Lubricant. I used SAE 75W-90 Mobil 1 Synthetic Gear Lube. Cost - $14.82
- 10 Bolt rear differential cover gasket. Felpro part number RDS 55072. This won't be required if you choose to use the "gasket in a tube" type stuff or just the RTV.
Gasket cost - $3.40 - 1 bottle of GM rear differential additive. GM Part number 1052358. Some people who use synthetic oil, don't use this and say you really don't need it. I have used it a couple times with synthetics "just to be sure" and have had no problems or noises. This could be considered optional and you can always add it later if you find you "need" it. Cost - $6.79
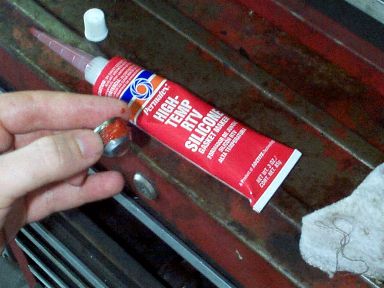
- High Temperature RTV Silicone - This is optional but I recommend it for at least sealing the fill plug and it's not a bad idea either to use this on the gaskets. I've installed rear differential gaskets before without using this and have had no problems. In fact, I wasn't planning on buying this but while at the auto parts store a guy recommended it so I figured "what the heck" and bought a tube. Cost - $4.23
- Tools & Supplies - 1/2" wrench, 3/8" socket wrench, razor blade, carb/brake cleaner, drain container for oil, rags.
- Total cost for this project - $29.24... assuming you buy the optional stuff above and use the good synthetic gear oil

This is a picture of the rear differential in my 96SS. Yours will most likely look a little different because this is SLP upgraded Torsen rear that was offered on some of the SS Camaros. The concept is the same though. Notice the oil "seepage?" This isn't from the gasket area but from the axle area. I don't particularly "like" this, but it happens on almost every F-Body I've seen so I actually consider it "normal."
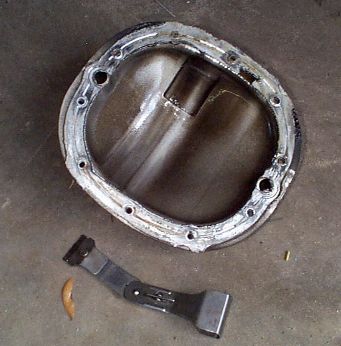
1. First thing you have to do is remove the rear differential cover. In GM's infinite wisdom, they FORGOT to engineer in a drain plug... DOH! Because of this, you pretty much have to remove the rear cover to change the oil. This is the reason for the new gasket if you chose the gasket method over the RTV method. It is easiest to use a 1/2" socket to remove the bolts you can get to, but some of them near the sway bar will require the use of a 1/2" wrench. Before beginning, get your oil drain pan aligned under the differential as it will start to leak out as you loosen the bolts. Note: You may need to use a pry bar to slightly pry the rear sway bar out of the way. Mine wasn't in the way by much but I did have to pry it about 1/4" away from the differential in order to remove two of the bolts. I found this to be MUCH easier than removing the entire sway bar! There will also be two wire brackets on two of the top bolts. Just move these out of the way when you take out these bolts. Once all the bolts are removed, you'll probably have to take your flat headed screwdriver and slightly pry the cover away... they usually stick a little. Doing this will complete the draining.
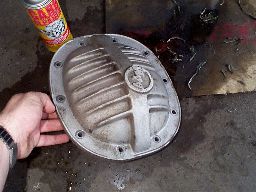
2. Now you need to remove the old gasket or liquid gasket RTV from the differential cover. Use a sharp razor blade to do this. Also, this cover may, again, look a bit different than yours. If I remember correctly, the standard F-Body cover has a hunk of magnet in it to catch any metal filings. Once you get the mating surface cleaned up with the razor blade, you can clean it up a bit with either brake or carb cleaner. These can be bought at an autoparts store for around $1.50 a can.
You can even use the carb/brake cleaner to clean the outside of the cover. This stuff works great to easily blast away even caked on gunk and grime!
3. Now scrape away and clean the surface of the differential mating surface like you did the cover above. This picture shows the sealer still on the surface.
Nice Torsen, eh?
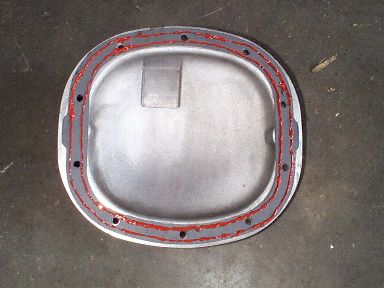
4. You're now ready to put the cover back on. Here is where you can learn from my mistake! Remember above where I said the use of this red RTV sealant is completely optional? Well, I hadn't used it before and did so this time just as a precautionary measure... even though I've never had any leaks on my 94Z. Anyway, the way I did it was to place two bands around the edge of the gasket as shown in the picture to the right. I then flipped the gasket (placed gasket with RTV on the cover) and did the same thing. Well, I neglected to remember that when I took the cover off, it bumped into the sway bar and a couple other things under there while I was pulling it down... basically it was a tight fit. Soooo, when I went to re-install the cover (as shown above) I smeared this RTV on my sway bar and some other stuff while getting it in place. It would have been better (if you choose to use the RTV) to apply the RTV to one side of the gasket, stick the gasket on the differential itself, apply the RTV again to the other side of the gasket (while it's in place on the differential) THEN put the cover in place. So, do yours like that NOTE: You'll notice above I covered up two holes in the differential cover (see earlier picture). This is a Torsen rear end but I do believe even the non Torsen rear end 4th gens also have these holes in the rear end and cover. This picture shows them covered up but at the moment I am not using a gasket and only RTV and did not cover these holes. There is some controversy on if you should or should not cover these holes. Take a look here for some info... http://www.socalss.com/special/holes.htm and you can decide for yourself what you want to do. I chose not to cover up the holes since this picture was taken.
5. Take your ten bolts and snug them up finger tight. Don't forget to re-install the two wire brackets on the bolts on the upper half of the differential! If you don't have a good feel for tightening things, you should tighten these to 22 ft-lbs in a crosswise pattern. I didn't use a torque wrench... I just tightened them snug in a crosswise pattern.
Now that everything is buttoned back up, it's time to refill the rear differential with oil. Once again, the GM engineers made something that should be easy a bit difficult as the fill port is not in an easily accessible area... oh well
6. Remove the fill plug. I don't have a picture of the plug, but it was obviously located where the black tube in this picture is sticking into the differential. To remove this plug, all you need is a 3/8" ratchet. You may find it a bit easier to use an extension but it isn't required. Note: No special attachment is required on your ratchet, the 3/8" ratchet itself fits into this plug to allow you to remove it.
7. Now that you have the plug out, grab 1 quart of your gear lube. Even with the spout on most gear lube bottles, it is still a pain to "pour" it into this hole. I find it much easier to attach some kind of tube or hose like pictured above. Now, "squeeze" this quart of oil into the rear differential. NOTE: Ensure your car is mostly level while filing. Since you are filling to "overflow" (see below) the angle of the car will determine exactly how much fluid you are able to get in there.
8. Once you've emptied 1 bottle of gear lube, take your GM Limited Slip Differential Additive and squeeze it in there too.
9. Position your drain pan under the rear differential in preparation for spillage Take your second quart of gear lube and begin squeezing it in. Once you get a little more than half of it in, slow down a bit. The idea here is to fill it up until it starts coming out the hole... this means it's full I got in all but 450ml of the 2nd quart. Not sure if yours will be exactly this amount or not but I do remember it taking about 1.5 to 1.75 quarts the last time I changed this fluid in an F-Body with the regular rear differential. Also, if you aren't able to completely level your car while filing, if you use about the same amount as I did, you'll be just fine... I did mine on a lift with everything completely level so my volumes should be accurate (+/- a little possibly due to the Torsen rear).
10. Now that you have oil slowly running out the fill hole, it's time to re-install the plug. I used a dab of the RTV sealant on the plug's threads. This probably isn't actually required, but I highly recommend it... just more added protection against a leak developing.
If you wish to torque this plug, the torque value is 26 ft-lbs. Again, I didn't torque it... just snugged it up
That's it! Start it up, drive it around for a few minutes, then check for leaks!
Disclaimer: This article is being re-hosted on Michigan FBody Association. The site does not claim ownership of the articles in this section if this disclaimer is included. If you are the original owner of this article and wish for it to be removed, simply use the "Contact Us" link at the very bottom right corner of the web page and we will promptly remove the article.
